Uncategorized

Brunch with a Splash of Denim and Lemons

Diva di Cucina started off nearly 12 years ago just as a way for me to share recipes with my family and friends. It has grown and evolved in ways I never could have ever imagined. While the intention of this blog is primarily to share recipes with you, it is also a place where I feel a sense of community and connection and I love being able to share my successes with you too, because if it wasn’t for having followers and supporters, I wouldn’t be doing this all these years later. With that said, I have a fun little story to share with all of you. 

Photo by Sara Pinnell, Creative Director, Ardent for Life Magazine

As many of you know, I branched out in October 2020 I launched my very own kitchen boutique on Etsy. That Etsy shop took off and I started also doing pop up markets in my community. Through these markets I have connected with so many amazing small business owners many of whom I have become friends with.

One small business I have connected with is Cindy of My Thrifty Sister who makes the cutest home décor. Cindy knew I had a cooking blog so in April she came to me and asked if I wanted to collaborate with her and some other small businesses and participate in a lifestyle photoshoot for Ardent for Life Magazine.

Now you if you know me, you know I am always going to jump at any opportunities that come my way so of course I said yes. A very enthusiastic, YES! The shoot was for a summer brunch and I was asked to make a main dish and a beverage.

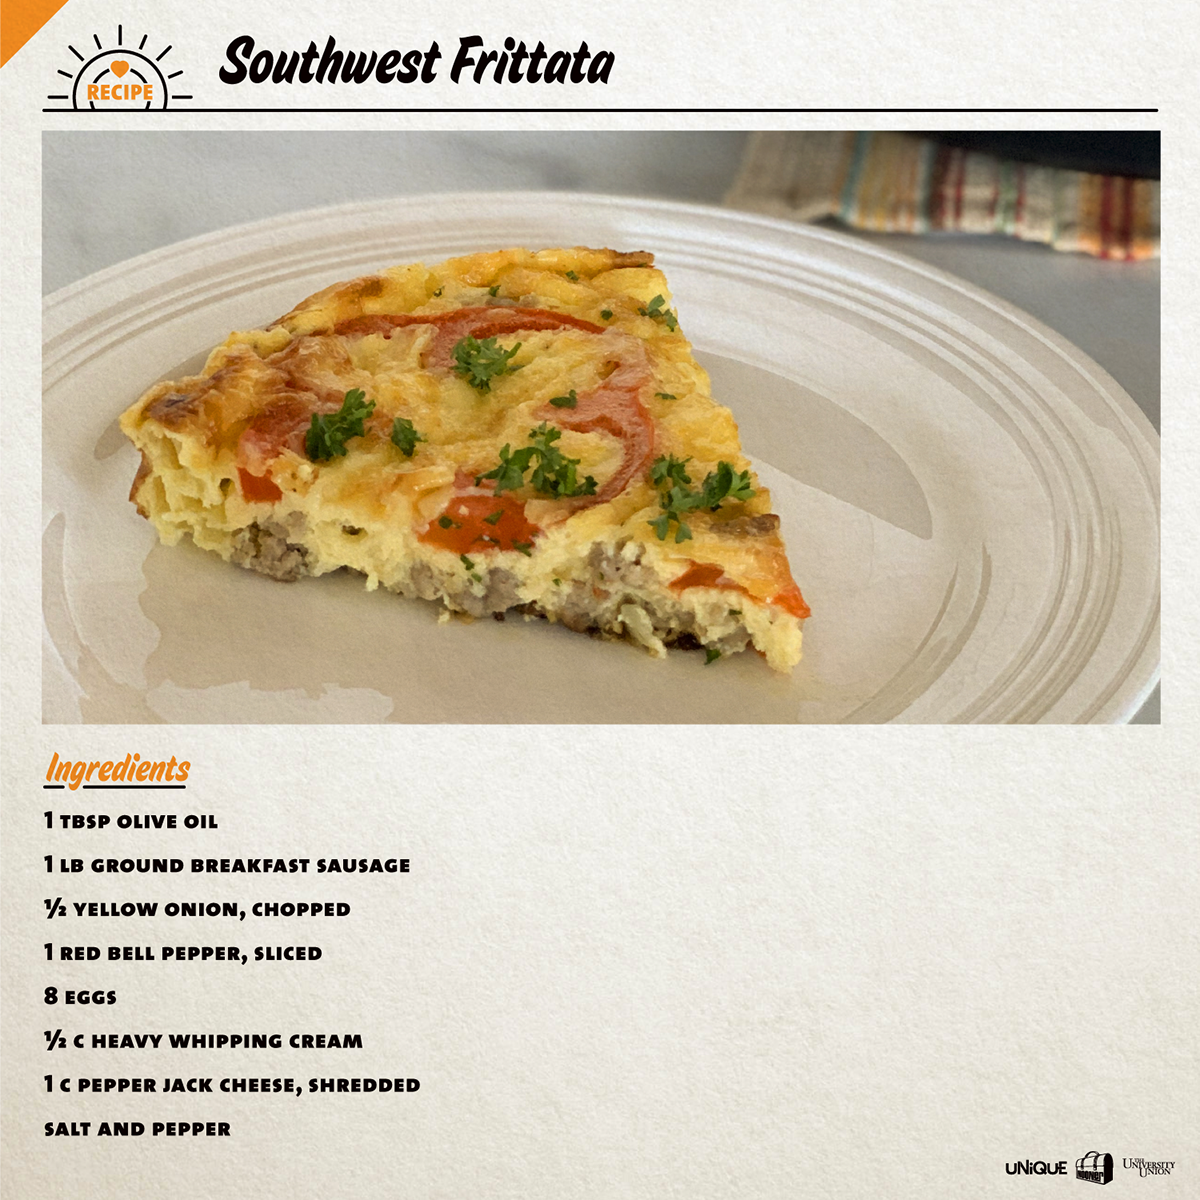
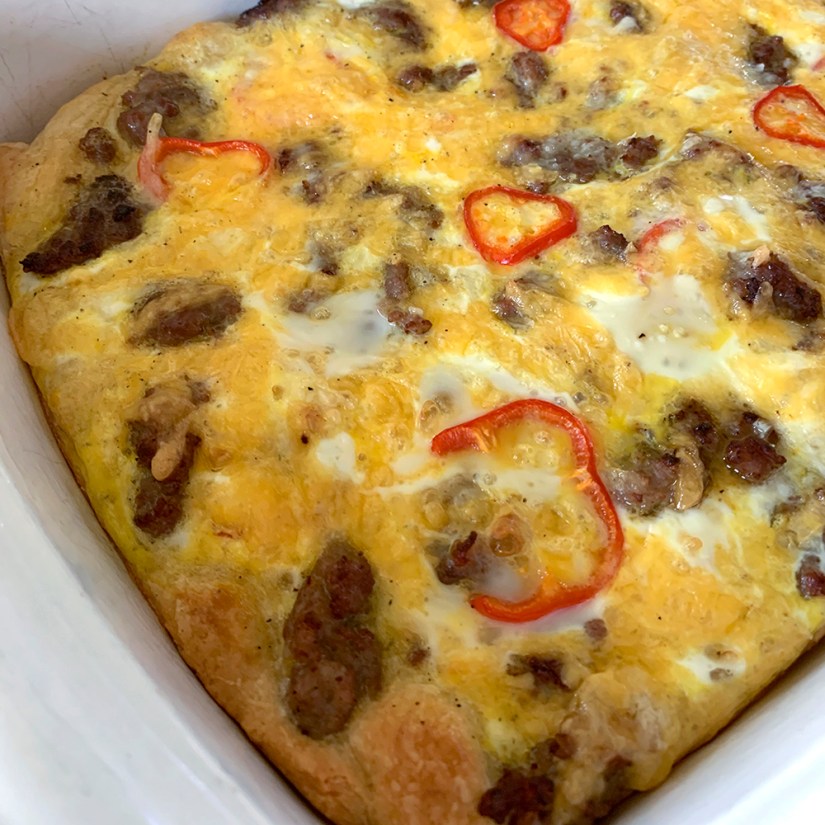
The theme for the brunch would be denim and lemons, so I decided to make my Southwest Frittata because I think cast iron skillets and denim go hand in hand. Something about the two give off a whole country living vibe. 

Photo by Sara Pinnell, Creative Director, Ardent for Life Magazine

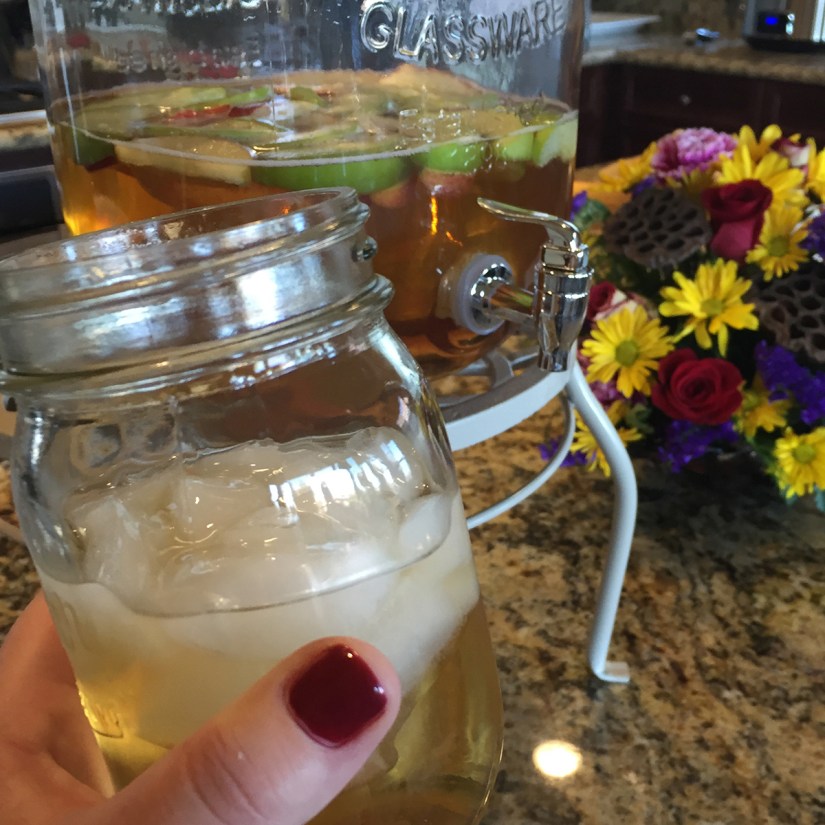
Now, in my opinion, brunch without booze is just a sad breakfast so for the drink I wanted to do a lemon-based brunch cocktail that would be light and refreshing and my Knock You Off Your Saddle Lemonade checked all the boxes. The flavors of ginger and lemon with the bubbles from the ginger ale are just perfect for sipping on a warm summer day.

Photo by Sara Pinnell, Creative Director, Ardent for Life Magazine

The morning of the shoot was so fun. I showed up with my frittata and cocktail ready to go. My Thrifty Sister had staged the entire thing in her backyard. There was a gorgeously set table made of crates and an old door set upon a big area rug and the cutest assortment of pillows for us to get cozy with. Then there was also the serving table which was covered with a tiered denim tablecloth she had made. We got to watch as the owner of Tilted Tulip set up all the beautiful floral arrangements throughout the yard making sure each flower was perfectly placed.

Photo by Sara Pinnell, Creative Director, Ardent for Life Magazine

Every detail was perfection! From the wood cutout lemons, the denim pockets for the silverware, and all the blue dishes and glasses.

Photo by Sara Pinnell, Creative Director, Ardent for Life Magazine

The magazine photographer was amazing to work with! She provided great direction and made everyone feel at ease. I loved how open she was to everyone’s ideas. 

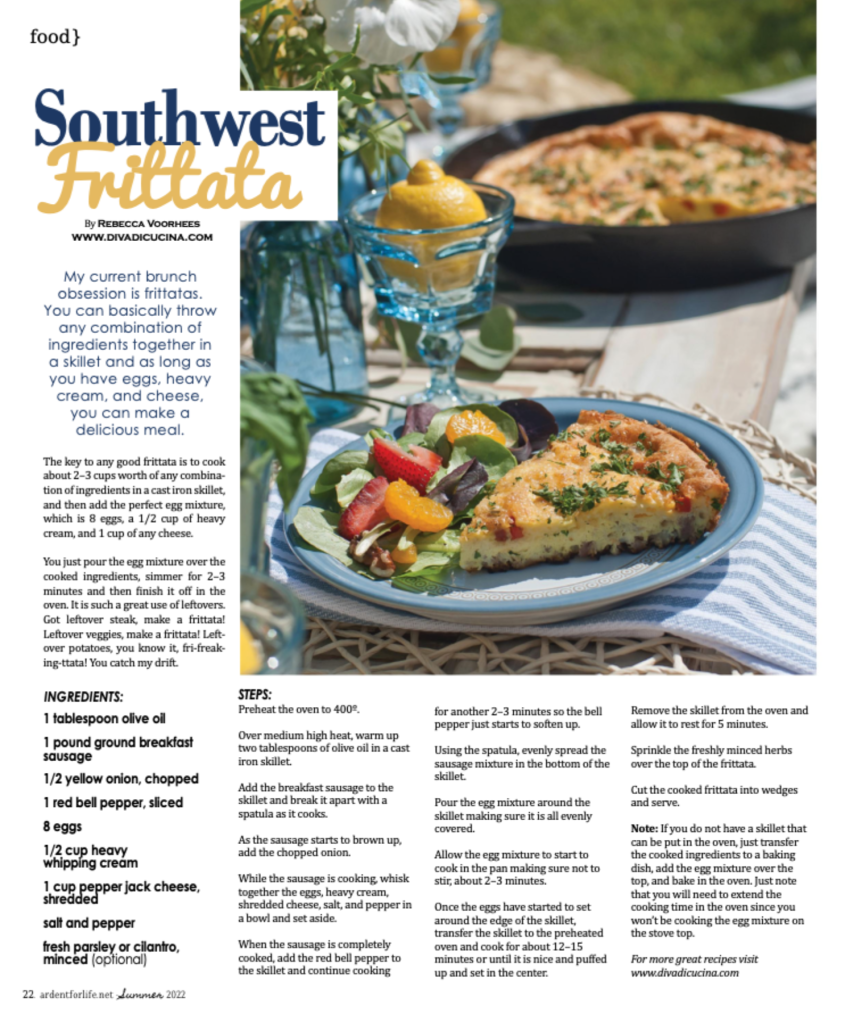
I initially went into this photoshoot thinking my dishes would just be photographed, so I was thrilled when the magazine told me they would like to include the recipes as well! Several weeks later I got the proofs from their designer and was floored to see that each recipe got a beautiful full page spread! And this story gets even better! A few days before going to print, I was notified by the magazine editor that my dish was selected to be the cover for the Summer 2022 issue of the magazine! 

If you were to tell me 12 years ago that one day, I would have some of my recipes published AND on the cover of a magazine I would have had you locked up because it just seems utterly insane. This was such an amazing experience, and I am so grateful to have been given this opportunity. I am excited to share with you the featured article, Brunch with a Splash of Denim and Lemons. Feel free to click through the article and recipes above.

You can read the full issue here.

Cooking Demos

Diva is Going Live with Another FREE Cooking Demo!

Hey everyone! You may recall that year I partnered up with UNIQUE Programs and did a couple of live cooking demos. Apparently, they went well because they have asked me back to do another! Wahoo!

So with that said, I am excited to announce that coming up on Wednesday, April 21 at 12:00 pm PST I will be going live once again and this time making brunch! I freaking love brunch and can honestly say it is my favorite meal of the day. Maybe it’s because brunch typically includes mimosas. 😉

This will be a completely FREE virtual event where you can tune in on Zoom and learn how to make my Homemade Poptarts and a Southwest Frittata. That’s right, essentially a completely free one-hour cooking class! 

You can tune in via Zoom using this link (https://csus.zoom.us/s/81635928074) or you can enter the Zoom ID from the graphic below. There is no need to sign up or create an account.

There will be no cooking show foolery here, I will be cooking in real time so you can make both these dishes right along with me! I have provided a list of the ingredients below for both dishes if you want to make sure you have everything on hand. If you are at work or unable to cook live with me that is absolutely okay too! Just tune in, say hi, be entertained, and get some tips for when you want to make these awesome dishes another time!

Growing up, eating pop tarts was part of my morning school routine. They were quick and easy to throw in the toaster and chow down on as you were headed out the door. I thought they were the best! Now as a grownup, my standards have changed. Awhile back I decided to try and perfect my very own pap tart recipe and let me just tell you, they are so much better than those boxed ones.

My current brunch obsession is frittatas. You can basically throw any combination of ingredients together in a skillet and as long as you have eggs, heavy cream, and cheese, you can make a delicious meal. My southwest frittata isn’t even on the blog yet so you are going to be the first to get the recipe. (Don’t worry, it will be posted soon!) 

GIVEAWAY ALERT! Also, UNIQUE Programs will be doing an awesome giveaway on Tuesday so make sure you go follow them and me on Instagram if you don’t already. You may just be able to get your hands on some kitchen products from my new online boutique! 😉

I really love connecting with my followers in a more personal way so I truly hope you will tune in on Wednesday to join me. At the very least pop in and say hello! I look forward to chatting with you all and answering any questions you may have as we spend an hour together! See you then!

Brunch

Recipe—French Toast Casserole

French Toast Casserole

Christmas morning can sometimes be a bit chaotic with hustle and bustle of gift giving, cleaning up of all the shreds of paper and ribbon, and then sometimes the mad dash to clean the house before relatives arrive for round two of Christmas. At least that’s how it is in our home. However, on Christmas morning I always want to sit down and have a nice breakfast with my crew, I just don’t always have the time to make a big Christmas worthy breakfast. However, I do have the time to throw a casserole in the oven. So here you have French Toast Casserole to save the morning!

Several years back I posted a recipe for Blueberry French Toast Casserole. Not to toot my own horn, but toot toot! It’s amazing if you haven’t given it a try. What I love about french toast casserole is you can prep the dish the day before, throw it in the oven in the morning, and boom! Just like that you have a hot and delicious breakfast with almost no work. This recipe has all that delicious cinnamon goodness baked into a sweet bread pudding with a crispy streusel topping. It is so tasty!

So if you are looking for a quick and easy breakfast that you can make in advance, then this is the recipe for you.

French Toast Casserole

INGREDIENTS
12 slices sourdough bread (or a sourdough loaf), cut into 1” cubes
10 eggs
2 c milk
1/2 c heavy cream
2 tbsp vanilla extract
1/2 c sugar
1 c brown sugar, divided
1/2 c flour
1 tsp cinnamon
1/2 c cold butter, cut into small pieces

STEPS

  • Cut the loaf of sourdough into cubes and distribute them in a greased 9” x 13” pan.
  • In a large bowl whisk together the eggs, milk, cream, and vanilla.
  • Whisk in a 1/2 cup of the brown sugar and all the granulated sugar to the egg mixture
  • Pour the egg mixture over the bread.
  • Using your fingers or the back of a spatula gently press all of the bread pieces down into the egg mixture.
  • Cover the baking dish with foil and place in the fridge 8 hours or overnight.
  • For the streusel topping, in a medium bowl, mix together the other 1/2 cup of brown sugar, flour, cinnamon.
  • Add the cut-up butter to the topping mix and using a large fork or pastry cutter mix it all together until it is a nice crumbly consistency.
  • Store the streusel in a Ziploc bag in the fridge until ready to bake.
  • When ready to bake, remove the casserole dish and streusel from the fridge and allow it to sit on the counter for about 30 minutes.
  • Preheat oven to 350º.
  • Sprinkle the streusel topping over the french toast.
  • Cover the dish back up with foil and bake for 45 minutes.
  • Remove the foil and continue baking until the top is a nice golden brown and the egg mixture is set, about an additional 15–20.
  • Remove from oven and allow it to cool for 5 minutes.
  • Cut and serve with a pat of butter and some warm syrup.
Brunch

Recipe—Chocolate Chip Scones

Chocolate Chip Scone

I can’t remember if I have brought it up on this blog before or not, but one of my first jobs in high school was working at a little mom and pop owned coffee shop in my small town. I loved it! So much so, that I frequently ponder what it would be like to throw my career out the window and open my own little coffee shop. There was just something so touching about being part of someone’s morning. Pretty much everyone was a regular and I knew what they did for work every day, I knew their families, and almost 20 years later I still remember several of their orders. I kind of have a crazy memory like that. LOL

While I started out as a barista for the first couple of months, I actually got the opportunity to start baking on the weekends too. I loved it! I would go in at 5 am on Saturday and Sunday mornings, crank up the radio, and had the whole kitchen to myself. I would bake dozens of assorted muffins, croissants, cinnamon rolls, cookies, and some of my favorite items were the scones. Chocolate chip scones to be exact. You have not lived if you have not had a scone fresh out of the oven. If they are done right, they are crumbly on the outside and just a little doughy in the middle, have just the right amount of density, and are a little sweet, but not too sweet (unless they are savory scones).

Scones are the perfect thing to make for special occasions, or even just on a lazy Sunday around the house. Making these for my family the other weekend brought back so many memories of that coffee shop. It is amazing how certain food can do that.

So, what food item do you associate with certain memories or a time in your life? Share in the comments below. I would love to hear from you. 😀

INGREDIENTS
2 1/4 c flour
1 1/2 tbsp baking powder
1/4 c brown sugar
1/4 tsp salt
1 stick cold butter, cut into 1/4-inch cubes
1 c mini chocolate chips
3/4 c heavy cream
1 egg
1 tsp vanilla

STEPS

  • Preheat oven to 400º.
  • Line a baking sheet with parchment paper and set aside.
  • In a medium bowl stir together the flour, baking powder, sugar, and salt.
  • Add the cubed butter to the mix and using a fork or pastry cutter, cut the butter into the dry ingredients. (The mixture should become very crumbly with no large chunks of butter remaining.)
  • Stir in the chocolate chips.
  • In a small separate bowl, whisk together the heavy cream, egg, and vanilla.
  • Add the wet ingredient to the dry ingredients and stir to combine.
  • Transfer the dough mix to a cutting board and using your hands form the dough into an 8-inch circle.
  • Using a knife or pizza cutter, cut the dough into 8 evenly sized triangles.
  • Brush the tops of the scones with heavy cream and then transfer to the parchment paper lined baking sheet.
  • Bake for 14–17 minutes or until the edges are a nice golden brown.
Brunch

Recipe—Strawberry Pop Tarts

Recipe—Strawberry Pop Tarts

Growing up, eating pop tarts was part of my morning school routine. They were quick and easy to throw in the toaster and chow down on as you were headed out the door. I thought they were the best! Now as a parent, I buy them for my son. Don’t go get all judgey on me here. He doesn’t eat them every day. I am a working parent with limited time in the morning and it is a child’s rite of passage to eat pop tarts. LOL

Recipe—Strawberry Pop Tarts

A couple of weeks ago I asked for a bite of his and I just have to say, they were not all that I had remembered them to be. Clearly my standards of quality food have changed over time. I started to think of what goes into a pop tart and realized I could easily make a copy cat version of my own. They were so simple and relatively quick to make. I literally just used refrigerated pie crust from the store and some strawberry jam and made a simple icing using powdered sugar mixed with a little water and vanilla. So basic and so easy!

It was fun to spend a lazy morning recreating something from my childhood and let me just tell you, they were so good, like way better than I would have ever imagined! Let’s be real, this is actually like eating pie for breakfast. The crust was so flaky and lite and the jam and frosting were the exact amount of sweet you would want for breakfast. Plus, they were just as good the next day and they looked super cute in my cake stand on the counter.

Next up, homemade toaster strudels!

Recipe—Strawberry Pop Tarts

Notes:

  • I was able to make a total of 8 finished pop tarts using the two pie crusts. I was able to cut out a total of 16 3” x 4” rectangles, 8 from each crust.
  • You can obviously use any flavor of jam you would like. I was a strawberry pop tart girl, so that’s what I went with. You do you.
  • The frosting will set on these within a couple of minutes of frosting so be sure and add sprinkles right after applying frosting to each..
  • Do not reheat your pop tarts by putting them in the toaster! They are delicious at room temperature, even the next day.

INGREDIENTS
1 package (2 sheets) of refrigerated piecrust at room temperature (I used Pillsbury)
flour (for dusting)
1 c seedless strawberry jam
1 c powdered sugar
1/2 tsp vanilla extract
water
sprinkles

STEPS

  • Cut out a rectangle template using cardstock or paper that is 3” x 4”. (You will use this as a template to cut out rectangles from the pie crust that are all the same shape and size.)
  • Preheat oven to 400º.
  • Line a baking sheet with parchment paper and set aside.
  • Dust a little flour over a large cutting board or work surface to help keep the pie crust from sticking when you are rolling it out.
  • Lay out one of your pie crusts on the floured surface and roll it out until it is 1/8” thick.
  • Place the cardstock rectangle template on the rolled-out pie crust and, using a knife, cut around the edges of it. Repeat this until you have gotten as many 3” x 4” rectangles as you can, transferring each one to the baking sheet as you finish them.
  • Take the scraps and roll them into a ball and roll that out to get more if you can. (I was able to get six initially and then rolled out the scraps to get two more, for a total of  eight.)
  • Place about 2 tablespoons of jam in the center of each rectangle and spread it out slightly leaving about 1/3” of clear space around all 4 edges. (If your jam is thick and hard to spread, warm it in the microwave for about 15 seconds and stir it.)
  • Roll out and cut the second pie crust in the same manner as you did the first placing the second batch of rectangles on top of the jam.
  • Use your fingers to gently press around the edges to help create a seal between the two layers of crust.
  • Next, use a fork to crimp around the outside edges and poke 3 sets of holes down the center. This will keep the jam from leaking out the edges.
  • Bake for 12–15 minutes until they are all a nice golden brown.
  • Allow to cool on the cookie sheet for 3–5 minutes and then transfer them to a cooling rack to cool for another 10–15 minutes.
  • While the pop tarts are cooling, whisk together the powdered sugar, 2 tablespoons of water, and the vanilla. Add additional water a little bit at a time as needed until your frosting is slightly runny and whisk until there are no longer any clumps.
  • Spoon the frosting onto each pop tart and add sprinkles immediately. The frosting will set really quickly once put on the pop tart.
  • Serve and enjoy!
Family Theme Nights

Family Theme Night—Saturday Morning

Good morning! Or good afternoon? Good evening? Whatever it is. I don’t know. The days blend together and the time drags on while also flying by. I decided to mail it in last week and fed my family breakfast for dinner. It was freaking fantastic. So, for this fourth installment of Family Theme Night I give you Saturday Morning!

I mentioned previously, these family theme nights do not need to stress you out or break the bank. It is all about getting out of the routine and doing something different! That is what makes it fun. It can be as simple as buying your family that sugar packed box of cereal you always say no to and letting them eat it for dinner none the less.

Growing up, I ALWAYS wanted that variety pack of all the little boxes of cereal. You know what I’m talking about? I don’t know what it is about miniature boxes of cereal but I wanted them! Even though I really only wanted about half of the types in the pack, so there were always a couple leftover that sat in the pantry forever. So guess what? I splurged, and bought those stupid little boxes of assorted cereal last week. Like Tony the Tiger says, “They’re grrreat!”

Family Theme Night—Saturday Morning

For this one we literally put on pajamas at 5 pm (Okay, we put on clean pajamas. You know, gotta change from those daytime jammies to nighttime jammies.) had breakfast in the living room, and watched CLASSIC 80s and 90s Saturday morning cartoons. I had the biggest freaking smile watching Gummi Bears while shoveling cereal in my mouth and drinking mimosas. In addition to cereal, I also made my breakfast pizza which is basically a croissant crust with eggs, sausage, and cheese and added some red peppers and then baked up some cherry cream cheese danishes for dessert.

Family Theme Night—Saturday Morning

So please do tell in the comments below, what is your favorite breakfast item? And what was your favorite thing to watch on lazy Saturday mornings growing up?

If you do participate in any of the theme nights please be sure to post your pics and tag me on Instagram @DivaDiCucina and use the hashtag #DivasThemeNight. I would love to see how you and your family incorporate any of the themes and put your own twist on them. Please also share any other ideas you have or links to other country or western themed recipes you enjoy in the comments below.

I hope you have as much fun with this as my family and I!

Breakfast Pizza

Cherry Cream Cheese Danishes

FOOD IDEAS
Click on the name of the food item below to be directed to a page with that recipe. Please note some of these link to recipes shared by other awesome food bloggers which will redirect you to their sites.

Breads/Muffins
Moist Banana Nut Bread
Pistachio Bread
Spiced Carrot Bread
Dutch Apple Pie Muffins
Lemon Crumble Breakfast Cake

Pastries
Fruit Pizza
Blueberry Cream Cheese Danishes
Cherry Cream Cheese Danishes
Raspberry Turnovers
Puff Pastry Spirals

Egg Dishes
Leek Quiche
Breakfast Portobellos
Broccoli and Cheddar Egg Bake
Chard and Mushroom Frittata

Other
Asparagus Gruyére Tart
Asparagus Ham Rolls
Blueberry French Toast Casserole
Breakfast Pizza
Tater Tot Sausage Breakfast Casserole
Breakfast Potatoes
Chicken & Waffle Sliders
Sausage Gravy
Breakfast Ramen

Drinks
Creamy Hot Cocoa in a Crock-Pot
Bloody Mary Shooters
Grapefruit Champagne Cocktails
Dalgona Coffee

Beverages

Recipe—Dalgona Coffee

Dalgona Coffee

Unless you have been living under a rock these past few weeks, you may have seen posts about Dalgona Coffee, the viral coffee drink popping up all over the internet. Dalgona Coffee is a whipped coffee drink that started in Korea and has taken the internet by storm. After seeing the beautiful drink posted to my friend’s social media I knew I had to give it a try. After all, it has been about 5 weeks since my last Starbucks drink so I have just been drinking the good ol’ drip and this looked like something I could pull off at home relatively quickly and easily.

You essentially just whip together instant coffee, sugar, and hot water until it becomes a beautiful fluffy little cloud of sweetened coffee and put that over some iced milk. While most of the recipes call for instant coffee I am a girl who likes REALLY dark and bold coffee so I went with instant espresso instead. It’s the Italian in me! Let me just say, it gave me perfect little mid-day jolt I needed.

Note: The total time to prepare is about 3 minutes. Way quicker than if I got my espresso machine out and fired it up.

Instant Coffee

INGREDIENTS
2 tbsp instant coffee or espresso
1–2 tbsp sugar (depends how sweet you like it)
2 tbsp hot water
milk (or milk substitute of choice)
ice
cinnamon or sweetened cocoa to sprinkle on top (optional)

STEPS

  • In a mixing bowl, combine the instant coffee or espresso, sugar, and water.
  • Using a stand-up mixer or hand mixer on medium speed, beat together until it is nice and fluffy and holds some shape. (Took me about 3 minutes.)
  • Fill a glass about half way up with ice and milk.
  • Add the whipped coffee to the glass and finish with some cinnamon or sweetened cocoa.
  • Sip and recharge.


Appetizers, Beverages

Recipe—Bloody Mary Shooters

Bloody Mary Shooters

I recently hosted a bridal shower brunch and of course we had bottomless mimosas but I also made these super cute bloody mary shooters that are the adult equivalent of grilled cheese and tomato soup. I used a spicy bloody mary mix so it had a nice kick but then you take a bite of that crispy mozzarella stick to cool down your mouth. Just the best combination ever! Plus, how cute are they?!?!

This recipe makes 12 but I recommend you make double from whatever you think you will need. Just trust me on this one. These will disappear!

Bloody Mary Shooters

Note: I made these using 2 ounce shooter glasses. If you use 2 ounce glasses this recipe will make 12 portions. You can find the mozzarella sticks in the freezer section of your local grocery store.

INGREDIENTS
12 mozzarella sticks
14 oz your favorite bloody mary mix
10 oz vodka
celery greens

STEPS

  • Bake the mozzarella sticks per the package instructions.
  • In a pitcher, mix together bloody mary mix and vodka.
  • Distribute the mix evenly among the shot glasses.
  • Garnish with a sprig of celery greens and lay a mozzarella stick across the top.
  • Dip, bite, sip, repeat.
Beverages

Recipe—Apple Cider Sangria

Recipe—Apple Cider Sangria

Tis the season for apples and cinnamon! If you are having a hard time transitioning into the fall season and all that goes with it, then make yourself a big batch of this apple cider sangria, get out your pumpkin pie candle, and slip on a cozy flannel.

I made a double batch of this recipe for Thanksgiving last year and it was gone before I knew it. It went down just a little too easy. If you could take all that is fall and contain it in a drink, this would be it. It is literally the perfect drink for all your fall festivities, or even just a lazy fall Sunday.

Note: This recipe is best when made right before serving as the champagne and club soda can lose their fizz and the apples can brown.

INGREDIENTS
750 ml bottle champagne
2 1/2 c apple cider
1 c club soda
1/2 c Disaronno or Frangelico
2 apples, sliced
cinnamon sticks

STEPS

  • In a large pitcher or serving container, combine the champagne, apple cider, club soda, and Disaronno or Frangelico.
  • Add in the apples and cinnamon sticks.
  • Stir and serve over ice.
Brunch, Sandwiches

Recipe—Chicken & Waffle Sliders

Chicken & Waffle Sliders

It seems silly writing a post for a recipe that is basically made up of frozen store bought items but this is such a fun and easy dish to prepare for brunch, lunch, or even an appetizer so I just had to share, for a creative idea I suppose more than anything. 😉

I recently made them for a mimosa brunch and everyone loved them! Who doesn’t love the sweet and salty combination of a classic comfort dish in bite size portions?!? You can certainly make these from scratch, and I will probably try sometime soon, but it would obviously be far more work and you would end up having way more dirty dishes. Having such an easy dish allows you to focus more attention to preparing other items or even enjoying an extra mimosa or three.

Note: A box of Eggo Minis Waffles has 10 waffles and each one is divided up into 4 mini waffles for a total of 40 mini waffles which will yield 20 sliders.

INGREDIENTS
20 frozen chicken nuggets
box of frozen Eggo Minis Waffles
20 blackberries
20 toothpicks
1/2 c maple syrup

STEPS

  • Bake chicken nuggets per package instructions.
  • Toast the Eggo waffles per package instructions.
  • As the waffles finish toasting separate them into the 4 mini waffles.
  • Sandwich a chicken nugget between two waffles.
  • Skewer a blackberry with a toothpick and then the secure the waffle slider.
  • Drizzle with maple syrup.