Appetizers, Sauces

Recipe—Salsa Fresca

Last year in my garden we were harvesting more tomatoes than we knew what to do with! We were having Panzanella Salad and Marinated Tomatoes almost every week. Once my jalapenos came in, I was all about that fresh salsa! Who doesn’t love that fresh salsa flavor!? Store bought salsa just does not compare.

This recipe is pretty much goof proof. You just add all the ingredients to the blender and blend. Yes, it really is that simple!

Just serve up with a side of some crispy salty tortilla chips or along with your favorite tacos or burritos. 

Note: If you over blend your salsa, it can become sort of frothy. If this happens, just cover and store in the fridge for a couple of hours and it should settle. Fresh salsa can last in the fridge covered for up to two weeks. The flavors get better and better with time.

INGREDIENTS
1/4 white onion 
2 tsp garlic, minced
1 jalapeno 
4–6 medium sized tomatoes
1/4 tsp salt
1/4 tsp ground cumin
1/2 c fresh cilantro leaves
juice from 1 lime
pinch of sugar (optional, to balance the acidity of the tomatoes)

STEPS

  • Add the onion, garlic, and jalapeno to a food processor or blender and pulse a few times to chop.
  • Add all the remaining ingredients to the blender and blend to desired consistency. 
  • Refrigerate for 30 minutes to allow the flavors to really come together. (Optional)

This salsa goes great with the following recipes:

Appetizers, Side Dishes

Recipe—Fiery Edamame

divadicucina_fieryedamame

You know how you have some food items that you literally just cannot get enough of? Like, you would eat every bit of it if you weren’t sharing and then when it is all gone you are using your fingers to get every last drop out of the bottom of the dish. That is me with this Creamy & Spicy Garlic Edamame. I literally would lick the bowl clean like a 5-year-old does with their ice cream bowl if I could get my tongue to the bottom of it. Too graphic? Sorry! The sauce is just so freaking good! It has just the right amount of heat that you feel a little burn but the creaminess of the sauce helps to tame it and you just keep going back for more.

I have been making this recipe a lot lately. It is a quick (I am talking less than 10 minutes start to finish) and easy side dish that goes great when I am making a stir fry or big batch of ramen but it also makes an awesome snack. Edamame is high in protein and fiber and is rich in vitamins and minerals, plus it is just fun to eat. It is probably a good thing that they have a shell because that is the only thing that slows me down when I have a bowl of these in front of me. 😉

INGREDIENTS
14 oz bag of frozen edamame in pods
1 tbsp garlic, minced
1 tsp sesame oil
2 tbsp chili paste (Sambal Oelek is my go to)
1/4 mayonnaise
1 tbsp soy sauce
sea salt
sesame seeds

STEPS

  • Prepare the edamame per the package instructions, drain, and transfer to a large bowl.
  • In a small bowl whisk together the garlic, sesame oil, chili paste, mayonnaise, and soy sauce.
  • Pour the sauce over the edamame and toss to coat.
  • Transfer to a serving dish a sprinkle with a little sea salt and sesame seeds.
Appetizers, Dinners

Recipe—Loaded Korean Beef Fries

Recipe—Loaded Korean Beef Fries

If your mouth isn’t watering just looking at this pic, then you must be dead. And if you are doing everything you can to keep from drooling on your keyboard or phone, then please, give this recipe a try. You will have no regrets. Absolutely calorie worthy.

This is actually a copycat version of the Loaded Korean BBQ Beef Fries from my favorite local food truck, Turnt Up Tacos and Tortas. The first time I had them, I was HOOOOOOKED!

I start off with a base of thin crispy fries and cover them in finely shredded jack cheese and then pile on a mound of my sweet and spicy Korean Beef and then top that with a cabbage and carrot-based coleslaw made with a creamy sesame ginger sauce and then don’t forget about that spicy sriracha drizzled over the top to give it a kick. The flavors are so freaking good, I tell ya! Mmmmm… mmmmm… mmmmmmmmm!

I have actually started serving this as a meal in my house with each person getting their own plate of loaded fries (yes, loaded fries as a meal, it even has most of the food groups) but you could absolutely make one big pile of loaded fries and share them with friends as an appetizer or shared plate.

Note: The sesame oil and ginger paste go in both the Korean beef as well as the creamy sesame ginger sauce so pay close attention when preparing.

INGREDIENTS
bag of frozen french fries
1 lb ground beef
1/2 c brown sugar
1/4 c soy sauce
1 tbsp & 1 tsp sesame oil
1 tbsp garlic, minced
1 tsp ginger paste, divided
1/4 tsp crushed red pepper
salt and pepper
3 c green cabbage, shredded
1/2 c carrots, shredded
1/2 c mayonnaise
1 tsp white sugar
1/4 c milk
2 c jack cheese, shredded
Sriracha sauce
2 green onions, chopped
sesame seeds

STEPS

  • Bake or fry the French fries according to the package directions.
  • While the fries are baking, cook the ground beef over medium high heat breaking it apart as it cooks.
  • Once the beef is cooked through, drain off most of the fat.
  • Add in the brown sugar, soy sauce, garlic, 1 tablespoon of the sesame oil, 1/2 teaspoon of the ginger paste, red peppers, salt, and pepper.
  • Simmer over medium heat for a 4–5 minutes stirring occasionally.
  • While the beef is cooking, put the cabbage and carrots in a medium bowl and set aside.
  • In a small bowl whisk together the mayonnaise, white sugar, 1 teaspoon of sesame oil, the other 1/2 teaspoon of ginger paste, and the milk to make the creamy sesame ginger sauce.
  • Toss about 3/4 of the creamy sesame ginger sauce with the cabbage and carrots and set aside the rest to drizzle over the top.
  • When the fries are done transfer them to the plates.
  • Top each pile of fries with the jack cheese, cooked Korean beef, and the coleslaw.
  • Drizzle the remaining creamy sesame ginger sauce and sriracha sauce over the top.
  • Sprinkle with sesame seeds and finish off with green onions.
Appetizers, Beverages

Recipe—Bloody Mary Shooters

Bloody Mary Shooters

I recently hosted a bridal shower brunch and of course we had bottomless mimosas but I also made these super cute bloody mary shooters that are the adult equivalent of grilled cheese and tomato soup. I used a spicy bloody mary mix so it had a nice kick but then you take a bite of that crispy mozzarella stick to cool down your mouth. Just the best combination ever! Plus, how cute are they?!?!

This recipe makes 12 but I recommend you make double from whatever you think you will need. Just trust me on this one. These will disappear!

Bloody Mary Shooters

Note: I made these using 2 ounce shooter glasses. If you use 2 ounce glasses this recipe will make 12 portions. You can find the mozzarella sticks in the freezer section of your local grocery store.

INGREDIENTS
12 mozzarella sticks
14 oz your favorite bloody mary mix
10 oz vodka
celery greens

STEPS

  • Bake the mozzarella sticks per the package instructions.
  • In a pitcher, mix together bloody mary mix and vodka.
  • Distribute the mix evenly among the shot glasses.
  • Garnish with a sprig of celery greens and lay a mozzarella stick across the top.
  • Dip, bite, sip, repeat.
Appetizers

Recipe—Steak & Goat Cheese Crostini with Pesto

Steak and Goat Cheese Crostini with Pesto

Last weekend I hosted a wine tasting party, which is so much fun by the way! Each person brought an appetizer and a bottle of wine so it was minimal preparation required on my part and didn’t break the bank. Thanks to all my amazing friends that came if you are reading this! It was such a blast! We had a total of 13 bottles of wine and an amazing spread of food.

Since I was holding the party around dinner time I knew I needed an appetizer that was hearty and filling. Steak came to mind since it would pair so nicely with a good hearty red blend. These appetizers may look very simple but the flavors were so amazing. The goat cheese is whipped together with cream cheese, olive oil, and red pepper so it is creamy and smooth with a mild kick. I was able to prepare everything earlier in the day and then assemble right before anyone arrived. And let me tell you, they were pretty darn popular among the ladies.

Steak and Goat Cheese Crostini with Pesto

Note: These can be served hot or cold. I served them cold for the sake of convenience. I was able to do all the prep in the morning, stored the cooked steak and goat cheese spread in the fridge, and put the toasted crostini in an unsealed Ziploc bag. I then assembled them right before the party.

INGREDIENTS
1 baguette, cut into 1/4 slices
10–12 ounce New York strip steak
4 oz goat cheese, softened
4 oz cream cheese, softened
1/2 tsp red pepper flakes
olive oil
salt & pepper
chili powder
garlic powder
1/2 c pesto

STEPS

  • Preheat the oven to 425º.
  • Place the baguette slices on a parchment paper lined baking sheets.
  • Brush each slice with olive oil and season with a light sprinkle of salt. Flip each slice over and repeat.
  • Toast the baguette slices for 12–15 minutes or until they are a nice golden brown.
  • While the baguette slices are toasting, season both sides of the steak with salt, pepper, a sprinkle of chili powder, and garlic powder.
  • Heat a tablespoon of olive oil in a skillet over medium high heat and add the steak.
  • Cook the steak for 4–6 minutes, flip, and continue to cook for an additional 4–6 minutes.
  • Remove the steak from the pan and allow it to sit for 10 minutes.
  • While the steak is resting, use a hand mixer to whip together the goat cheese, cream cheese, red pepper flakes, and two tablespoons of olive oil.
  • Thinly slice the steak and set aside.
  • To assemble, spread about one teaspoon of the whipped goat cheese on a slice of toasted bread, top with a slice of steak, and a dollop of pesto.
  • Enjoy!


Recipe adapted from Domesticate Me.

Appetizers, Dinners

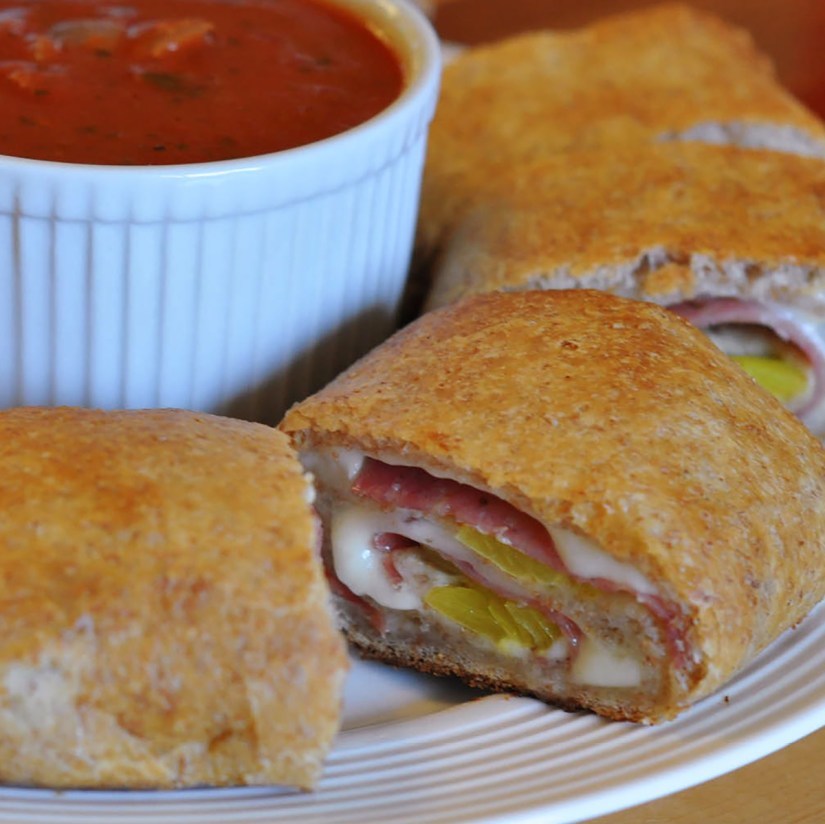
Recipe—Salami & Pepperoncini Stromboli

Salami & Pepperoncini Stromboli

If you aren’t sure what a stromboli is, it is basically a rolled-up pizza. And you know what I love about stromboli? I love that it can work as either an appetizer or even a main meal. Plus, it is so versatile! While this one has just a few simple ingredients you can certainly go crazy and use any of your favorite pizza toppings. The last time I made this it was for a Superbowl party. It worked out great! I was able to make it in advance, store it in plastic wrap in the fridge, and then just put it in the oven once the guests arrived. It was the perfect cheesy, meaty, melty dish. Some people like to put marinara inside but I find that it can sometimes come out soggy so I just serve it on the side as a dip.

INGREDIENTS
1 package refrigerated pizza crust (I used the wheat one from Pillsbury)
2 c mozzarella, shredded
3 oz sliced salami
1/2 c pepperoncini peppers, copped
Italian seasoning
marinara for dipping

STEPS

  • Preheat oven to 400º
  • Spread out the pizza crust on a parchment paper lined baking sheet.
  • Sprinkle the mozzarella over the crust leaving one of the long edges clear of any ingredients. This will help you to seal it up after you wrap it.
  • Top the rolled out pizza crust with the salami and chopped pepperoncinis and finish with a sprinkle of the Italian seasoning.
  • Starting with the long end roll the pizza crust up into a log working your way towards the edge that is clear of any toppings.
  • Pinch the ends close and be sure it is seam side down on the baking sheet.
  • Bake for 16–20 minutes or until it is a nice golden brown.
  • Allow it to cool for about 5 minutes before slicing.
  • Serve with a side of marinara.
Appetizers

Recipe—Spicy Black Bean Dip

I might as well take on the title as Queen of Appetizers. It’s just what I do. I personally just love appetizers and finger foods and no party is complete without a nice spread. When it comes to throwing a party a good dip is a must on the appetizer menu. There is no need to spend hours slaving away in the kitchen to come up with something everyone will love. This recipe literally takes five minutes to make and is so easy! You spend more time measuring out the seasonings than anything else. Just toss it all in the blender and voila! You have a delicious bean dip ready to serve!

The flavors in this dip are amazing. It might look sort of blah but then you take one bite and zap, bing, bang! Flavor explosions happening right in your mouth! You have a nice kick from the jalapeños, a little zest from the lime and lots of other great flavors from all the seasonings. The first time I made this I was (no joke) licking it off the rubber spatula. This is great at room temperature, warm, or even right out of the fridge. Talk about diverse! Next time you are throwing or attending a party make this recipe. You will have lots of people asking for the recipe. No need to tell them it took less than five minutes to make. That can be our little secret.

INGREDIENTS
2 large cloves of garlic
1 jalapeño, deseeded, deveined, and chopped
1/2 c fresh cilantro
1 (15 oz) cans black beans, rinsed and drained
2 tsp cumin
1 1/2 tsp garlic salt
1/2 tsp chili powder
1/4 tsp dried oregano
1/4 tsp black pepper, ground
1 1/2 tbsp lime juice
1 tbsp balsamic vinegar
water

GARNISHES
cotija cheese, crumbled
a couple of slices of fresh jalapeño

STEPS

  • Place all of the main ingredients except the water into the blender or food processor and blend until well mixed.
  • Add 4 tablespoons of water and continue blending until nice and smooth. If necessary, continue adding water 2 tablespoons at a time until it reaches the desired consistency.
  • Transfer to a bowl and garnish with some crumbled cotija cheese and slices of fresh jalapeños.
  • Enjoy with some tortilla chips now or place in fridge until ready to serve.
Appetizers

Recipe—Herbed Cucumber Bites

I have been wanting to host a tea party type of event and this year Easter was the perfect occasion. We were just having a couple of people over so I did all sorts of small bites. So fun and classy! The cucumber rounds were one of my faves! They were so light and refreshing and reminded me of the typical cucumber sandwiches you would have at a tea party, minus the rye bread. These are definitely the perfect snack for bridal showers, baby showers, or an afternoon tea.

INGREDIENTS
8 oz block of cream cheese, softened
1/4 c fresh dill (or 1 tbsp dried)
2 tbsp dill pickle juice (just the stuff form the jar)
3/4 tsp onion powder
1/2 tsp garlic powder
pepper
1 green onion, finely chopped
1 cucumber, sliced
parsley to garnish (optional)

STEPS

  • In a medium bowl beat together the cream cheese, dill, pickle juice, onion powder, garlic powder, pepper, and green onion until smooth.
  • Transfer the mixture to a pastry bag or a Ziploc bag.
  • Pipe the herbed cream cheese mixture onto each cucumber round.
  • Garnish each cucumber with a sprig of parsley on top.
  • Serve immediately or cover and store in the fridge until ready to enjoy.
Appetizers, Kitchen Tips

Kitchen Tip—Fun Individual Veggie and Dip Cups

Back in December I threw a little party for my son. We invited over a couple of his closest friends. Keep in mind this was a group of 4–5 year olds. I wanted to have kid friendly food that they would enjoy. I made mini burgers, little fruit kabobs with marshmallows, a fun neon green punch, and a couple of other things. Now being a mom who insists on a balanced meal I knew I needed to get some veggies in there. I wanted to do something different so that the kids would actually want to eat them. So here you have Individual Veggie and Dip Cups!

The kids thought they were awesome! They loved having their own little cups. I bought a pack of these small plastic cups at a local party store, did a little squirt of ranch in the bottom and added in sliced carrots, cucumbers, and celery. How great, right?!?! Not only were these fun to eat but it also prevents the kids from double dipping. Have you ever watched kids go to town on a table of appetizers? They will bite and dip and repeat. Heck, I have even caught adults doing that! So regardless of the age of your party guests this is a fun and great way to serve veggies as an appetizer. A crowd pleaser for all ages!

If you like this idea you should check out this one too!

Pre-Scooped Ice Cream—A Party Time Saver

Appetizers, Sauces

Recipe—Black Bean and Corn Salsa

Summer is approaching and that means its BBQ and party season! Whoop whoop! We seem to attend and host so many great BBQs and parties throughout the summer and I am always jumping at the chance to make something that will really wow people. However, I don’t always have the time to throw together a fancy smancy dish. This black bean and corn salsa has been a go to recipe of mine for years now and people always love it! It is completely different and super easy to make.

I pretty much keep all the canned ingredients in my pantry year round because you never know what will come up and when you may suddenly need an appetizer to bring. And a huge plus is it makes a lot, so I always leave a little extra at home to keep for myself for later on. I’m greedy like that. And if I haven’t already convinced you to try it, another plus is it stays good for at least a week in the fridge.

This salsa goes great just served with some chips but I have also found it is amazing in a baked potato, in a quesadilla, stuffed in an omelet, or even along side some grilled chicken or steak. Seriously, super versatile. Okay, now I am getting hungry and need a reason to go make some of this. Fiesta anyone?

I hope you enjoy this awesome recipe as much as I do!

INGREDIENTS
2 (8 oz) cans of Rotel Tomatoes and Chilies
1 (14 oz) can of Mexicorn (Mexican style corn)
1 (16 oz) can black beans
1 (4 oz) can green chilies
1 c diced sweet onion
1/2 c cilantro, chopped
1/2 tsp garlic powder
1/2 tsp chili powder
1/2 tsp cumin
salt and peppers to taste

STEPS

  • Add all ingredients in a large bowl and stir.
  • Store in refrigerator until ready to serve. (Yes, it is seriously that easy.)