Dinners

Recipe— Quesabirria Tacos

I follow a LOT of foodies on social media and over the last year I have seen this trend of people posting photos of these delicious looking meat and cheese filled tacos served up with a dish of red sauce for dipping. This delicious looking meal is called birria or quesabirria tacos and now it seems like you see them everywhere! I scoped out some of our local Mexican restaurants and could not find anywhere that had birria tacos on the menu, but I had to have them! Sooooo… to Pinterest I went! 

I found quite a few recipes out there and of course every one of them was different, but none of them had me sold. Being who I am, I picked and pulled elements from several different recipes and came up with my own recipe. 

I was absolutely thrilled with how these tacos turned out. The meat was flavorful and juicy and the broth was so rich and just the right amount of spicy. I served my husband, son, and I each up with three tacos to start with but we kept going back to the grill for another one, and another one, and another one until we were about to pop. These seriously lived up to all the hype. I can honestly say, these were not only the best tacos I have ever made, but also the best tacos I have ever eaten!

Note: These are relatively easy to make but time consuming since you slow cook the meat on the stovetop. It is the perfect recipe to make on a rainy Sunday while you watch some football and just want to indulge in some good food. 

BIRRIA INGREDIENTS
3 lbs short ribs (bone in)
1 large white onion skin removed, halved and cut into 1/2″ thick slices
1 garlic bulb with skin on, top cut off 
2 carrots, cut into quarters
5 bay leaves
8 dried guajillo chiles, stems cut off and seeds removed
3 chicken bouillon cubes
2 tsp chili powder 
1 tsp oregano
1 tsp ground cumin
1 tsp salt

TACO INGREDIENTS
corn tortillas
jack cheese, shredded
white onion, chopped
cilantro, chopped
cotija cheese, crumbled

STEPS

  • In a large pot add meat, onion, garlic, carrots, bay leaves, and dried peppers and cover with water. 
  • Add the chicken bouillon, oregano, cumin, and salt.
  • Bring the pot to a boil over medium high heat.
  • After 30 minutes of cooking, skim any foam off the top of the water.
  • Remove the peppers, onions, and carrots and place them in a blender.
  • Squeeze the garlic cloves from the bulb into the blender and add 1 cup of the liquid from the pot.
  • Puree the ingredients in the blender until smooth. 
  • Pour the vegetable puree back into the pot.
  • Add the lid to the pot and simmer over medium-low heat for 3 hours stirring every 30 minutes or so.
  • Transfer the meat and bones to a large cutting board. 
  • Remove the meat from the bones and discard the bones.
  • Using two large forks, shred the meat and set aside.
  • Heat a large skillet or griddle over medium heat.
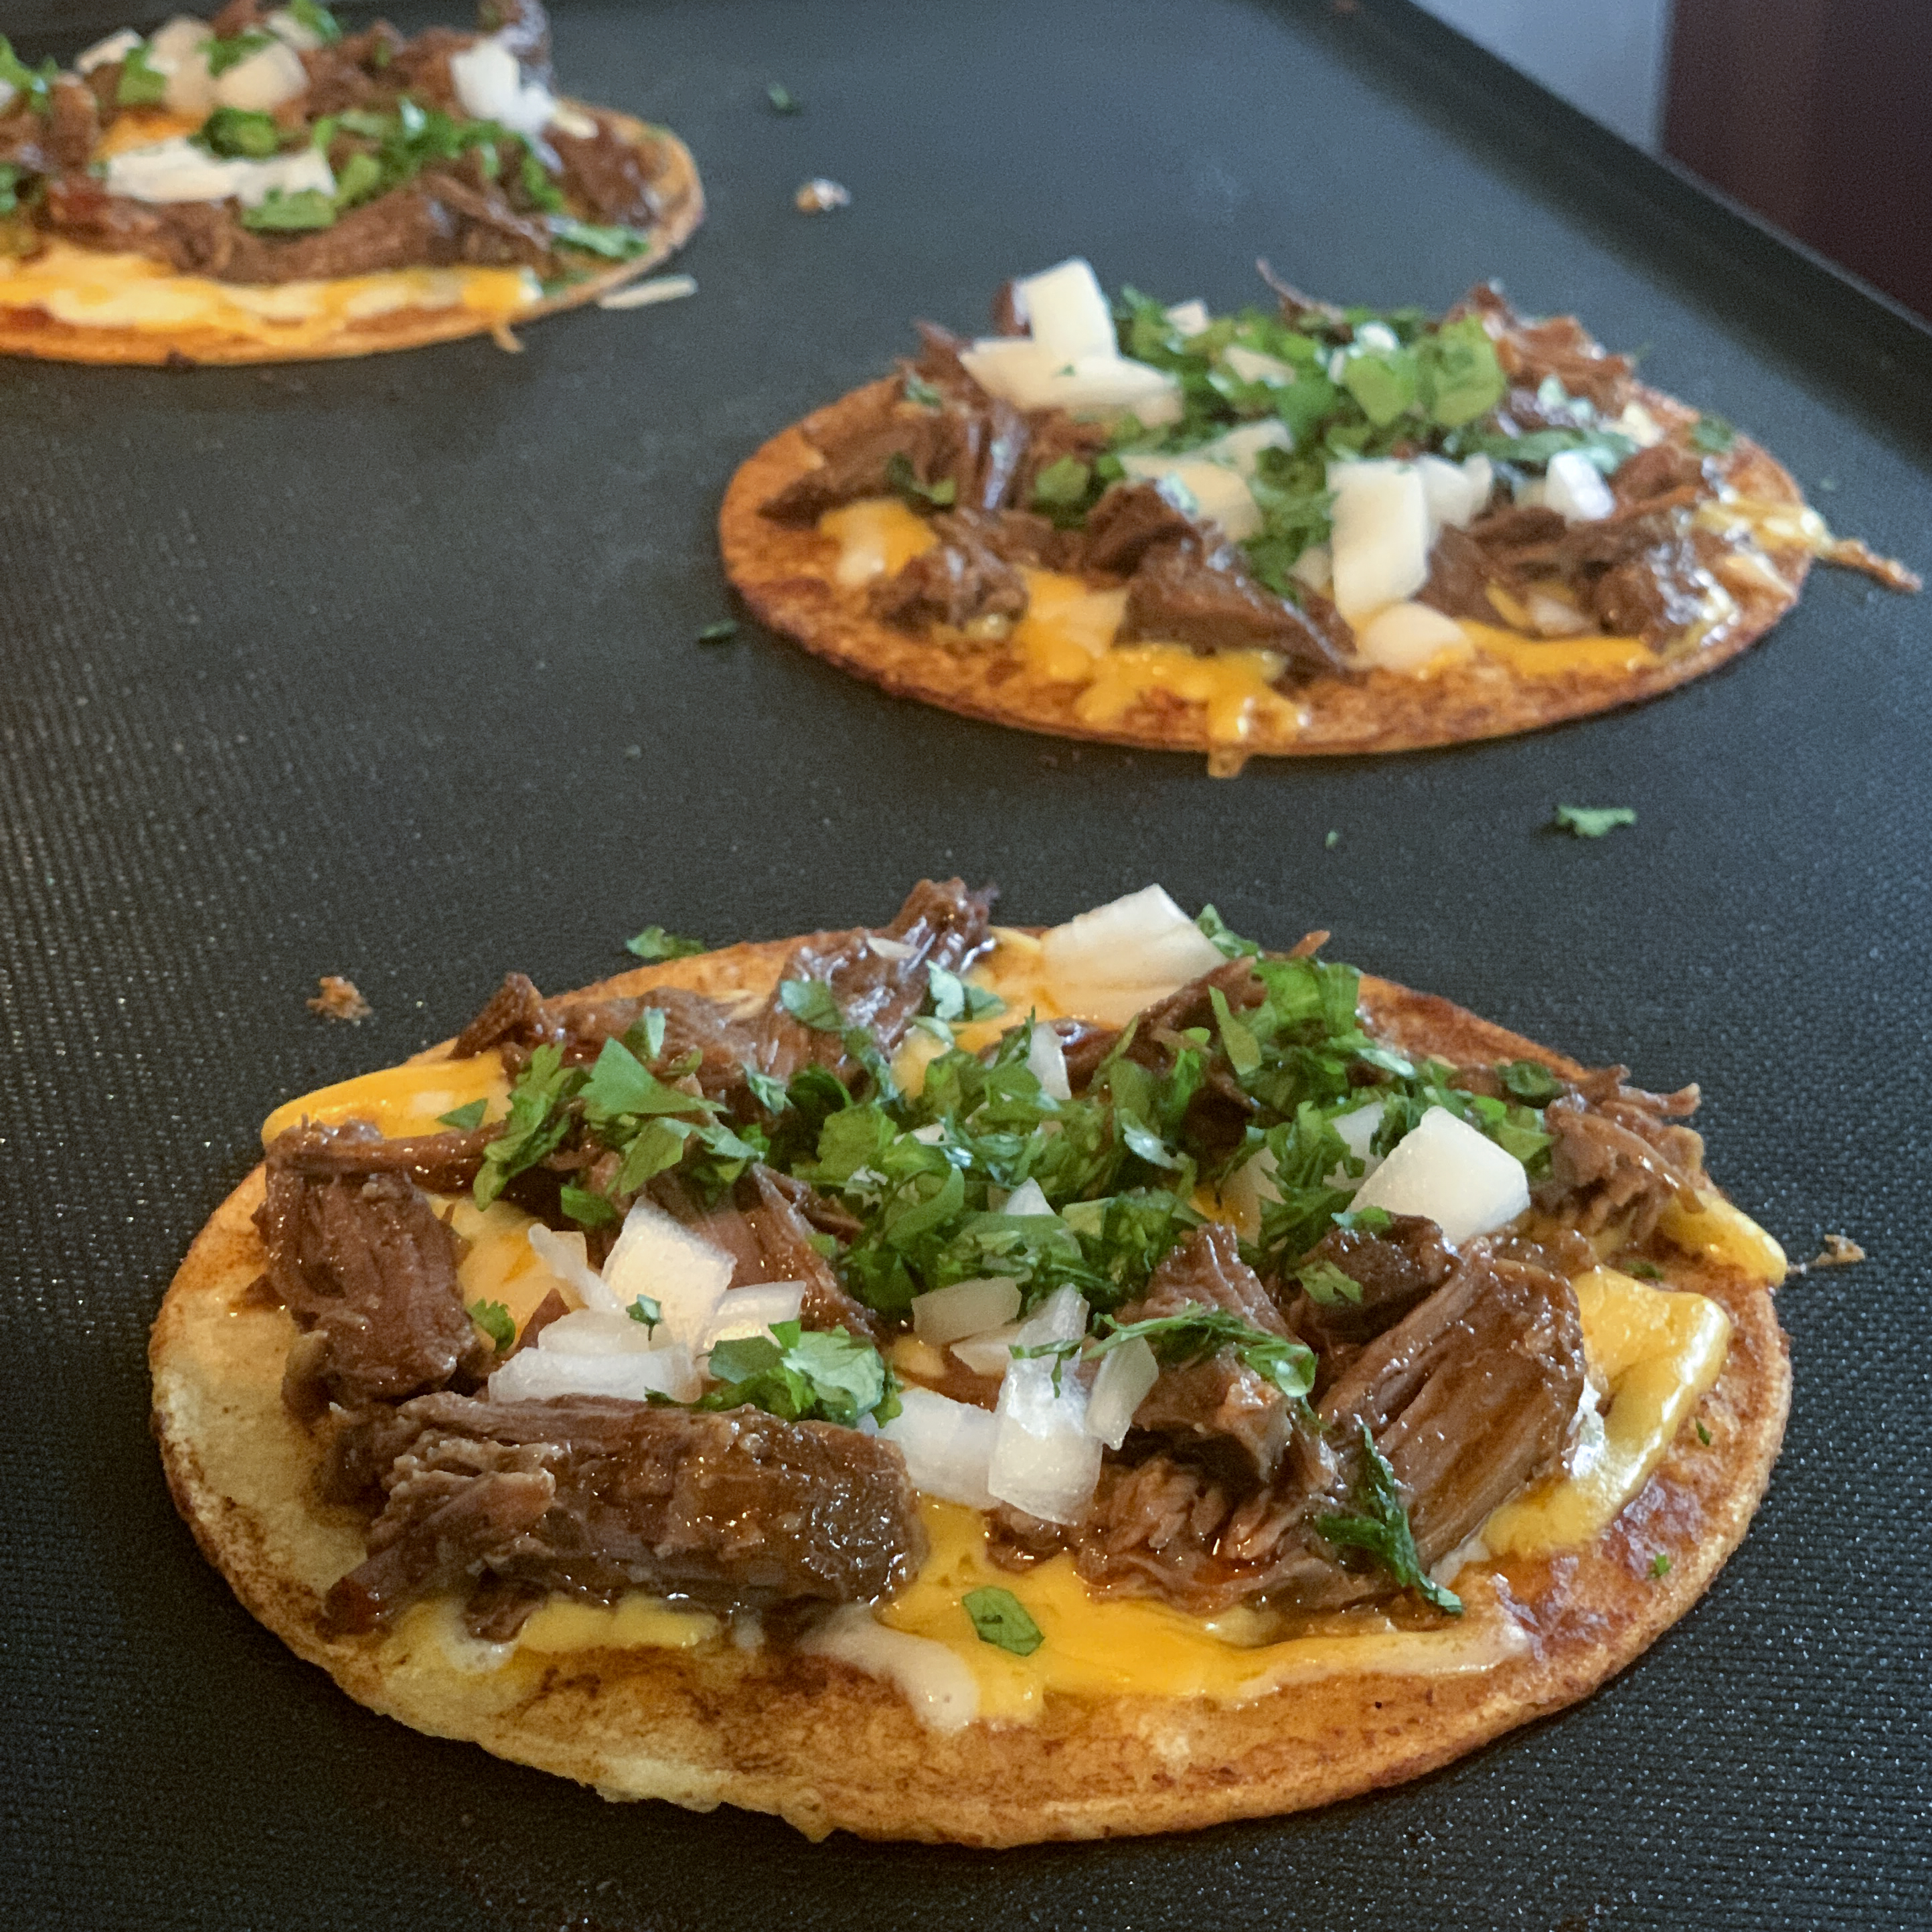
  • Dip a corn tortilla into the broth left in the pot and place the tortilla on the griddle. 
  • Top the tortilla with jack cheese, chopped meat, diced white onion, and some cilantro.
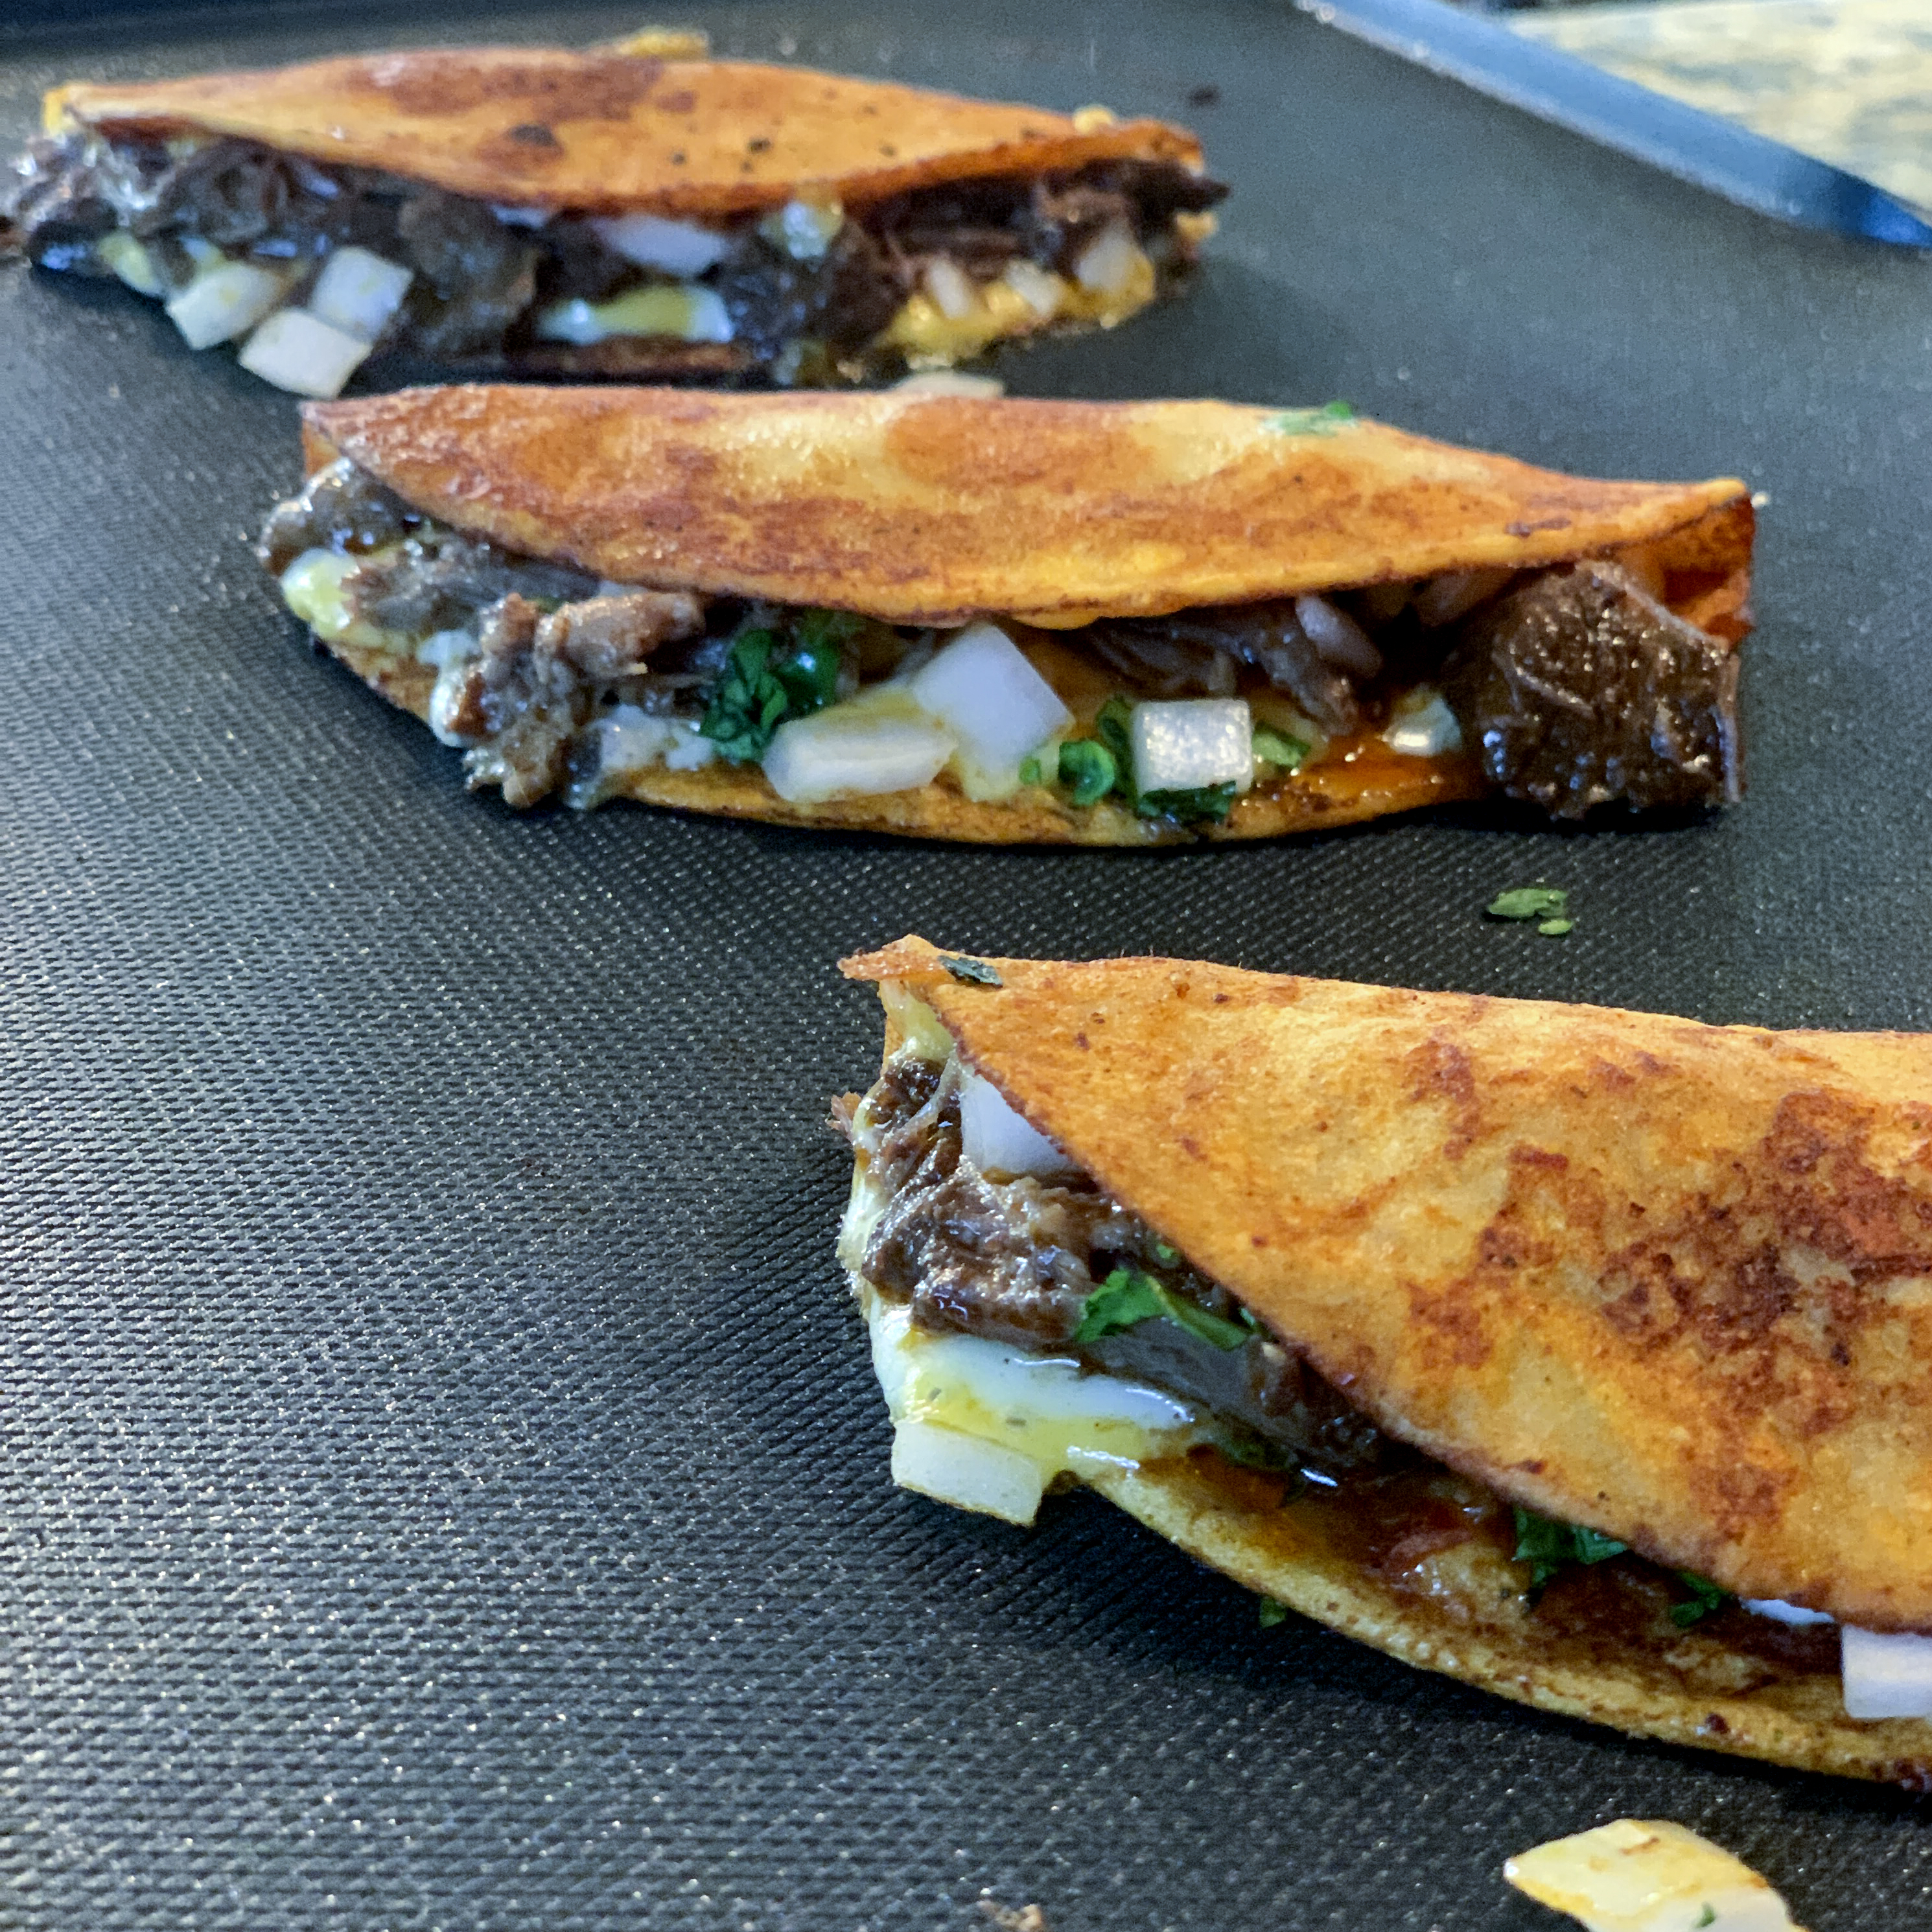
  • Fold the taco in half and press down with the back of a spatula.
  • Continue cooking until the tortilla is golden and cheese is melted, about 2–3 minutes.
  • Flip the taco and continue cooking the other side.
  • Transfer the tacos to a plate or serving dish as you finish them. 
  • Garnish the finished tacos with cilantro and crumbled cotija cheese. 
  • Ladle some of the broth into a ramekin and top with fresh onions and more cilantro and serve with the tacos. 
  • Dip the tacos into the broth and enjoy each and every sauce-soaked cheesy bite. 
Advertisement
Appetizers, Beverages

Recipe—Bloody Mary Shooters

Bloody Mary Shooters

I recently hosted a bridal shower brunch and of course we had bottomless mimosas but I also made these super cute bloody mary shooters that are the adult equivalent of grilled cheese and tomato soup. I used a spicy bloody mary mix so it had a nice kick but then you take a bite of that crispy mozzarella stick to cool down your mouth. Just the best combination ever! Plus, how cute are they?!?!

This recipe makes 12 but I recommend you make double from whatever you think you will need. Just trust me on this one. These will disappear!

Bloody Mary Shooters

Note: I made these using 2 ounce shooter glasses. If you use 2 ounce glasses this recipe will make 12 portions. You can find the mozzarella sticks in the freezer section of your local grocery store.

INGREDIENTS
12 mozzarella sticks
14 oz your favorite bloody mary mix
10 oz vodka
celery greens

STEPS

  • Bake the mozzarella sticks per the package instructions.
  • In a pitcher, mix together bloody mary mix and vodka.
  • Distribute the mix evenly among the shot glasses.
  • Garnish with a sprig of celery greens and lay a mozzarella stick across the top.
  • Dip, bite, sip, repeat.
Brunch

Recipe—Breakfast Pizza

I love breakfast and I love pizza. (Everyone does, right?) Put them together and you get the best of both worlds. Breakfast truly is one of my favorite meals but I just don’t take the time to enjoy it nearly enough. So when I can find recipes that are quick and awesome (like breakfast pizza) they are an instant fave. Come on, a savory breakfast pizza built upon a fluffy and buttery crescent crust topped with sausage, eggs, and melted cheese. I could seriously start every morning with this recipe.

INGREDIENTS
1 lb loose meat breakfast sausage
1 tube crescent roll dough (like Pillsbury)
1 c cheddar, shredded
6 eggs
1/4 c milk
1 tsp rosemary
salt and pepper

STEPS

  • Preheat oven to 400º.
  • Cook the sausage in a skillet over medium-high heat making sure to break up any large chunks until it is cooked thoroughly.
  • Transfer the sausage to a plate covered in paper towels to soak up the oil.
  • Unroll the crescent dough and lay it out in the bottom of a 9” x 13” baking dish and press the seams together to make one large sheet of dough.
  • Sprinkle the sausage evenly over the crescent dough.
  • Distribute the cheese over the sausage.
  • In a medium bowl whisk together the eggs, milk, rosemary, salt, and pepper.
  • Pour the egg mixture over the top making sure the pizza is evenly covered.
  • Bake the pizza for 15–20 minutes or until the crust is golden and eggs are set.
  • Remove form oven and allow to cool for 5 minutes before slicing and serving.

Recipe adapted from Bran Apetit.

Dinners

Recipe—Easiest Beef Enchiladas Ever

Over the summer the wonderful people at Del Real sent me a massive party box of all sorts of wonderful goodies to try out. One of the items was a package of seasoned shredded beef (carne deshebrada). As soon as I saw it I thought to myself, “wow, having cooked and seasoned meat all ready to go would make enchiladas a total breeze!”

I decided to try and simplify the usually overly complex enchilada process. The name of this recipe describes it to a “t.” I am a huge fan of enchiladas. I make them fairly regularly but when I do the kitchen ends up in total disarray because of all the work that goes into them. This recipe uses only 5 ingredients but makes enough food to feed a small army.

Note: This recipe makes about 12 enchiladas. Since there are only 2 1/2 people in our household I cooked 4 that night and then put the rest into two 8” x 8” foil containers and froze them. That is 3 nights worth of dinner for about $5 a meal. Who can beat that? Cheap and easy. That is my style.

INGREDIENTS
32 oz package Del Read Shredded Beef
12 soft taco sized flour tortillas
2 (28 oz) can Las Palmas Enchilada Sauce (red or green)
4 c jack cheese, shredded
1 c black olives, sliced

STEPS

  • Heat the meat per package instructions.
  • Preheat oven to 425º.
  • After the meat is done cooking transfer it to a large bowl and toss with 1 1/2 cups of the enchilada sauce.
  • Spray your baking dish(es) with a non stick spray or lightly grease.
  • Pour enough enchilada sauce in the bottom of your baking dish(es) to cover the bottom.
  • On a large cutting board, lay a tortilla out flat and add a scoop full of meat and sprinkle with cheese and a few of the sliced olives.
  • Roll up the enchilada and place seam side down in your “sauced up” bake dish and repeat until you are out of ingredients.
  • Pour the remaining sauce over the tops of the enchiladas.
  • Sprinkle with remaining cheese and olives.
  • Cover with foil and bake for 20 minutes.
  • Remove foil and finish off in the oven for another 10–15 minutes or until the cheese is nice and melted and just starting to brown.
  • Allow the enchiladas to cool for 5 minutes before serving.
  • Top with sour cream or guacamole if desired.

A huge thank you to Del Real for giving me the opportunity to try out several of your products. I love them all! You guys rock!

Uncategorized

Happy National Grilled Cheese Day!

There is something truly wonderful about a perfectly toasted grilled cheese sandwich. Eating a grilled cheese takes me back to my childhood days. I have always been a lover of the ooey gooey cheesy sandwich. There is something absolutely perfect about the simplicity of cheese toasted between a couple of slices of buttered bread.

Today is a day to celebrate the all American sandwich enjoyed by people of all ages. Toasted bread with cheese has been around for ages. The classic version we know in the U.S. originated in the 1920s when sliced bread and American cheese was cheap and easily available. It was one of the more popular meals during the Great Depression for this very reason. Until the 1960s it was served as an open faced sandwich, a single slice of bread with cheese melted on top.

Grilled cheese sandwiches have come a long way with gourmet versions growing in popularity over the last several years. You can use a variety of meats, cheeses, and vegetables to make the ordinary grilled cheese, extraordinary.

Here are a couple of grownup versions of the American classic for you to try:

Jalapeno Popper Grilled Cheese

Fancy Man Grilled Cheese

Whether you prefer a classic or a modern day version, today is still a day about grilled cheese. Wonderful, fabulous, grilled cheese.

Appetizers, Brunch

Recipe—Asparagus Gruyére Tart

Since asparagus is plentiful at the market right now I thought I would post a simple, yet elegant asparagus recipe that will excite your palate. The final product looks impressive and tastes just as good. This asparagus tart is perfect as an appetizer or a side dish with brunch. You really can’t go wrong serving it warm or cold. It is very easy to make and requires hardly any prep time at all. Enjoy!

INGREDIENTS
1/4 c flour, for work surface
1 sheet frozen puff pastry, thawed (I love Pepperidge Farms)
2 c Gruyére cheese, shredded
1 bundle thin asparagus spears
olive oil
lemon pepper
sea salt

STEPS

  • Preheat oven to 400º.
  • On a floured surface, roll the puff pastry into a 16-by-10-inch rectangle and trim uneven edges.
  • Carefully move the pastry to a baking sheet.
  • Using a knife, lightly score pastry dough 1 inch in from the edges to give it a border. This is identifies the boundary you will put your cheese and asparagus in.
  • Using a fork, poke the dough inside the rectangle at 1/2-inch intervals.
  • Bake pastry until golden, about 15 minutes.
  • While the pastry is baking, trim the bottoms of the asparagus spears to fit crosswise inside the tart shell.
  • In a large bowl toss the asparagus with olive oil, lemon pepper, and salt.
  • Remove pastry shell from oven. (If your pastry swells up lay a clean kitchen towel over the top and gently press down until it is about a 1/2” tall.)
  • Evenly sprinkle with the shredded Gruyére.
  • Arrange the asparagus in a single layer over Gruyére, alternating ends and tips.
  • Bake until spears are tender, approximately 15–20 minutes.
  • Allow to cool and then cut into squares using a pizza cutter.

For some great information about asparagus check out a previous post of mine here: https://divadicucina.wordpress.com/2012/03/13/kitchen-tip-asparagus/