Sweet Treats

Recipe—Cannoli Dip  

Recipe—Cannoli Dip

Yesterday I did my first ever Instagram Live Cooking Demo. Did anyone catch it? If so, what did you think? Any feedback? I know there was certainly areas for improvement but I had fun and know what I can do better next time! If you want to view it you can do so here.

This was my first time ever doing any sort of live cooking demo so when Sac State UNIQUE Programs asked me if I would be willing to be a part of their summer virtual programming I jumped at the opportunity. I have never done any sort of cooking demo or Instagram Live video so I was absolutely stoked to do something outside my comfort zone. After all, virtual programming and activities have become such a big part of life these last several months.

For the cooking demo I was given a 1-hour timeslot and could make anything I wanted. I thought about it for a couple of days and knew I wanted to do a dinner and dessert. My go to favorite meal these days is my Italian Chicken Dinner. (It is so freaking easy and it is an entire meal!) Once I had that established, I decided to commit to an Italian theme. My first thought for dessert was tiramisu or cannolis. However, both are relatively time consuming and complex and since this was my first time cooking live I wanted to be sure it was something I could pull off. I decided to try and do a quick adaptation of cannolis and came up with this cannoli dip. Dessert dips are kind of my thing. You may recall that I have also posted recipes for Funfetti Cake Batter Cookie Dip, Sweet Cherry Chip Dip, Toffee Apple Dip, and a Sweet Cream Dip with Strawberries.

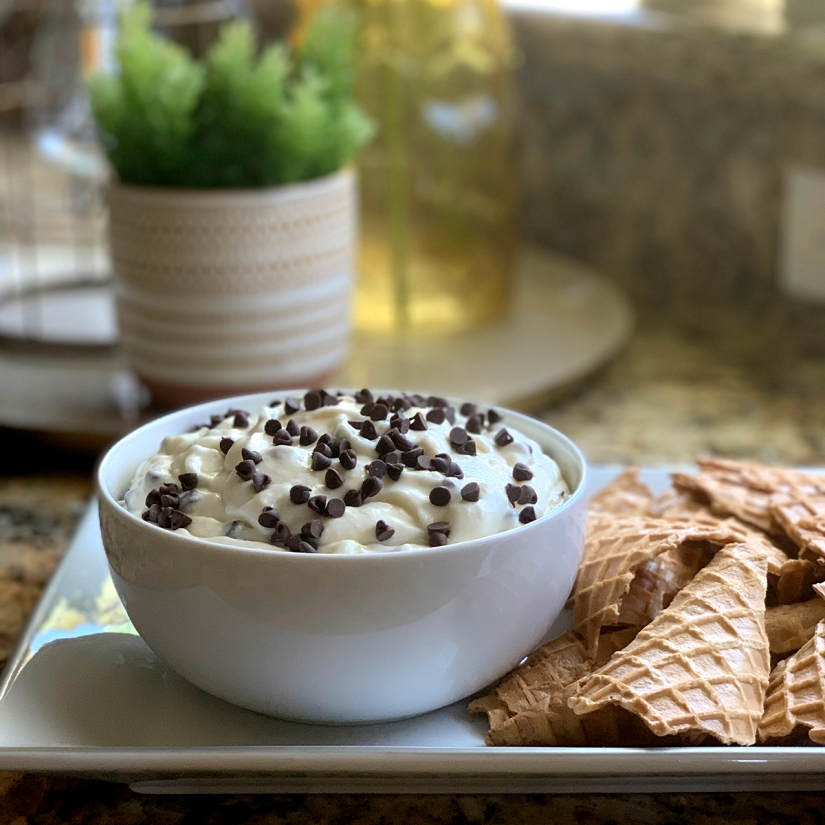
For those of you that may not know, a cannoli, it is a traditional Italian dessert that is a fried pastry tube filled with a sweet cream made with ricotta cheese as the base and then the ends are traditionally dipped in assorted garnishes, pistachios, chocolate chips, cherries, etc. If you have never had a cannoli, you may be thinking ricotta cheese in a pastry? The answer is, YES! YES! YES! Ricotta is a cheese that can be used in both savory or sweet dishes. The fluffy ricotta cheese is completely transformed in this recipe to a light and sweet cream filling that you could eat by the spoonful. This recipe is fantastic to take to a party or just to serve up for the family for a night in. I served it with broken waffle cones but it also goes great with strawberries, graham crackers, and Nilla wafers. The possibilities are really endless!

INGREDIENTS
1 c ricotta cheese
8 oz cream cheese, room temperature
1 tsp vanilla
1 1/2 c powdered sugar
1 c mini chocolate chips
box of waffle cones, broken up into chip sizes

STEPS

  • Place the ricotta, cream cheese, and vanilla in a large mixing bowl and beat using a handheld or standing mixer on medium speed for 3–5 minutes or until smooth.
  • Add in the powdered sugar and continue to mix for another 1–2 minutes making sure it is all evenly incorporated.
  • Add most of the chocolate chips to the bowl and fold in using a rubber spatula or spoon. (Be sure to save a small handful to sprinkle over the top as garnish!)
  • Transfer the dip to a serving dish, garnish with remaining chocolate chips, and serve along with the broken waffle cones.
Advertisement
Appetizers, Side Dishes

Recipe—Creamy & Spicy Garlic Edamame

Creamy & Spicy Garlic Edamame

You know how you have some food items that you literally just cannot get enough of? Like, you would eat every bit of it if you weren’t sharing and then when it is all gone you are using your fingers to get every last drop out of the bottom of the dish. That is me with this Creamy & Spicy Garlic Edamame. I literally would lick the bowl clean like a 5-year-old does with their ice cream bowl if I could get my tongue to the bottom of it. Too graphic? Sorry! The sauce is just so freaking good! It has just the right amount of heat that you feel a little burn but the creaminess of the sauce helps to tame it and you just keep going back for more.

I have been making this recipe a lot lately. It is a quick (I am talking less than 10 minutes start to finish) and easy side dish that goes great when I am making a stir fry or big batch of ramen but it also makes an awesome snack. Edamame is high in protein and fiber and is rich in vitamins and minerals, plus it is just fun to eat. It is probably a good thing that they have a shell because that is the only thing that slows me down when I have a bowl of these in front of me. 😉

INGREDIENTS
14 oz bag of frozen edamame in pods
1 tbsp garlic, minced
1 tsp sesame oil
2 tbsp chili paste (Sambal Oelek is my go to)
1/4 mayonnaise
1 tbsp soy sauce
sea salt

STEPS

  • Prepare the edamame per the package instructions, drain, and transfer to a large bowl.
  • In a small bowl whisk together the garlic, sesame oil, chili paste, mayonnaise, and soy sauce.
  • Pour the sauce over the edamame and toss to coat.
  • Transfer to a serving dish a sprinkle with a little sea salt.
Appetizers, Beverages

Recipe—Bloody Mary Shooters

Bloody Mary Shooters

I recently hosted a bridal shower brunch and of course we had bottomless mimosas but I also made these super cute bloody mary shooters that are the adult equivalent of grilled cheese and tomato soup. I used a spicy bloody mary mix so it had a nice kick but then you take a bite of that crispy mozzarella stick to cool down your mouth. Just the best combination ever! Plus, how cute are they?!?!

This recipe makes 12 but I recommend you make double from whatever you think you will need. Just trust me on this one. These will disappear!

Bloody Mary Shooters

Note: I made these using 2 ounce shooter glasses. If you use 2 ounce glasses this recipe will make 12 portions. You can find the mozzarella sticks in the freezer section of your local grocery store.

INGREDIENTS
12 mozzarella sticks
14 oz your favorite bloody mary mix
10 oz vodka
celery greens

STEPS

  • Bake the mozzarella sticks per the package instructions.
  • In a pitcher, mix together bloody mary mix and vodka.
  • Distribute the mix evenly among the shot glasses.
  • Garnish with a sprig of celery greens and lay a mozzarella stick across the top.
  • Dip, bite, sip, repeat.
Brunch, Sandwiches

Recipe—Chicken & Waffle Sliders

Chicken & Waffle Sliders

It seems silly writing a post for a recipe that is basically made up of frozen store bought items but this is such a fun and easy dish to prepare for brunch, lunch, or even an appetizer so I just had to share, for a creative idea I suppose more than anything. 😉

I recently made them for a mimosa brunch and everyone loved them! Who doesn’t love the sweet and salty combination of a classic comfort dish in bite size portions?!? You can certainly make these from scratch, and I will probably try sometime soon, but it would obviously be far more work and you would end up having way more dirty dishes. Having such an easy dish allows you to focus more attention to preparing other items or even enjoying an extra mimosa or three.

Note: A box of Eggo Minis Waffles has 10 waffles and each one is divided up into 4 mini waffles for a total of 40 mini waffles which will yield 20 sliders.

INGREDIENTS
20 frozen chicken nuggets
box of frozen Eggo Minis Waffles
20 blackberries
20 toothpicks
1/2 c maple syrup

STEPS

  • Bake chicken nuggets per package instructions.
  • Toast the Eggo waffles per package instructions.
  • As the waffles finish toasting separate them into the 4 mini waffles.
  • Sandwich a chicken nugget between two waffles.
  • Skewer a blackberry with a toothpick and then the secure the waffle slider.
  • Drizzle with maple syrup.
Appetizers

Recipe—Steak & Goat Cheese Crostini with Pesto

Steak and Goat Cheese Crostini with Pesto

Last weekend I hosted a wine tasting party, which is so much fun by the way! Each person brought an appetizer and a bottle of wine so it was minimal preparation required on my part and didn’t break the bank. Thanks to all my amazing friends that came if you are reading this! It was such a blast! We had a total of 13 bottles of wine and an amazing spread of food.

Since I was holding the party around dinner time I knew I needed an appetizer that was hearty and filling. Steak came to mind since it would pair so nicely with a good hearty red blend. These appetizers may look very simple but the flavors were so amazing. The goat cheese is whipped together with cream cheese, olive oil, and red pepper so it is creamy and smooth with a mild kick. I was able to prepare everything earlier in the day and then assemble right before anyone arrived. And let me tell you, they were pretty darn popular among the ladies.

Steak and Goat Cheese Crostini with Pesto

Note: These can be served hot or cold. I served them cold for the sake of convenience. I was able to do all the prep in the morning, stored the cooked steak and goat cheese spread in the fridge, and put the toasted crostini in an unsealed Ziploc bag. I then assembled them right before the party.

INGREDIENTS
1 baguette, cut into 1/4 slices
10–12 ounce New York strip steak
4 oz goat cheese, softened
4 oz cream cheese, softened
1/2 tsp red pepper flakes
olive oil
salt & pepper
chili powder
garlic powder
1/2 c pesto

STEPS

  • Preheat the oven to 425º.
  • Place the baguette slices on a parchment paper lined baking sheets.
  • Brush each slice with olive oil and season with a light sprinkle of salt. Flip each slice over and repeat.
  • Toast the baguette slices for 12–15 minutes or until they are a nice golden brown.
  • While the baguette slices are toasting, season both sides of the steak with salt, pepper, a sprinkle of chili powder, and garlic powder.
  • Heat a tablespoon of olive oil in a skillet over medium high heat and add the steak.
  • Cook the steak for 4–6 minutes, flip, and continue to cook for an additional 4–6 minutes.
  • Remove the steak from the pan and allow it to sit for 10 minutes.
  • While the steak is resting, use a hand mixer to whip together the goat cheese, cream cheese, red pepper flakes, and two tablespoons of olive oil.
  • Thinly slice the steak and set aside.
  • To assemble, spread about one teaspoon of the whipped goat cheese on a slice of toasted bread, top with a slice of steak, and a dollop of pesto.
  • Enjoy!


Recipe adapted from Domesticate Me.

Snacks, Sweet Treats

Recipe—Churro Chex Mix

Churro Snack Mix

Cinco de Mayo is right around the corner and I have the perfect and fun sweet treat for you! This is a festive twist on the original Chex Muddy Buddies. The first time I made this was for a Cinco de Mayo party my son was attending and we were put on dessert duty. I instantly thought of churros but that was going to be way too much work for 20+ kids.

Churro Snack Mix

While nothing can replace the deliciousness of a freshly fried churro this snack mix certainly helps to satisfy that craving. The cereal maintains a nice crunchiness and then you have this delicious and creamy coating and a nice dusting of sugar and cinnamon. I will warn you though, it can be highly addictive! Perfect for your snacking pleasure.

Churro Snack Mix

INGREDIENTS
9 c corn Chex
1 (10 oz) bag Hershey’s cinnamon chips
1/2 c butter
1 c powdered sugar
2 tbsp cinnamon
1 c sugar

STEPS

  • Place the Chex cereal in large mixing bowl.
  • In a Ziploc bag, combine the powdered sugar and cinnamon.
  • In a microwave safe bowl, heat the cinnamon chips and butter at 50% power for one minute and stir.
  • Continue to heat at 50% power in 30 second intervals stirring in between each, until the mixture is all melted and smooth.
  • Drizzle the melted cinnamon chip mixture over the cereal and stir to coat.
  • Add the powdered sugar mixture and stir to coat.
  • Lastly, stir in the sugar until all the cereal is well coated.
  • Cover a large baking sheet or cutting board with wax paper and spread out all the coated cereal to cool.


Adapted from Sunny Days with My Loves.

Appetizers

Recipe—Spicy Black Bean Dip

I might as well take on the title as Queen of Appetizers. It’s just what I do. I personally just love appetizers and finger foods and no party is complete without a nice spread. When it comes to throwing a party a good dip is a must on the appetizer menu. There is no need to spend hours slaving away in the kitchen to come up with something everyone will love. This recipe literally takes five minutes to make and is so easy! You spend more time measuring out the seasonings than anything else. Just toss it all in the blender and voila! You have a delicious bean dip ready to serve!

The flavors in this dip are amazing. It might look sort of blah but then you take one bite and zap, bing, bang! Flavor explosions happening right in your mouth! You have a nice kick from the jalapeños, a little zest from the lime and lots of other great flavors from all the seasonings. The first time I made this I was (no joke) licking it off the rubber spatula. This is great at room temperature, warm, or even right out of the fridge. Talk about diverse! Next time you are throwing or attending a party make this recipe. You will have lots of people asking for the recipe. No need to tell them it took less than five minutes to make. That can be our little secret.

INGREDIENTS
2 large cloves of garlic
1 jalapeño, deseeded, deveined, and chopped
1/2 c fresh cilantro
1 (15 oz) cans black beans, rinsed and drained
2 tsp cumin
1 1/2 tsp garlic salt
1/2 tsp chili powder
1/4 tsp dried oregano
1/4 tsp black pepper, ground
1 1/2 tbsp lime juice
1 tbsp balsamic vinegar
water

GARNISHES
cotija cheese, crumbled
a couple of slices of fresh jalapeño

STEPS

  • Place all of the main ingredients except the water into the blender or food processor and blend until well mixed.
  • Add 4 tablespoons of water and continue blending until nice and smooth. If necessary, continue adding water 2 tablespoons at a time until it reaches the desired consistency.
  • Transfer to a bowl and garnish with some crumbled cotija cheese and slices of fresh jalapeños.
  • Enjoy with some tortilla chips now or place in fridge until ready to serve.
Sweet Treats

Recipe—Mini Key Lime Pies

I have never eaten nor have I ever made key lime pie. However, I always think it looks beautiful and absolutely delicious! You may recall in one of my last posts that I mentioned for Easter I went with a tea party theme and did small bites. I wanted something very festive so I decided to finally wing it and do something totally different. I ended up with the cutest and most delectable little key lime pies. They were amazing! They were perfectly tart and had just the right amount of creaminess. And they were just so cute! If you follow my lead and get the premade crusts and whip cream this recipe takes no longer than 3 minutes to make and 15 minutes to bake. Who doesn’t have time for that? With summer warming up this really is the perfect refreshing dessert to enjoy on a warm day.

Note: I opted to make mini pies but you can just as easily make one big pie with this recipe. Adjust the baking time to 23–25 minutes.

INGREDIENTS
12 mini graham cracker pie crusts (I found Keebler ones in the baking aisle)
4 egg yolks
3/4 c key lime juice
zest from one lime
14 oz can sweetened condensed milk
1/2 c sour cream
whipped cream
1 lime sliced and then cut into quarters (optional)

STEPS

  • Preheat oven to 350º.
  • In a medium bowl combine the egg yolks, lime juice, zest, condensed milk, and sour cream and whisk until well smooth.
  • Place the pie crusts on a large baking sheet and top off each with the filling.
  • Bake pies for 18–20 minutes and allow to cool before moving to the refrigerator.
  • Chill the pies in the refrigerator for at least 3 hours before serving.
  • When ready to serve top each pie with a dollop of whip cream and a little slice of lime.
  • Enjoy! (And good luck eating just one!)
Appetizers

Recipe—Herbed Cucumber Bites

I have been wanting to host a tea party type of event and this year Easter was the perfect occasion. We were just having a couple of people over so I did all sorts of small bites. So fun and classy! The cucumber rounds were one of my faves! They were so light and refreshing and reminded me of the typical cucumber sandwiches you would have at a tea party, minus the rye bread. These are definitely the perfect snack for bridal showers, baby showers, or an afternoon tea.

INGREDIENTS
8 oz block of cream cheese, softened
1/4 c fresh dill (or 1 tbsp dried)
2 tbsp dill pickle juice (just the stuff form the jar)
3/4 tsp onion powder
1/2 tsp garlic powder
pepper
1 green onion, finely chopped
1 cucumber, sliced
parsley to garnish (optional)

STEPS

  • In a medium bowl beat together the cream cheese, dill, pickle juice, onion powder, garlic powder, pepper, and green onion until smooth.
  • Transfer the mixture to a pastry bag or a Ziploc bag.
  • Pipe the herbed cream cheese mixture onto each cucumber round.
  • Garnish each cucumber with a sprig of parsley on top.
  • Serve immediately or cover and store in the fridge until ready to enjoy.
Appetizers, Kitchen Tips

Kitchen Tip—Fun Individual Veggie and Dip Cups

Back in December I threw a little party for my son. We invited over a couple of his closest friends. Keep in mind this was a group of 4–5 year olds. I wanted to have kid friendly food that they would enjoy. I made mini burgers, little fruit kabobs with marshmallows, a fun neon green punch, and a couple of other things. Now being a mom who insists on a balanced meal I knew I needed to get some veggies in there. I wanted to do something different so that the kids would actually want to eat them. So here you have Individual Veggie and Dip Cups!

The kids thought they were awesome! They loved having their own little cups. I bought a pack of these small plastic cups at a local party store, did a little squirt of ranch in the bottom and added in sliced carrots, cucumbers, and celery. How great, right?!?! Not only were these fun to eat but it also prevents the kids from double dipping. Have you ever watched kids go to town on a table of appetizers? They will bite and dip and repeat. Heck, I have even caught adults doing that! So regardless of the age of your party guests this is a fun and great way to serve veggies as an appetizer. A crowd pleaser for all ages!

If you like this idea you should check out this one too!

Pre-Scooped Ice Cream—A Party Time Saver