Snacks, Sweet Treats

Recipe—Churro Chex Mix

Churro Snack Mix

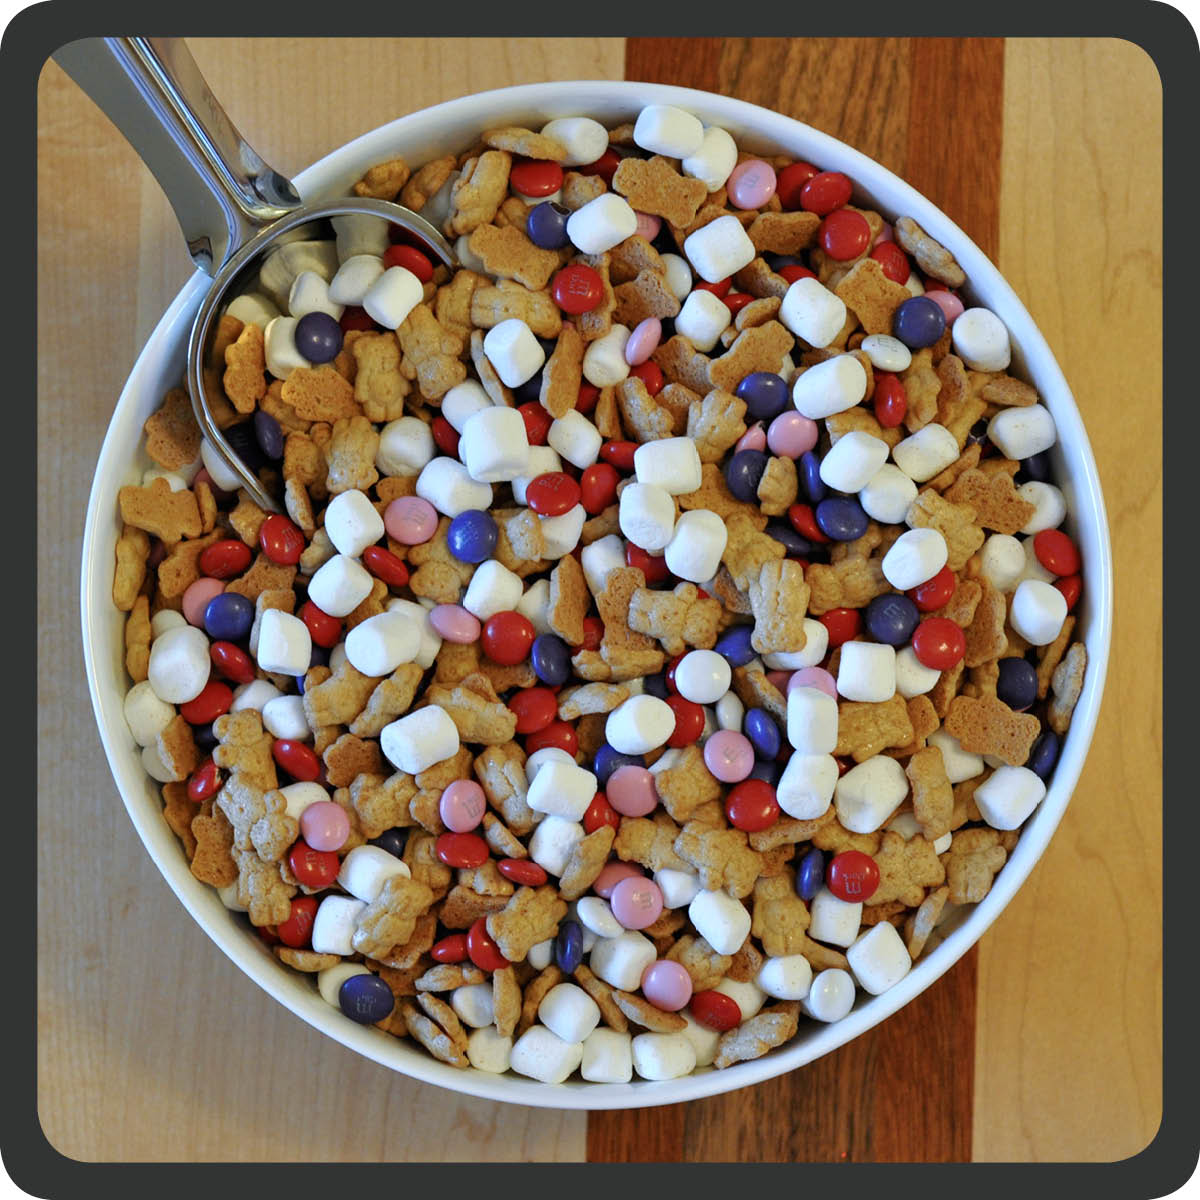
Cinco de Mayo is right around the corner and I have the perfect and fun sweet treat for you! This is a festive twist on the original Chex Muddy Buddies. The first time I made this was for a Cinco de Mayo party my son was attending and we were put on dessert duty. I instantly thought of churros but that was going to be way too much work for 20+ kids.

Churro Snack Mix

While nothing can replace the deliciousness of a freshly fried churro this snack mix certainly helps to satisfy that craving. The cereal maintains a nice crunchiness and then you have this delicious and creamy coating and a nice dusting of sugar and cinnamon. I will warn you though, it can be highly addictive! Perfect for your snacking pleasure.

Churro Snack Mix

INGREDIENTS
9 c corn Chex
1 (10 oz) bag Hershey’s cinnamon chips
1/2 c butter
1 c powdered sugar
2 tbsp cinnamon
1 c sugar

STEPS

  • Place the Chex cereal in large mixing bowl.
  • In a Ziploc bag, combine the powdered sugar and cinnamon.
  • In a microwave safe bowl, heat the cinnamon chips and butter at 50% power for one minute and stir.
  • Continue to heat at 50% power in 30 second intervals stirring in between each, until the mixture is all melted and smooth.
  • Drizzle the melted cinnamon chip mixture over the cereal and stir to coat.
  • Add the powdered sugar mixture and stir to coat.
  • Lastly, stir in the sugar until all the cereal is well coated.
  • Cover a large baking sheet or cutting board with wax paper and spread out all the coated cereal to cool.


Adapted from Sunny Days with My Loves.

Advertisement
Brunch, Sweet Treats

Recipe—Pistachio Bread

When it comes to the classic Jell-O one of my favorite flavors has always been pistachio. I know, I’m kind of a freak. Don’t get me wrong, I love chocolate but there is just something about the pistachio that is pretty fabulous too. When I saw this recipe for pistachio bread that called for my favorite tasty green pudding I knew I had to give it a try. I served this bread as a brunch item but with it’s cake base it could easily be a dessert. It ended up super moist, fluffy, and had just the right amount of nutty pistachio flavor. My four-year-old son got a kick out of making and eating green bread. It is so easy to make that I recommend putting the kiddos in the kitchen and letting them help. Such a fun recipe to make together!

INGREDIENTS
15 oz box yellow cake mix
3 eggs
1/4 c oil
3/4 c water
3.4 oz package instant pistachio Jell-O pudding, unprepared
1 c sour cream
10 drops green food coloring
1 tsp almond extract
1/2 c pistachios or pecans, chopped

STEPS

  • Preheat oven to 350º.
  • Grease two bread loaf pans.
  • Mix together all ingredients in a large bowl until well combined.
  • Divide the batter among the two loaf pans.
  • Bake for 40-45 minutes or until a toothpick comes out clean when inserted.
  • Cool 10 minutes and remove from bread pans.
  • Allow to cool an additional 15 minutes or more before slicing.
Appetizers, Snacks

Recipe—Off the Chain Cheddar Crackers

INGREDIENTS
3/4 c sharp cheddar cheese, shredded
1/2 c butter, softened
1 c flour
1/2 tsp salt
dash of paprika

STEPS

  • Combine all ingredients in a bowl and mix thoroughly.
  • Cover and refrigerate dough for 45 minutes.
  • Preheat oven to 375º.
  • Shape the dough into 1″ balls and place a couple of inches apart on a parchment paper lined baking sheet.
  • Press down with a fork leaving hatch marks on top.
  • Bake for 12–14 minutes or until the edges just start to turn a nice golden color.
  • Leave on baking sheet to cool for 10 minutes.
  • Serve and enjoy!

Note: These crackers will stay fresh in an airtight container for several days.

Recipe adapted from Chef in Training.

Snacks

Recipe—S’More Snack Mix

S’more snack mix please! Last year I made a Valentine’s Day Snack Mix that was a total hit with my followers and also my little man’s little buddies at school. Well it’s that time of year again and I was trying to come up with something fun. All kids love Teddy Grahams so those were a given ingredient. What goes better with graham crackers than M&M’s and marshmallows? This was a no brainer! I had to make s’more snack mix. This is a perfect treat whether or not it’s Valentine’s Day. I’m thinking I will make a big batch for our next summer camping trip (with traditional M&M’s of course). You can just serve it in a large bowl (perfect for a party) ORRRRR you can make your own Valentine’s Day snack bags to pass out!

Last year I had a couple people contact me requesting that I share my valentine snack bag design so that they could print and make their own. This year I thought I would just go ahead and include it right here on my blog. That’s right! You can download a pdf of the cute cards I designed and print and make your own! How fun is that?!? A special homemade bag of snack mix for the kiddos to share with their friends! You’re welcome.

Click to Download PDF

I hope you enjoy this fabulous mix as much as me and my munchkin do! I wish all of my followers a wonderful Valentine’s Day filled with lots of love and happiness.

xoxox
The Diva

Note: This recipe makes enough to fill 24–26 snack size Ziploc bags or 1 large bowl. IF you don’t want to print and trim these on your own just take the pdf file to Kinkos or Staples and they can do the work for you. 😉

INGREDIENTS
3 (8 oz) bags Honey Teddy Grahams
10 oz bag mini marshmallows
2 (12.6) oz bags Valentine’s M&M’s

STEPS

  • Combine all ingredients in a large bowl and mix.

STEPS TO CREATE THE VALENTINE’S DAY SNACK BAGS

  • Make snack mix as directed above.
  • Distribute mix into snack sized ziplock bags.
  • Click on the above picture of the Valentine’s Day tabs.
  • Save the pdf to your computer.
  • Print out however many pages you will need to a heavy card stock.
  • Cut out the valentines along the black trim marks.
  • Fill in the “To” and “From” portion of the valentine.
  • Fold each valentine in half.
  • Staple along the top of the ziploc bag.
  • Wellah!


If you like this recipe, perhaps you will LOVE this!

Appetizers, Side Dishes, Snacks

Recipe—Roasted Carrot Fries

A couple of weeks back we got these GORGEOUS rainbow carrots in our box of organic produce and when my son saw them he honestly didn’t believe me that they were carrots.  They ranged from a deep purple to red and even white. They were just too pretty to get tossed into a salad or cooked any ordinary way. I wanted these to stand on their own. I know I have mentioned in many previous posts that I am always looking for fun and healthy after school snacks for my little man so we decided to make roasted carrot fries. They were awesome! I just sliced, baked, and served them with a little side of ranch (because every 3 year old loves to dip their food in sauce).  These were super quick and a wonderful way to enjoy these rainbow carrots.

INGREDIENTS
4–5 large carrots (I used rainbow carrots)
olive oil for drizzling
salt
ranch for dipping (optional)

STEPS

  • Preheat oven to 425º.
  • Carefully cut the carrots into “fry sized” pieces.
  • Place the carrots on a parchment paper lined baking sheet and drizzle with olive oil.
  • Toss the carrots to coat and season with salt.
  • Bake the carrots for 15–18 minutes or until crisp tender, flipping once halfway through cooking.
  • Remove from oven and transfer to a serving dish or plate.
  • Serve with a side of your favorite dressing or enjoy all on their own.
Snacks, Sweet Treats

Recipe—Funfetti Cake Batter Cookie Dip

Funfetti Cake Batter Cookie Dip

The other day I was going to be attending a pool party for one of my favorite munchkins. I knew there would be plenty of kids there and I wanted to bring a snack that all the kids would love and have fun eating. Well turns out the grownups liked this just as much as the little ones. This cookie dip was a HUGE hit! This is a cream cheese based dip blended with a scoop of dry cake mix giving it the true cake batter flavor. It was delicious! Super creamy and just the right amount of sweet. I’m guessing this will forever be a staple on our party menus.  It would be perfect for a birthday party or any type of social event, and I’m sure it will get people talking. This is by no means healthy, but sometimes you just need to relax and let the kids have a little fun enjoying a special treat. It’s all about moderation after all, not that you will be able to control yourself with this dip. So dive in, let loose, and enjoy this perfect youthful treat! I know you can’t resist.

Note: I served this dip with Nilla wafers but I know it would go great with graham crackers or animal crackers as well.

INGREDIENTS
1/2 c butter
8 oz cream cheese
1/2 c powdered sugar
1 cup dry funfetti cake mix
1 tsp vanilla
1/4–1/2 c milk
1/4 c sprinkles, plus more for garnish

STEPS

  • Melt the butter in the microwave and set aside to cool.
  • In a large mixing bowl beat together the cream cheese, powdered sugar, and cake mix for 2 minutes.
  • Add in vanilla and cooled butter and continue beating for another 2 minutes.
  • Beat in the vanilla and then 1/4 cup of the milk. Add more milk as needed to reach desired consistency.
  • Fold in 1/4 cup of the sprinkles.
  • Transfer the dip to a small bowl for serving and garnish with additional sprinkles. Serve immediately with your favorite dippers or refrigerate until ready to serve. (Note: the dip will get very firm in the fridge so remove it 15–20 minutes before you plan on serving it to allow it to soften.)
Sweet Treats

Recipe—Sugar Cookie Bars

Last month we celebrated my son’s third birthday. I knew I wanted to send him to school with some sort of treats to share with all his friends. Well, his birthday is the day after Valentine’s Day so that week is already pretty hectic for me. I didn’t have tons of time to spend on baking and frosting individual mini-cupcakes like I wanted to. I needed something easy that I could make a lot of, and fast. I stumbled upon a recipe for sugar cookie bars. I knew they would be perfect! They had a cute festive look to them and were so easy to make. They turned out perfect! They were just the right size for a bunch of toddlers and I didn’t have to frost them all individually. These sugar cookie bars are perfect for any occasion. Have fun with different festive colored frostings and sprinkles. (I love sprinkles!)

COOKIE BAR INGREDIENTS
1/2 c butter, softened
1 c sugar
2 eggs
1 tsp vanilla
2 1/2 c flour
1/2 tsp salt
1/4 tsp baking soda

FROSTING INGREDIENTS
1/2 c butter
1/2 tsp vanilla
pinch of salt
2 c powdered sugar
2–3 tbsp milk
food coloring
sprinkles

STEPS

  • Preheat oven to 375º.
  • Using an electric mixer beat together the sugar and butter until fluffy, about 2 minutes.
  • Beat in the eggs and vanilla making sure to mix well.
  • In a separate bowl combine the flour, salt, and baking soda and stir to combine.
  • Gradually mix the dry ingredients into the creamy mixture.
  • Line a xx” x xx” baking dish with parchment paper going both directions.
  • Press the cookie dough into the lined baking dish.
  • Bake for 12–14 minutes.
  • Allow cookie bars to cool completely.
  • Using an electric mixer beat together the butter, vanilla, salt, and powdered sugar until well combined.
  • Gradually add in the milk until your frosting reaches the desired consistency. (If it becomes too runny just add in a bit more powdered sugar.
  • Once your frosting reaches desired consistency beat in the food coloring.
  • Spread the cookie bars with the frosting and top with sprinkles.
  • Place in the refrigerator for 1 hour and use a pizza wheel to cut into squares with ease.

Sweet Treats

Recipe—Peanut Butter & Jelly Bars

Peanut and butter jelly sandwiches are an American classic. I love PB & Js! And by love I mean I REAAAALLLLLLY love them! I ate more peanut butter and jelly sandwiches during my pregnancy than the typical American child does in their first 10 years of life. There is just something so nostalgic about smooth peanut butter squished together with a layer of sweet sticky jelly. It is one of those items that takes me back to being a little girl on the playground. When I saw this recipe for peanut butter and jelly bars I knew they had to be mine! My son’s school had a bake sale coming up and I knew it was the perfect occasion to make these. Come on? Toddlers… peanut butter and jelly… they belong together! These bars turned out fabulous! The cookie layer is almost brownie like, the moistest peanut butter cookie you have ever had and then of course you have the layer of jelly and then just the right amount of crunch from the honey roasted peanuts on top. Superb when served with a big cold glass of milk. I may have a new addiction.

Note: These can be tricky to cut when still warm so be sure to allow for adequate chilling time. Otherwise you may find that the bars sort of crumble.

INGREDIENTS
1 c butter, softened
1 1/2 c sugar
2 eggs
2 1/2 c creamy peanut butter
1 tsp vanilla
3 c flour
1 1/2 tsp salt
1 tsp baking powder
2 c of your favorite jelly (I used Strawberry)
1 c honey roasted peanuts, chopped

STEPS

  • Preheat oven to 350º.
  • In a large mixing bowl beat together the butter and sugar for 2 minutes.
  • Add in the eggs, peanut butter, and vanilla and beat for another 2 minutes making sure it’s completely combined.
  • In another bowl combine the flour, salt, and baking powder.
  • Add the dry ingredients to the wet ones and fold in using a rubber spatula until completely combined.
  • Line a 9” x 13” baking dish with parchment paper going both directions and spray parchment paper with cooking spray.
  • Transfer 2/3 of your dough to the prepared baking dish and spread the dough out evenly.
  • Press the dough down firmly in the bottom of the entire baking dish making sure it’s even thickness all over.
  • Place the jelly in a small microwave safe bowl and warm it in the microwave for 1 minute and stir using a fork (this really seems to help in spreading it out).
  • Using a rubber spatula spread the warmed jelly over the top of the cookie dough making sure the dough is completely covered.
  • Using your hands, crumble the remaining dough over the top of the jelly.
  • Sprinkle the chopped peanuts over the top.
  • Bake until golden, about 50–60 minutes.
  • Remove the pan from the oven and set on a trivet to cool for 30minutes.
  • Holding onto the parchment paper, carefully lift the entire contents of the dish and transfer to a large cutting board.
  • Refrigerate the whole dish for 1–2 hours making sure it is completely cool before trying to cut into bars.
  • After bars have cooled cut into squares using a sharp knife or even a pizza wheel.
  • Store in an airtight container at room temperature.
Snacks

Recipe—Valentine’s Day Snack Mix

If you are on Pinterest then you have probably seen one form or another of “Puppy Chow” snack mixes. (Basically a super sweet treat made from chocolate covered Chex cereal and tossed with other tasty goods.) These snack mixes are popping up everywhere! I saw one the other day for Valentine’s Day that looked super cute. I liked the idea of doing something like this for my son and all his little classmates at school but thought his teacher’s may not appreciate it if I get a classroom full of 2 and 3 year olds all hopped up on sugar. I decided to create this lower sugar version snack mix that is great for people of all ages. Have fun mixing any and all of your favorite bite size snacks!

Note: This recipe makes enough to fill 24–26 snack size Ziploc bags or 1 large bowl.

Here are my final goodie bags. I made some cute tags that I folded in half and stapled over the top.

INGREDIENTS
15.5 oz box Strawberry Frosted Mini Wheats
10 oz box Honey Teddy Grahams
2 c yogurt covered raisins
2 c raspberry yogurt covered pretzels
1 1/2 c dried cranberries
1.25 oz yo’ drops crunchable yogurt

STEPS

  • Combine all ingredients and one large bowl and use a large serving spoon or scoop to mix together gently.
  • Divide mix into snack size bags or serve in one large bowl.
  • Enjoy!

Happy Valentine’s Day!

Dinners

Recipe—Homemade Fish Sticks & Tartar Sauce

The other night I asked my son what he would like for dinner. His reply, an enthusiastic “FISH STICKS!” I was not so enthusiastic. I have never been a fan of the frozen mystery fish sticks you get in your store’s frozen section, I am however a huge fan of good, quality, fresh fish. So I was on a mission to make some out of this world homemade fish sticks. Why not go with one of the best pieces of fish on the market, halibut. These turned out incredible! By far the best fish sticks I have ever had. These were a huge hit not for only my husband and I, but my son loved them. We had a happy family all around. I served them with my macadamia nut rice and some coleslaw. Talk about totally indulgent. We will be making these again very soon.

Note: Halibut filets typically come with a layer of skin on them. Many butchers will remove it for you if you bat your eyes and ask them nicely. So unless you want to remove the skin yourself, see if you can get a butcher to remove the skin from the filet for you. Trust me, it’s worth it.

FISH STICK INGREDIENTS
2 eggs
1 tbsp milk
1 lb halibut filets cut into 1” strips
1 1/2 c panko
1/2 tsp kosher salt
1/2 tsp pepper
1/4 c vegetable oil

TARTAR SAUCE INGREDIENTS
1/4 c sour cream
3 tbsp mayo
2 tbsp sweet pickle relish
2 tsp capers, minced
1/8 tsp salt
1/8 tsp pepper

GARNISH
lemon wedges

STEPS

  • Make tartar sauce by combining all ingredients in a small bowl mixing well. Place tartar sauce in fridge until ready to use.
  • For the fish sticks, whisk together eggs and milk.
  • Add fish strips to the egg wash and gently toss to coat.
  • In a shallow bowl combine panko, salt, and pepper.
  • Remove the fish strips one at a time from the egg wash and coat them in the panko mixture. Set the breaded fish to the side on a cutting board as you finish them.
  • Heat the oil in a large skillet over medium-high heat.
  • Add as many of the fish sticks to the hot oil as you can making sure not to overlap.
  • Cook for 4 minutes turning once to making sure all sides are a golden brown.
  • Remove the fish sticks from the oil as they are done cooking and place on a paper towel lined sheet.
  • Repeat the last 3 steps until all of the fish sticks are done.
  • Serve fish sticks with the tartar sauce and a lemon wedge.