Dinners

Recipe—Bruschetta Chicken

Tomatoes and basil are like an Italian match made in heaven. You can almost guarantee that anything made with those two ingredients will be amazing. One of my favorite ways to bring them together is in a classic bruschetta made up of tomatoes, basil, garlic, and olive oil. So simple but so damn good! Now imagine that fresh bruschetta spooned over a juicy chicken breast smothered in zesty pesto and a layer of melted mozzarella cheese. That my friends, is one hell of a tasty main dish for dinner.

I like to just eat this chicken on it’s own but with the carb monsters I live with, I tend to serve it for them with a side of rice pilaf or over a bed of pasta alfredo. This recipe is so easy to put together, but it looks fancy enough, that you can totally serve it for dinner guests.

BAKED CHICKEN INGREDIENTS
3–4 boneless skinless chicken breast
salt & pepper
1 c pesto
2 c mozzarella, shredded

BRUSCHETTA INGREDIENTS
2 large ripe tomatoes, diced
8–10 basil leaves, chopped
1 tsp garlic, minced
2 tbsp extra virgin olive oil
salt & pepper

STEPS

  • Preheat the oven to 400º.
  • Place the chicken breasts in a lightly greased baking dish and season both sides with salt and pepper.
  • Spread the pesto over the tops of the chicken breasts and sprinkle with the mozzarella cheese.
  • Place the baking dish in the oven and bake for about 25 minutes or until the chicken is cooked completely through and mozzarella is just starting to brown up.
  • While the chicken is cooking, combine all the bruschetta ingredients in a medium bowl and stir to combine.
  • When the chicken is done cooking, transfer them to a plate and finish with a big scoop of that fresh bruschetta.
Sauces

Recipe—Basil Pesto Sauce

If you follow me on Instagram, you have probably seen my backyard pride and joy, my little garden. One of the first springs in our home I had my dad and husband build me this big, beautiful redwood garden box. It has been a couple of years of figuring out what grows good and what doesn’t. Tomatoes, zucchini and pesto thrive during the hot California summer months.  

Well, this year by spry little basil plants turned into full on basil bushes in a matter of a couple of weeks. They were thick, tall, and bushy and I knew they had to be harvested before they went to flower and became bitter and tough. Homemade pesto coming right up!

While I absolutely love store bought pesto nothing beats the freshness of making your own. It can be a little pricey with the cost of pine nuts, quality parmesan, and extra virgin olive oil but it is absolutely worth it! Plus, it is so easy to make. Load all the ingredients in the blender, and blend!

With how much basil I harvested I actually made a massive batch but you certainly don’t need to make that much at a time unless you are sitting on a big basil harvest yourself. The recipe below is written for a single batch.

One thing that is really great about pesto is that it freezes great! I proportion it out into larger containers for pasta dinners and then smaller containers that work great for pizza sauce like when I make my Shrimp Pesto Pizza

What makes my pesto unique is I like to add some fresh lemon juice to the mix. I find it helps serve as a natural preservative, gives it a great flavor, and also helps to keep the vibrant green color.

INGREDIENTS
2 c basil leaves, packed
3/4 c parmesan cheese, shredded
1 c extra virgin olive oil
1/2 c pine nuts
3 cloves garlic
juice from one lemon
1/2 tsp salt
1/4 pepper

STEPS

  • Combine all the ingredients in the blender and blend string periodically if needed.
  • Add additional olive oil if you need more liquid to blend.
Sweet Treats

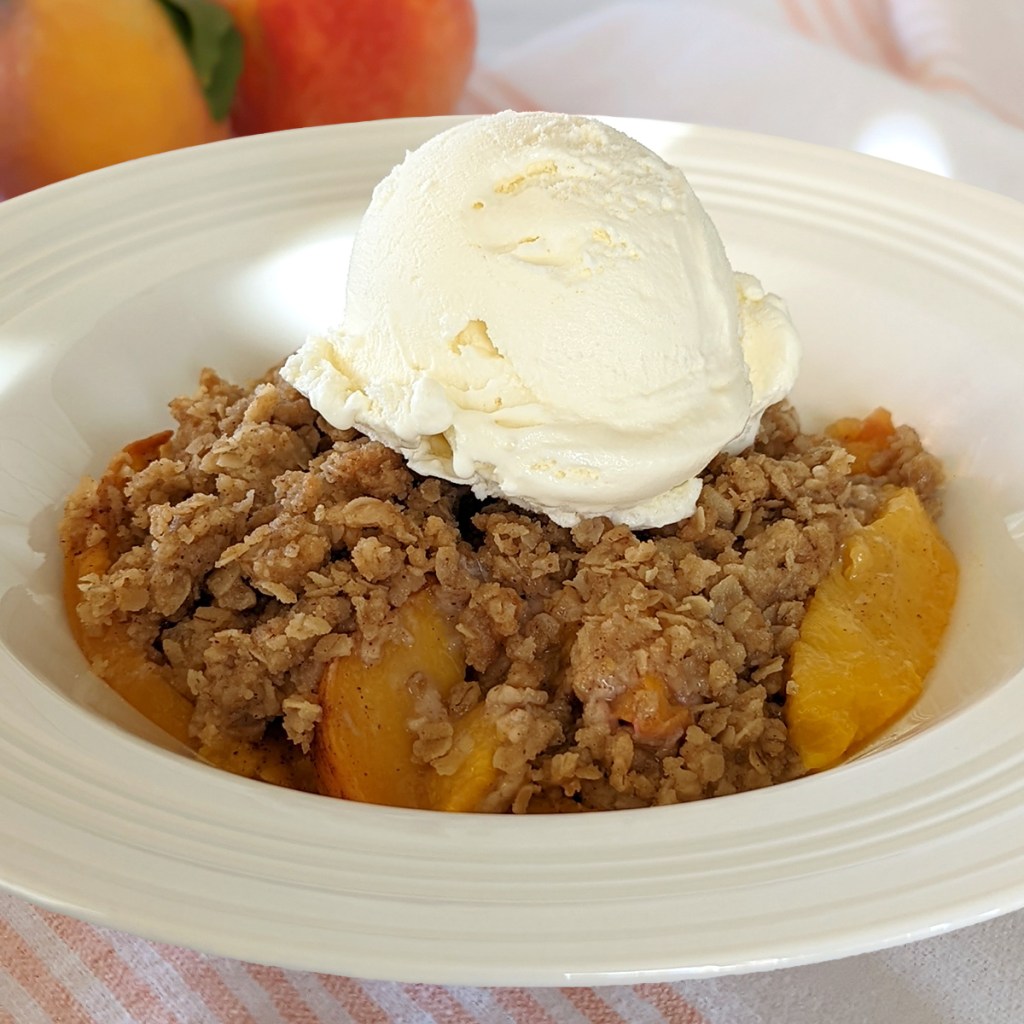
Recipe—Peach Crisp

Peach Crisp

Okay, so I am on a total peach kick here. Hopefully you didn’t miss the recipe I posted last week for Peach Margaritas. I am still recovering from those! 

Now, in my opinion, the peach is the epitome of summer fruit. I just love that this time of year when I walk into the produce section or I’m at the farmers market, I get hit with a wall of the sweet sweet smell of stone fruit. Peaches, apricots, nectarines! Yum! There is just something about that sweet fleshy fruit that is so good anyway you have them.

Now when it comes to baking with peaches, I am all about a homecooked peach crisp, not a cobbler. When cooked, peaches get super soft so I like that sweet oatmeal baked to a nice crisp on top with a little bit of cinnamon. This is such a simple recipe, and you just can’t beat it hot out of the oven with a scoop of vanilla ice cream. I could eat it for breakfast, lunch, dinner, and dessert. Trust me, you will want to too!

Note: As much as I love using fresh peaches in my crisp, I want to be able to have peach crisp year round and you can really only get good quality peaches during the summer. So, with that said, I give you permission to substitute canned or frozen peaches in this recipe. If you want to use canned, make sure to completely drain them and if you use frozen, add 10 minutes to the cooking time. 

PEACH FILLING INGREDIENTS
6–8 peaches, sliced
2 tablespoons butter, melted
1/2 tsp cinnamon
2 tbsp cornstarch

CRISP INGREDIENTS
1/2 c old fashioned oats
1 c flour
1/2 tsp cinnamon
3/4 c butter, softened

STEPS

  • Preheat oven to 350º.
  • In a large bowl combine all the filling ingredients and gently fold making sure not to pulverize the peaches.
  • Transferthe fruit mixture to the bottom of a greased 13” x 9” baking dish and evenly spread out. 
  • In that same bowl, mix together the oats, flour, and cinnamon.
  • Add the softened butter to the oat mix and using your hands, or a large electric mixer with a paddle, combine everything until it is all evenly mixed and nice and crumbly. 
  • Distribute the oatmeal topping over the top of your fruit. (It is okay if it is all rough and crumbly. Do not push or pat it down.)
  • Bake uncovered for 30–35 minutes. 
  • Remove from oven and allow it to cool for 10 minutes. 
  • Serve in bowls topped with vanilla ice cream or whip cream.
Beverages

Recipe—Peach Margarita

When we bought our house 7 years ago, the backyard was a bare lot. I told my husband right off the bat that if we plant any trees in the backyard, they have to produce fruit. I don’t want to water something unless it provides more than shade. So over the years we have planted a lemon tree, lime tree, apricot tree, and a peach tree. This year the peach tree has produced more than ever before so I have been enjoying coming up with new recipes to try.

Now if you know me, you know I love a margarita and something I have found through the years is that you can make a margarita with pretty much any fruit. I’ve posted recipes for Grapefruit Margaritas, Mango Margaritas, and more recently a Watermelon Margarita. So why not a peach margarita!

The peach schnapps in this recipe replace the typical triple sec in a margarita and really gives it that peachy flavor. Perfect for a warm summer day!

Notes: This recipe makes two margaritas. I doubled the recipe and put the margaritas in a carafe so I could enjoy a couple poolside. If you like a frozen blended margarita, use two cups frozen peaches instead of fresh and then also add in about a cup of ice. 

INGREDIENTS
2 peaches, peeled and pit removed
4 oz silver tequila
2 oz peach schnapps
2 oz lime juice
lime wedges (optional)
tajin or salt for the rim (optional)

STEPS

  • Add the prepared peach to a blender or food processor and blend fully, you want it nice and smooth.
  • Pour some tajin or salt on a small plate. 
  • Rub a lime wedge around the rim of two glasses and dip the glasses into the tajin or salt to coat.  
  • In a drink shaker, combine the peach puree, tequila, schnapps, lime juice, and ice and shake well.
  • Pour the margarita into the prepared glasses over ice. 
  • Garnish with a lime.
  • Put your feet up, sit back, and enjoy!
Salads, Side Dishes

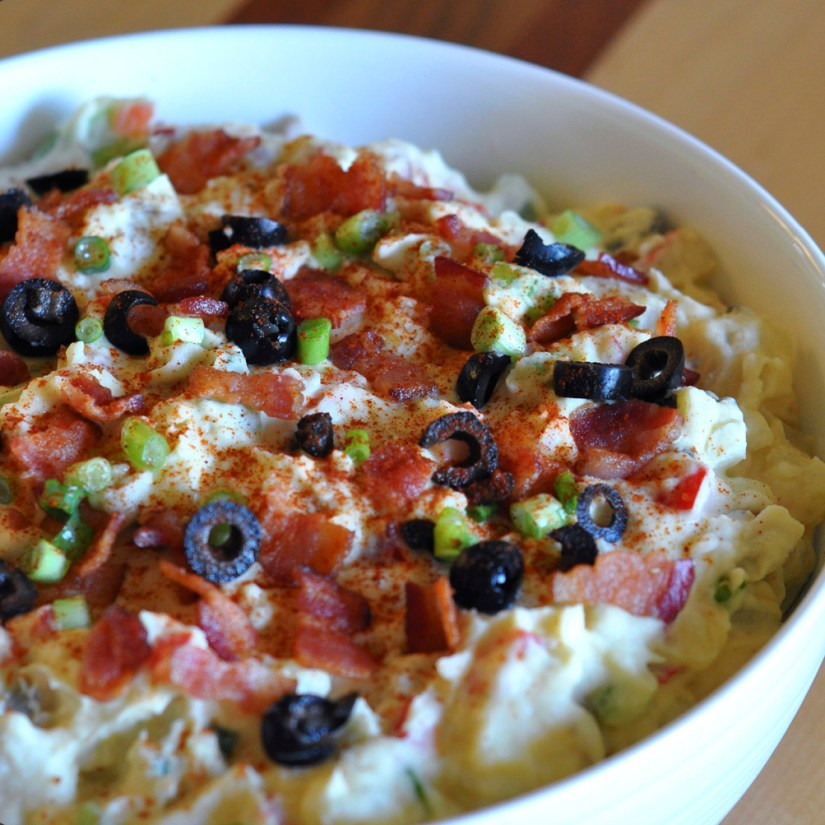
Recipe—Red, White, & Blue Potato Salad

Hello grilling season! It is great to have you back in my life! (And all of you amazing followers too!) Nothing says summer like lazy days with friends, sun shining on your skin, hot grilled meat, and some tasty side salads! 

With 4th of July just around the corner it feels like the perfect time to share one of my favorite summer side dish recipes with y’all. This Red White and Blue Potato salad is packed with all my favorite flavors and by favorite flavors, I mean bacon and blue cheese. 

This salad is an amazing complement to any bbq dish, but we especially love it with a nice steak and some red wine. Just something about the way all those flavors come together is top notch. *chef’s kiss*

Note: I like to set aside some of the bacon, blue cheese crumbles, and green onions to garnish the top of the salad with.

INGREDIENTS
3 lbs baby red potatoes, chopped into 3/4” cubes
1/2 cup mayonnaise
1/2 cup sour cream
1/2 tsp dill
1/2 tsp salt  
1/4 tsp ground mustard 
1/2 tsp onion powder  
8 slices bacon, cooked and chopped
3/4 c blue cheese
1/2 c green onion, sliced

STEPS

  • Place the chopped potatoes into a large pot and cover with water. 
  • Bring to a boil and cook for approximately 12–15 minutes, or until the potatoes are soft and tender.
  • Drain the potatoes and transfer them into a large bowl and allow to cool for 30 minutes. 
  • In a medium bowl mix together the mayonnaise, sour cream, dill, salt, ground mustard, and onion powder. 
  • Add the bacon, blue cheese, and green onion to the bowl with the potatoes. 
  • Pour the dressing over the top of the potatoes and other ingredients and stir to combine.
  • Cover and chill for at least 2 hours before serving. 

Here are some other amazing summer side dishes to try out!

Appetizers, Sauces

Recipe—Salsa Fresca

Last year in my garden we were harvesting more tomatoes than we knew what to do with! We were having Panzanella Salad and Marinated Tomatoes almost every week. Once my jalapenos came in, I was all about that fresh salsa! Who doesn’t love that fresh salsa flavor!? Store bought salsa just does not compare.

This recipe is pretty much goof proof. You just add all the ingredients to the blender and blend. Yes, it really is that simple!

Just serve up with a side of some crispy salty tortilla chips or along with your favorite tacos or burritos. 

Note: If you over blend your salsa, it can become sort of frothy. If this happens, just cover and store in the fridge for a couple of hours and it should settle. Fresh salsa can last in the fridge covered for up to two weeks. The flavors get better and better with time.

INGREDIENTS
1/4 white onion 
2 tsp garlic, minced
1 jalapeno 
4–6 medium sized tomatoes
1/4 tsp salt
1/4 tsp ground cumin
1/2 c fresh cilantro leaves
juice from 1 lime
pinch of sugar (optional, to balance the acidity of the tomatoes)

STEPS

  • Add the onion, garlic, and jalapeno to a food processor or blender and pulse a few times to chop.
  • Add all the remaining ingredients to the blender and blend to desired consistency. 
  • Refrigerate for 30 minutes to allow the flavors to really come together. (Optional)

This salsa goes great with the following recipes:

Salads, Side Dishes

Recipe—Creamy Dill Red Potato Salad

Summer is upon us! Well not quite, but we are so close! I can literally smell it! The smell of grilled meat has infiltrated the warm evening air in my subdivision and I am itching for a good ol’ fashioned cookout.

One thing I absolutely love about summer BBQs are all the cold salads. Macaroni salads, potato salads, mmmmmmm… mmmm… mmmm! (I really should not write these posts when I am hungry because right now, I am salivating just thinking back to this potato salad.)

I have a go to potato salad that is loaded with bacon, olives, bell peppers, onions, and so much more and it is amazing, but sometimes I am looking to mix it up with something a little more simple and lighter. 

The red potatoes really come out fluffy and then the super creamy dressing is a little tangy from the vinegar and sour cream and then you have this delicious dill flavor. So simple and so lite. Perfect for these warm summer days!

INGREDIENTS
8 large red potatoes, diced
1 c sour cream
1 c mayonnaise
1/2 c red wine vinegar
1 1/2 tsp dill
salt and pepper
4 green onions, chopped

STEPS

  • Add 1–2 tablespoon of salt to a large pot of water and bring to a boil.
  • Add the diced potatoes and boil for 10–14 minutes or until fork tender.
  • While the potatoes are boiling whisk together the sour cream, mayonnaise, vinegar, dill, salt and pepper in a small bowl.
  • When the potatoes are done cooking drain them in a colander and transfer to a large bowl.
  • Add most of the green onions (saving a handful for garnish) and dressing and toss to coat. 
  • Garnish with the leftover green onions and a little bit of the dill.
  • Cover with a lid or saran wrap and refrigerate for at least 4 hours. The longer it rests, the better the flavors.

If you like this recipe, then I highly recommend you check out these other awesome salads that make for great additions to your BBQ menu!

Italian Pasta Salad

Italian Pasta Salad

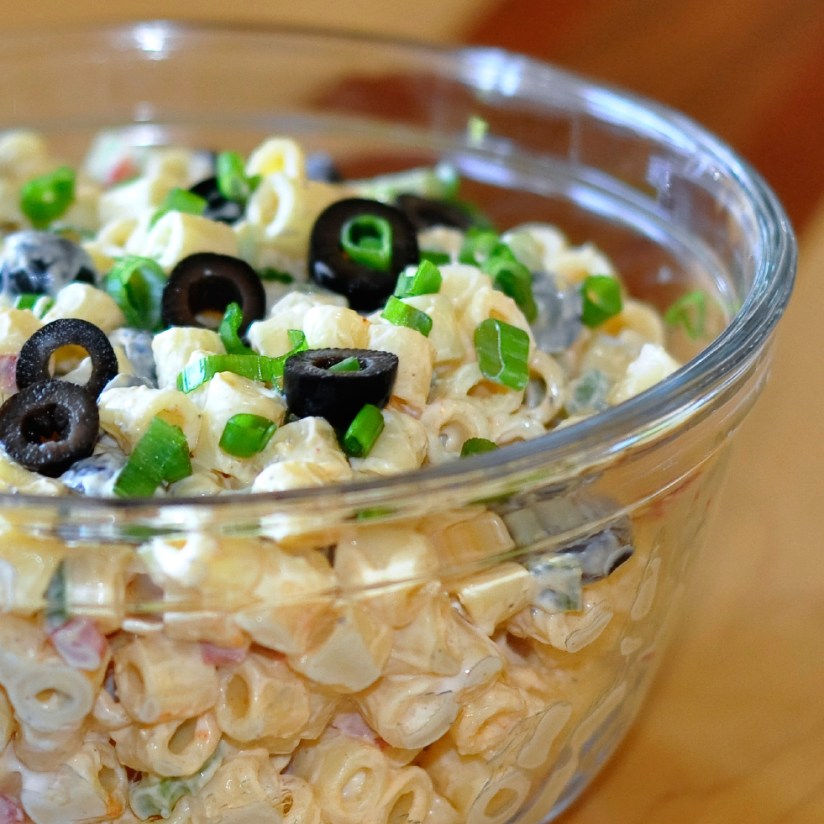
Classic Macaroni Salad

Classic Macaroni Salad

Orzo Pesto Pasta

Orzo Pesto Pasta

Dinners

Recipe—Grilled Hawaiian Sticky Chicken & Pineapple

Grilled Hawaiian Chicken & Pineapple

Aloha! Summer is coming to a close and most vacations are currently on hold. So if you can’t get to a tropical island, then let’s bring the island life to you!

Back in April when we were about a month into sheltering in place at home, my family and I came up with an idea to do a weekly family theme night. We were doing them every Friday just so we had something fun to look forward to at the end of the week. The first one we did was a Tropical Beach Party. The primary focus of our theme nights was our menu but we found lots of other fun details to incorporate. We ended up watching Lilo and Stitch while sprawled out on beach towels on our living room floor.

For this specific dinner I made my Grilled Hawaiian Sticky Chicken and Pineapple. It was so good! The key is definitely marinating the chicken for the entire day to really let all those flavors soak into the meat. You get this delicious combination of salty, sweet, and smoky. Cooking it low and slow on the grill gives the chicken and pineapple a nice caramelized exterior and then you brush them with honey at the end so you end up with this sweet sticky exterior that brings out so much flavor. The pineapple manages to get even sweeter and even picks up a bit of a smoky flavor from the grill. My mouth is literally watering just thinking about it. I served it up with some of my Tropical Macadamia Nut Ricewhich is packed with island flavors of toasted coconut and macadamia nuts. If you really want to take this meal to the next level then break out the blender and try my Best Ever Piña Coladas. So, for now, home may not be as good as Hawaii but at least with this meal, the only thing you will be missing is the sand between your toes.

Grilled Hawaiian Chicken & Pineapple

Note: The trick with grilling this recipe to is to do it over a lower indirect heat and making sure not to have it directly over the heat source. The glaze can easily burn if you try and cook it hot and fast. If you are not the grilling type then you can absolutely cook it in a pan on the stove top.

INGREDIENTS
4 chicken breasts
1/4 c pineapple juice
1/4 c soy sauce
1/4 c brown sugar
3 tbsp ketchup
1 tbsp garlic, minced
2 tbsp olive oil
fresh pineapple, cut into long spears
1/4 c honey
green onions, chopped

STEPS

  • In a small bowl whisk together the pineapple juice, soy sauce, brown sugar, ketchup, garlic, and olive oil.
  • Place the chicken and marinade in a large Ziploc bag and mix to ensure all the chicken breasts get covered with the marinade.
  • Marinade in the refrigerator for 2–24 hours.
    About 30 minutes before cooking, remove the marinated chicken from the bag and place in a shallow dish. Allow the chicken to rest at room temperature for about 30 minutes before grilling.
  • Preheat the grill to 350º.
  • Add the chicken to the grill making sure you cook it over indirect heat. (See above note.)
  • Cook the chicken for 7–10 minutes per side or until the internal temperature reaches 160º.
  • During the last 10 minutes of the chicken cooking, add the pineapple spears to the grill also making sure to cook it over indirect heat.
  • Turn the pineapple every 2–3 minutes making sure to get some nice grill marks on them.
  • When the chicken and pineapple are done, transfer them to a serving dish and lightly brush with the honey, and sprinkle with the green onions.
Beverages

Recipe—Strawberry Sangria

Recipe—Strawberry Sangria

We have had a hot streak out here in California with every day last week being over 100º and being that it is strawberry season I figured it was time to whip up a batch of refreshing sangria using some of my favorite seasonal fruit! This sangria is so perfect for sipping on in this summer sun. It is light, refreshing, and ridiculously easy to make! You just stir together a bottle of wine, some silver rum, a little sugar, and a splash seltzer. You can certainly make it and drink it right away but I like to let mine sit in the fridge for about an hour so that the wine really takes on those strawberry flavors. Mmmm…mmm… tastes like summer in a glass!Recipe—Strawberry Sangria

And if you like this recipe then be sure to also check out my Red Wine Sangria or Summertime White Sangria.

Notes: 

  • If you are watching your carbs or don’t like drinks that are too sweet, feel free to leave out the sugar all together. I made it that way the other day and it was still delicious! You get lots of natural sweetness from the fruity wine and fresh strawberries.
  • For the white wine I used Pomelo’s sauvignon blanc (one of my favorite summer wines). It has a nice refreshing grapefruit flavor. Anything with citrus notes will give you wonderful results. I recommend using a pinot grigio, rosé, or sauvignon blanc for this recipe. Something fruity and light.

INGREDIENTS
750 ml bottle of sauvignon blanc (see above note)
1/3 c silver rum
1/4 c sugar
1 lemon, sliced
2 c fresh strawberries, sliced
1 1/2 c seltzer

STEPS

  • Pour the wine, rum, and sugar into a large pitcher.
  • Stir until the sugar is dissolved.
  • Add the sliced lemons and strawberries to the pitcher and refrigerate until ready to serve.
  • Add the seltzer right before serving.
  • Pour over ice and enjoy!


Sweet Treats

Recipe—Peach Mousse

Peach Mousse
A couple of weeks ago, I did my first ever live cooking demo on Instagram. I shared my recipes for a delicious Italian Chicken Dinner and easy Cannoli Dip. This cooking demo was part of a summer event series hosted by Sac State UNIQUE Programs. They typically host local bands for their Nooners (noon-time events), so I was really excited to share a couple of recipes! UNIQUE Programs also had Carly Preston of Adventures In Yum do a live cooking demo at the beginning of July. Carly and I thought it would be fun to partner up as guest bloggers for a little recipe swap since we both have so many amazing recipes to share with our followers. She has been posting recipes since summer of 2019 and she has a lot of great posts on her site, especially desserts! Seriously, she is the dessert queen! Make sure you go check out Adventures In Yum!

Today she is sharing with you all her recipe for Peach Mousse. Look at how beautiful and fluffy it looks! And you know I am all about using seasonal produce and since it is stone fruit season this seems perfect! Just add a refreshing drink like my Summertime White Sangria and enjoy the refreshing flavors of summer.

I present to you, a recipe for Peach Mousse from Adventures In Yum!

Peach Mousse

Happy Stone Fruit Season! With peaches, nectarines, and plums being plentiful during this time of year, I love to create at least a couple of fun desserts every year with these flavorful summer fruits.

Peaches are one of my go-to summer fruits when making desserts. When I think about them, I always think of peach cobbler. Last year I made a couple of yummy treats inspired by this classic dessert, so if you love peach cobbler, I highly recommend checking out my Peach Cobbler Cupcakes and my Boozy Peach Cobbler Milkshakes. Both will give you the flavors of peach cobbler, but in fun and different ways.

When thinking about what peach dessert to make this year, I wanted to make something that was very light. An airy, no-bake dessert is the perfect treat for this time of year! The result? My peach mousse! I first tested this recipe last year when I decided to make a peach cobbler inspired dessert in the shape of a peach. The mousse was the outermost layer of the peach, and it offered a lighter texture compared to the “peach pit” made of peach curd and peach compote. All three layers of peach plus the streusel topping “gravel” gave all the flavor of a peach cobbler, but in a light and refreshing take on the traditional dessert.

Finishing this yummy mousse with a dollop of whipped cream and/or some crunchy streusel topping is a great way to add a delicious depth of flavor and a great textural component. The flavors will remind you of peach cobbler, but the components will result in a lovely, light treat.
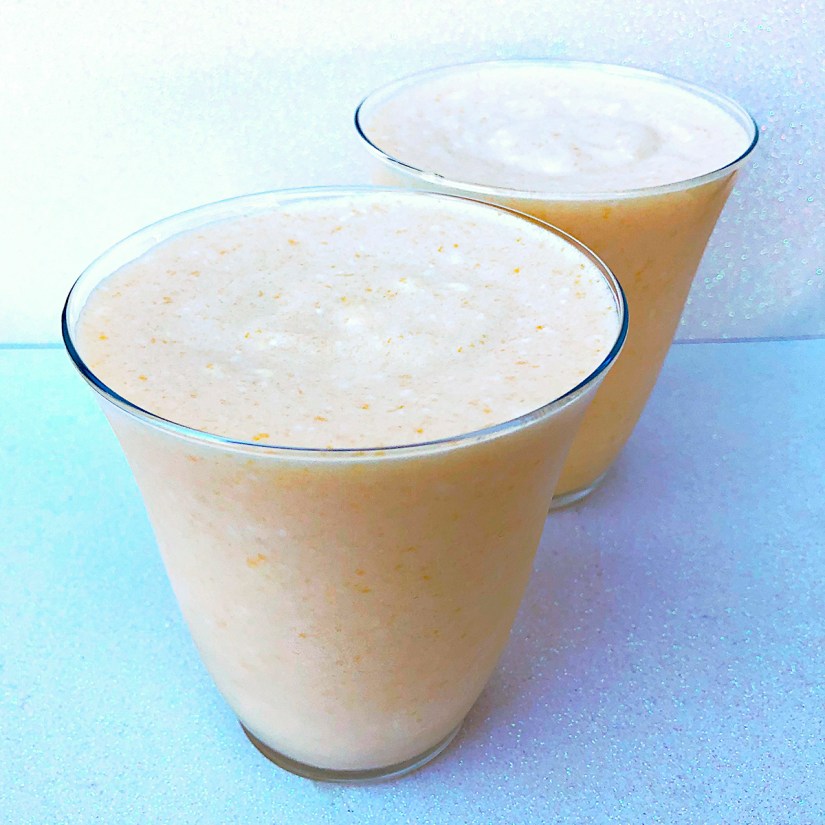
Peach Mousse

INGREDIENTS
1/2 c cool water
2 packets of unflavored gelatin
1 c heavy whipping cream
1/4 c granulated sugar
2 c peach purée
4 egg whites
1/4 cup + 2 tablespoons granulated sugar

OPTIONAL GARNISHES
Whipped cream
Streusel Topping (Found in my Peach Cobbler Cupcakes post)

STEPS

  • To a small microwave-safe bowl, add a 1/2 cup water and then sprinkle the 2 packets of powdered gelatin over the top.
  • Briefly mix together and set aside for 5 minutes to allow the gelatin to bloom, and prep the rest of your ingredients and equipment.
  • Next, place the gelatin in the microwave and heat for 15–30 seconds, until all the gelatin has melted. Set aside to work on the rest of the components.
  • To a stand mixer bowl, add the 1/4 cup + 2 tablespoons of granulated sugar and 4 egg whites.
  • Using a wire whisk, whisk these ingredients by hand and then place the bowl over a medium saucepan containing simmering water.
  • Constantly whip this mixture until all of the sugar dissolves and reaches a temperature of 140°F on a thermometer. (This will pasteurize the egg whites so that they are safe for consumption.)
  • Remove the bowl from the stove, place it in the stand mixer, and whip on medium until it achieves medium peaks.
  • While the meringue whips, add the remaining 1/4 cup of granulated sugar and 1 cup cold heavy whipping cream to a medium mixing bowl whisk either by hand or with a hand mixer until you reach medium peaks.
  • In a large mixing bowl, stir together the peach puree and melted gelatin.
  • Next, fold the whipped cream into the mixture.
  • And finally, gently fold the meringue into the mixture. Fill your favorite serving glasses with the peach mousse and let it set for at least an hour.
  • The peach mousse is set and ready to serve!
  • Optional toppings include a nice dollop of whipped cream and/or a sprinkle of crunchy streusel topping.

Thank you so much for checking out this recipe! I hope you enjoy it as much as my taste-testers and I did!