Beverages

Recipe—Peach Margarita

When we bought our house 7 years ago, the backyard was a bare lot. I told my husband right off the bat that if we plant any trees in the backyard, they have to produce fruit. I don’t want to water something unless it provides more than shade. So over the years we have planted a lemon tree, lime tree, apricot tree, and a peach tree. This year the peach tree has produced more than ever before so I have been enjoying coming up with new recipes to try.

Now if you know me, you know I love a margarita and something I have found through the years is that you can make a margarita with pretty much any fruit. I’ve posted recipes for Grapefruit Margaritas, Mango Margaritas, and more recently a Watermelon Margarita. So why not a peach margarita!

The peach schnapps in this recipe replace the typical triple sec in a margarita and really gives it that peachy flavor. Perfect for a warm summer day!

Notes: This recipe makes two margaritas. I doubled the recipe and put the margaritas in a carafe so I could enjoy a couple poolside. If you like a frozen blended margarita, use two cups frozen peaches instead of fresh and then also add in about a cup of ice. 

INGREDIENTS
2 peaches, peeled and pit removed
4 oz silver tequila
2 oz peach schnapps
2 oz lime juice
lime wedges (optional)
tajin or salt for the rim (optional)

STEPS

  • Add the prepared peach to a blender or food processor and blend fully, you want it nice and smooth.
  • Pour some tajin or salt on a small plate. 
  • Rub a lime wedge around the rim of two glasses and dip the glasses into the tajin or salt to coat.  
  • In a drink shaker, combine the peach puree, tequila, schnapps, lime juice, and ice and shake well.
  • Pour the margarita into the prepared glasses over ice. 
  • Garnish with a lime.
  • Put your feet up, sit back, and enjoy!
Brunch

Recipe—Strawberry Pop Tarts

Recipe—Strawberry Pop Tarts

Growing up, eating pop tarts was part of my morning school routine. They were quick and easy to throw in the toaster and chow down on as you were headed out the door. I thought they were the best! Now as a parent, I buy them for my son. Don’t go get all judgey on me here. He doesn’t eat them every day. I am a working parent with limited time in the morning and it is a child’s rite of passage to eat pop tarts. LOL

Recipe—Strawberry Pop Tarts

A couple of weeks ago I asked for a bite of his and I just have to say, they were not all that I had remembered them to be. Clearly my standards of quality food have changed over time. I started to think of what goes into a pop tart and realized I could easily make a copy cat version of my own. They were so simple and relatively quick to make. I literally just used refrigerated pie crust from the store and some strawberry jam and made a simple icing using powdered sugar mixed with a little water and vanilla. So basic and so easy!

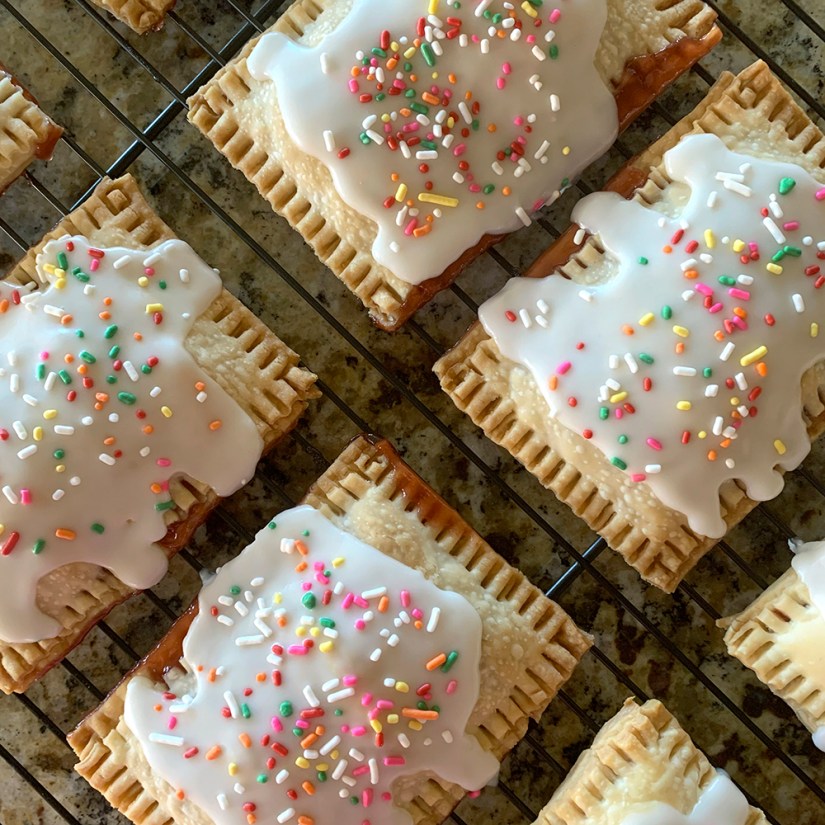
It was fun to spend a lazy morning recreating something from my childhood and let me just tell you, they were so good, like way better than I would have ever imagined! Let’s be real, this is actually like eating pie for breakfast. The crust was so flaky and lite and the jam and frosting were the exact amount of sweet you would want for breakfast. Plus, they were just as good the next day and they looked super cute in my cake stand on the counter.

Next up, homemade toaster strudels!

Recipe—Strawberry Pop Tarts

Notes:

  • I was able to make a total of 8 finished pop tarts using the two pie crusts. I was able to cut out a total of 16 3” x 4” rectangles, 8 from each crust.
  • You can obviously use any flavor of jam you would like. I was a strawberry pop tart girl, so that’s what I went with. You do you.
  • The frosting will set on these within a couple of minutes of frosting so be sure and add sprinkles right after applying frosting to each..
  • Do not reheat your pop tarts by putting them in the toaster! They are delicious at room temperature, even the next day.

INGREDIENTS
1 package (2 sheets) of refrigerated piecrust at room temperature (I used Pillsbury)
flour (for dusting)
1 c seedless strawberry jam
1 c powdered sugar
1/2 tsp vanilla extract
water
sprinkles

STEPS

  • Cut out a rectangle template using cardstock or paper that is 3” x 4”. (You will use this as a template to cut out rectangles from the pie crust that are all the same shape and size.)
  • Preheat oven to 400º.
  • Line a baking sheet with parchment paper and set aside.
  • Dust a little flour over a large cutting board or work surface to help keep the pie crust from sticking when you are rolling it out.
  • Lay out one of your pie crusts on the floured surface and roll it out until it is 1/8” thick.
  • Place the cardstock rectangle template on the rolled-out pie crust and, using a knife, cut around the edges of it. Repeat this until you have gotten as many 3” x 4” rectangles as you can, transferring each one to the baking sheet as you finish them.
  • Take the scraps and roll them into a ball and roll that out to get more if you can. (I was able to get six initially and then rolled out the scraps to get two more, for a total of  eight.)
  • Place about 2 tablespoons of jam in the center of each rectangle and spread it out slightly leaving about 1/3” of clear space around all 4 edges. (If your jam is thick and hard to spread, warm it in the microwave for about 15 seconds and stir it.)
  • Roll out and cut the second pie crust in the same manner as you did the first placing the second batch of rectangles on top of the jam.
  • Use your fingers to gently press around the edges to help create a seal between the two layers of crust.
  • Next, use a fork to crimp around the outside edges and poke 3 sets of holes down the center. This will keep the jam from leaking out the edges.
  • Bake for 12–15 minutes until they are all a nice golden brown.
  • Allow to cool on the cookie sheet for 3–5 minutes and then transfer them to a cooling rack to cool for another 10–15 minutes.
  • While the pop tarts are cooling, whisk together the powdered sugar, 2 tablespoons of water, and the vanilla. Add additional water a little bit at a time as needed until your frosting is slightly runny and whisk until there are no longer any clumps.
  • Spoon the frosting onto each pop tart and add sprinkles immediately. The frosting will set really quickly once put on the pop tart.
  • Serve and enjoy!
Sweet Treats

Recipe—Blackberry Ice Cream

Blackberry Ice Cream

Homemade ice cream is so easy to make and yet people hardly ever do it. I mean look, 4 ingredients and 3 steps. There is really nothing quite like homemade fresh churned ice cream. As a kid I grew up with an old school hand cranked ice cream maker. My mom would add all the ingredients to the metal container and then we would put it in a wooden bucket and surround that with ice and salt and my sister and I would take turns churning it by hand. Best. Summer. Memories. Ever! Anyone else do that growing up?

Now I have evolved with the times and have a wonderful electrical ice cream maker. You just add in the ingredients, plug it in, and watch it go! I have this one by Cuisinart and LOVE it!

My favorite time to use it is during the summer when we have friends over for a BBQ. The kids always love watching it and they think it is so cool to make their own homemade ice cream!

I’ve tried several different recipes, mint chip, vanilla, mocha almond fudge, cookies and cream, vanilla, and then this blackberry ice cream recipe. I think blackberry has been my all-time favorite! It is truly the flavor of summer.

Blackberry Ice Cream

Notes: I use fresh blackberries but you can always get frozen ones and defrost them. This recipe is for a 2 quart maker so if you have a 5 quart you may want to double it.

INGREDIENTS
3 c blackberries
1 1/2 c sugar
1 pint half and half
1 pint heavy whipping cream

STEPS

  • Combine the blackberries and sugar in a large bowl.
  • Mash all the blackberries and sugar by hand until they are all juicy and syrupy. (You can also place the berries and sugar in a blender if you prefer.)
  • Pour the blackberry mixture, half and half, and heavy whipping cream into your ice cream maker and churn until it is desired thickness.
Sauces

Recipe—Alfredo Sauce

One of my son’s first favorite foods was cheese tortellini smothered in alfredo sauce. I personally love alfredo sauce over fettuccine noodles and served with a grilled chicken breast and some broccoli. Either way alfredo sauce is a great indulgence to enjoy anytime. Who doesn’t love the thick creamy Italian cheese sauce over their favorite pasta? It is popular with people of all ages and can be extremely versatile. I have even used it as a white pizza sauce or poured over a baked potato. Homemade alfredo sauce is actually really easy and quick to make and so worth it. The quality does not compare to anything store bought. Give it a try! It will be a home run with the whole family!

Note: If you want a high quality sauce equal to that of one served in a restaurant (or better) use high quality ingredients. I recommend getting a fresh ball of mozzarella and a block of Parmesan over in the deli. You will notice the difference! Kraft will leave it gritty and we want it to be smooth.

INGREDIENTS
2 tbsp butter
2 tbsp olive oil
2 tsp garlic, minced
1/3 c white wine
2 c heavy cream
1/4 tsp white pepper
1/2 c parmesan cheese, shredded
3/4 c mozzarella cheese, shredded

STEPS

  • In a large saucepan over medium heat melt the butter and add olive oil.
  • Add the garlic and sauté for 1–2 minutes.
  • Carefully pour in the wine and heat until it begins to simmer.
  • Stir in the heavy cream and the white pepper and bring to a simmer stirring often.
  • Add in the Parmesan cheese and simmer for 8–10 minutes. By this point the sauce should be smooth and start to thicken.
  • Add the mozzarella cheese and stir frequently until smooth and completely incorporated.
  • Reduce heat to low and begin cooking your noodle of choice while the sauce simmers and continues to thicken.
  • Remove sauce from the stovetop and allow it to sit for a few minutes. It will thicken up a bit more.
  • Serve sauce over cooked pasta.