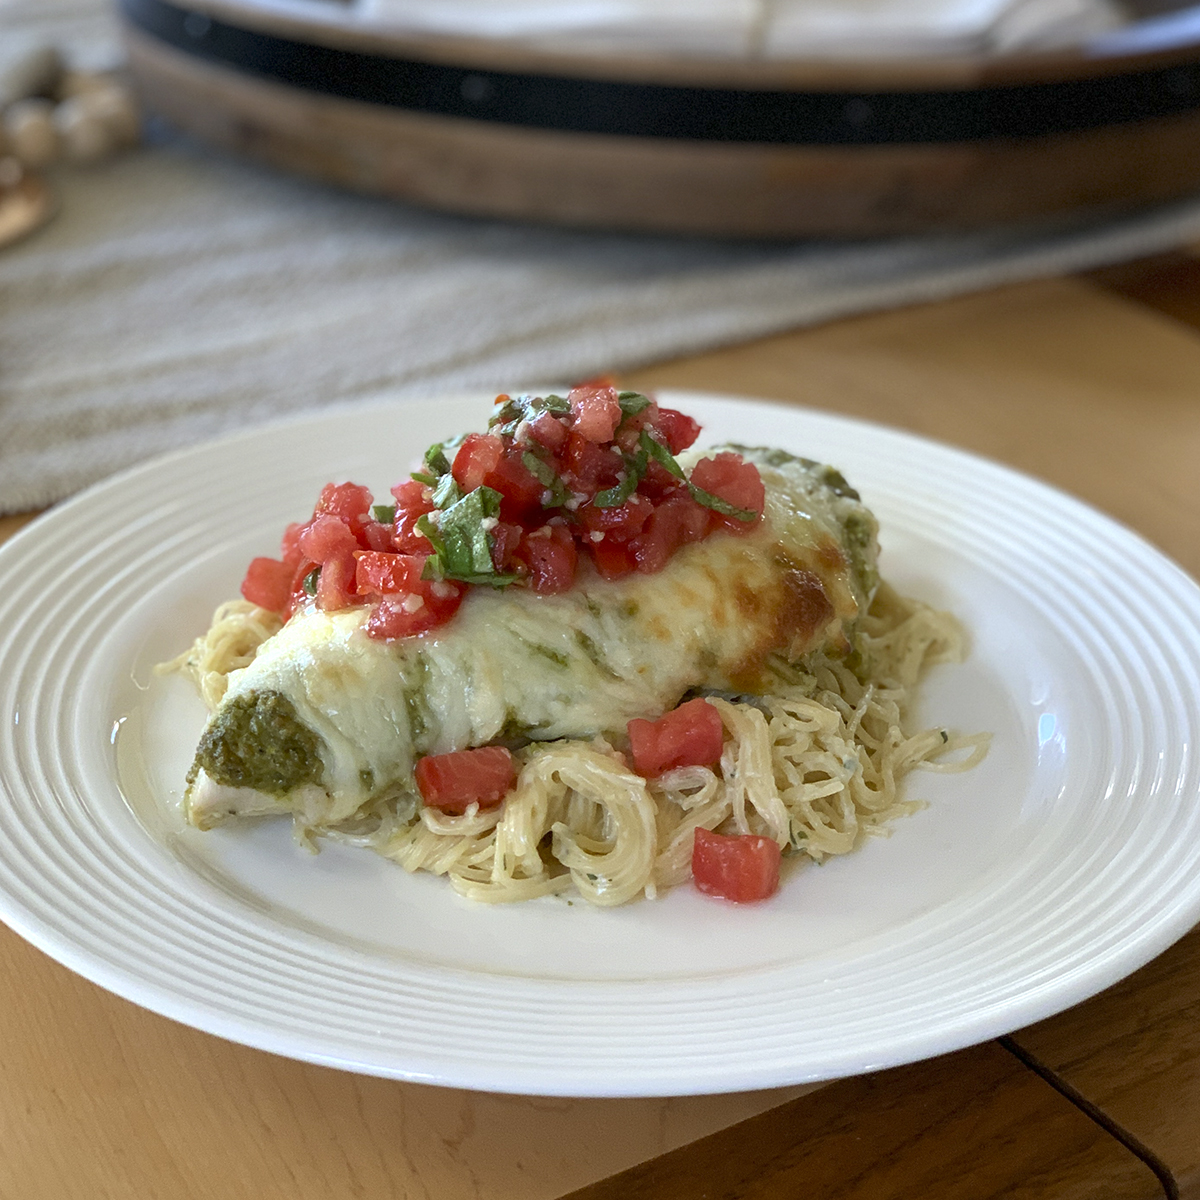
Tomatoes and basil are like an Italian match made in heaven. You can almost guarantee that anything made with those two ingredients will be amazing. One of my favorite ways to bring them together is in a classic bruschetta made up of tomatoes, basil, garlic, and olive oil. So simple but so damn good! Now imagine that fresh bruschetta spooned over a juicy chicken breast smothered in zesty pesto and a layer of melted mozzarella cheese. That my friends, is one hell of a tasty main dish for dinner.
I like to just eat this chicken on it’s own but with the carb monsters I live with, I tend to serve it for them with a side of rice pilaf or over a bed of pasta alfredo. This recipe is so easy to put together, but it looks fancy enough, that you can totally serve it for dinner guests.
BAKED CHICKEN INGREDIENTS 3–4 boneless skinless chicken breast salt & pepper 1 c pesto 2 c mozzarella, shredded
BRUSCHETTA INGREDIENTS 2 large ripe tomatoes, diced 8–10 basil leaves, chopped 1 tsp garlic, minced 2 tbsp extra virgin olive oil salt & pepper
STEPS
Preheat the oven to 400º.
Place the chicken breasts in a lightly greased baking dish and season both sides with salt and pepper.
Spread the pesto over the tops of the chicken breasts and sprinkle with the mozzarella cheese.
Place the baking dish in the oven and bake for about 25 minutes or until the chicken is cooked completely through and mozzarella is just starting to brown up.
While the chicken is cooking, combine all the bruschetta ingredients in a medium bowl and stir to combine.
When the chicken is done cooking, transfer them to a plate and finish with a big scoop of that fresh bruschetta.
If you follow me on Instagram, you have probably seen my backyard pride and joy, my little garden. One of the first springs in our home I had my dad and husband build me this big, beautiful redwood garden box. It has been a couple of years of figuring out what grows good and what doesn’t. Tomatoes, zucchini and pesto thrive during the hot California summer months.
Well, this year by spry little basil plants turned into full on basil bushes in a matter of a couple of weeks. They were thick, tall, and bushy and I knew they had to be harvested before they went to flower and became bitter and tough. Homemade pesto coming right up!
While I absolutely love store bought pesto nothing beats the freshness of making your own. It can be a little pricey with the cost of pine nuts, quality parmesan, and extra virgin olive oil but it is absolutely worth it! Plus, it is so easy to make. Load all the ingredients in the blender, and blend!
With how much basil I harvested I actually made a massive batch but you certainly don’t need to make that much at a time unless you are sitting on a big basil harvest yourself. The recipe below is written for a single batch.
One thing that is really great about pesto is that it freezes great! I proportion it out into larger containers for pasta dinners and then smaller containers that work great for pizza sauce like when I make my Shrimp Pesto Pizza.
What makes my pesto unique is I like to add some fresh lemon juice to the mix. I find it helps serve as a natural preservative, gives it a great flavor, and also helps to keep the vibrant green color.
INGREDIENTS 2 c basil leaves, packed 3/4 c parmesan cheese, shredded 1 c extra virgin olive oil 1/2 c pine nuts 3 cloves garlic juice from one lemon 1/2 tsp salt 1/4 pepper
STEPS
Combine all the ingredients in the blender and blend string periodically if needed.
Add additional olive oil if you need more liquid to blend.
During the hot summer months my body craves lighter refreshing meals and I just hate running the oven when it is 105º outside. We eat a lot of salads and tacos to keep it quick and simple, but it is always fun to mix it up with some new flavors.
I just absolutely LOVE this peanut sauce with all the other ingredients coming together. You have this flavor medley of peanuts, garlic, and ginger which are so good together and then you get this nice sweetness from the mangos and a little kick from the jalapeño, and that is all just in the sauce and toppings! Don’t forget about all those flavor packed veggies and shrimp in the layered in the lettuce cup too.
This recipe is incredibly versatile. While I myself enjoyed these as lettuce wraps, my husband and son had theirs in a flour tortilla as more of a fusion style taco (they like their carbs) but this would make an amazing entrée salad too if you just wanted to chop up the lettuce and use the sauce as a dressings. Either way, you will not be disappointed!
Note: These take less than 15 minutes to cook and assemble but there is a little bit of prep time needed to slice and dice all the veggies. If you have a busy week ahead, you can absolutely prep ahead of time by chopping up all the veggies and storing them in some sealed containers or bags.
Okay, so I am on a total peach kick here. Hopefully you didn’t miss the recipe I posted last week for Peach Margaritas. I am still recovering from those!
Now, in my opinion, the peach is the epitome of summer fruit. I just love that this time of year when I walk into the produce section or I’m at the farmers market, I get hit with a wall of the sweet sweet smell of stone fruit. Peaches, apricots, nectarines! Yum! There is just something about that sweet fleshy fruit that is so good anyway you have them.
Now when it comes to baking with peaches, I am all about a homecooked peach crisp, not a cobbler. When cooked, peaches get super soft so I like that sweet oatmeal baked to a nice crisp on top with a little bit of cinnamon. This is such a simple recipe, and you just can’t beat it hot out of the oven with a scoop of vanilla ice cream. I could eat it for breakfast, lunch, dinner, and dessert. Trust me, you will want to too!
Note: As much as I love using fresh peaches in my crisp, I want to be able to have peach crisp year round and you can really only get good quality peaches during the summer. So, with that said, I give you permission to substitute canned or frozen peaches in this recipe. If you want to use canned, make sure to completely drain them and if you use frozen, add 10 minutes to the cooking time.
CRISP INGREDIENTS 1/2 c old fashioned oats 1 c flour 1/2 tsp cinnamon 3/4 c butter, softened
STEPS
Preheat oven to 350º.
In a large bowl combine all the filling ingredients and gently fold making sure not to pulverize the peaches.
Transferthe fruit mixture to the bottom of a greased 13” x 9” baking dish and evenly spread out.
In that same bowl, mix together the oats, flour, and cinnamon.
Add the softened butter to the oat mix and using your hands, or a large electric mixer with a paddle, combine everything until it is all evenly mixed and nice and crumbly.
Distribute the oatmeal topping over the top of your fruit. (It is okay if it is all rough and crumbly. Do not push or pat it down.)
Bake uncovered for 30–35 minutes.
Remove from oven and allow it to cool for 10 minutes.
Serve in bowls topped with vanilla ice cream or whip cream.
When we bought our house 7 years ago, the backyard was a bare lot. I told my husband right off the bat that if we plant any trees in the backyard, they have to produce fruit. I don’t want to water something unless it provides more than shade. So over the years we have planted a lemon tree, lime tree, apricot tree, and a peach tree. This year the peach tree has produced more than ever before so I have been enjoying coming up with new recipes to try.
Now if you know me, you know I love a margarita and something I have found through the years is that you can make a margarita with pretty much any fruit. I’ve posted recipes for Grapefruit Margaritas, Mango Margaritas, and more recently a Watermelon Margarita. So why not a peach margarita!
The peach schnapps in this recipe replace the typical triple sec in a margarita and really gives it that peachy flavor. Perfect for a warm summer day!
Notes: This recipe makes two margaritas. I doubled the recipe and put the margaritas in a carafe so I could enjoy a couple poolside. If you like a frozen blended margarita, use two cups frozen peaches instead of fresh and then also add in about a cup of ice.
INGREDIENTS 2 peaches, peeled and pit removed 4 oz silver tequila 2 oz peach schnapps 2 oz lime juice lime wedges (optional) tajin or salt for the rim (optional)
STEPS
Add the prepared peach to a blender or food processor and blend fully, you want it nice and smooth.
Pour some tajin or salt on a small plate.
Rub a lime wedge around the rim of two glasses and dip the glasses into the tajin or salt to coat.
In a drink shaker, combine the peach puree, tequila, schnapps, lime juice, and ice and shake well.
Pour the margarita into the prepared glasses over ice.
Diva di Cucina started off nearly 12 years ago just as a way for me to share recipes with my family and friends. It has grown and evolved in ways I never could have ever imagined. While the intention of this blog is primarily to share recipes with you, it is also a place where I feel a sense of community and connection and I love being able to share my successes with you too, because if it wasn’t for having followers and supporters, I wouldn’t be doing this all these years later. With that said, I have a fun little story to share with all of you.
Photo by Sara Pinnell, Creative Director, Ardent for Life Magazine
As many of you know, I branched out in October 2020 I launched my very own kitchen boutique on Etsy. That Etsy shop took off and I started also doing pop up markets in my community. Through these markets I have connected with so many amazing small business owners many of whom I have become friends with.
One small business I have connected with is Cindy of My Thrifty Sister who makes the cutest home décor. Cindy knew I had a cooking blog so in April she came to me and asked if I wanted to collaborate with her and some other small businesses and participate in a lifestyle photoshoot for Ardent for Life Magazine.
Now you if you know me, you know I am always going to jump at any opportunities that come my way so of course I said yes. A very enthusiastic, YES! The shoot was for a summer brunch and I was asked to make a main dish and a beverage.
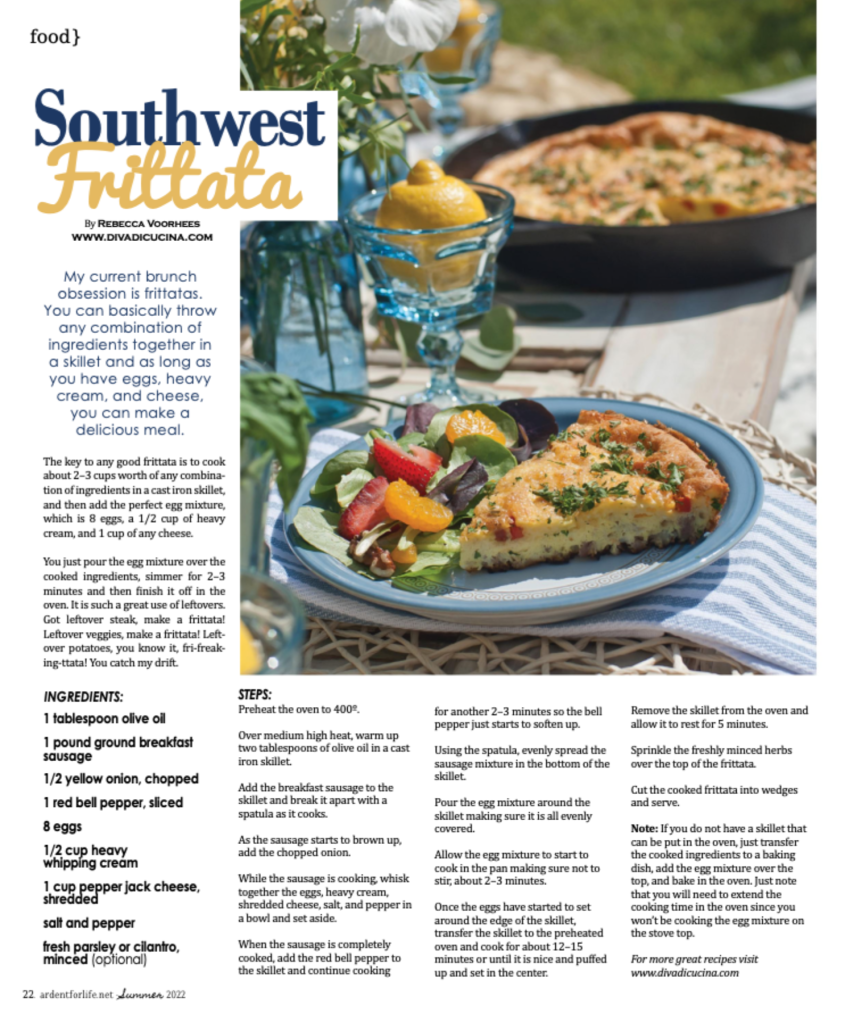
The theme for the brunch would be denim and lemons, so I decided to make my Southwest Frittata because I think cast iron skillets and denim go hand in hand. Something about the two give off a whole country living vibe.
Photo by Sara Pinnell, Creative Director, Ardent for Life Magazine
Now, in my opinion, brunch without booze is just a sad breakfast so for the drink I wanted to do a lemon-based brunch cocktail that would be light and refreshing and my Knock You Off Your Saddle Lemonade checked all the boxes. The flavors of ginger and lemon with the bubbles from the ginger ale are just perfect for sipping on a warm summer day.
Photo by Sara Pinnell, Creative Director, Ardent for Life Magazine
The morning of the shoot was so fun. I showed up with my frittata and cocktail ready to go. My Thrifty Sister had staged the entire thing in her backyard. There was a gorgeously set table made of crates and an old door set upon a big area rug and the cutest assortment of pillows for us to get cozy with. Then there was also the serving table which was covered with a tiered denim tablecloth she had made. We got to watch as the owner of Tilted Tulip set up all the beautiful floral arrangements throughout the yard making sure each flower was perfectly placed.
Photo by Sara Pinnell, Creative Director, Ardent for Life Magazine
Every detail was perfection! From the wood cutout lemons, the denim pockets for the silverware, and all the blue dishes and glasses.
Photo by Sara Pinnell, Creative Director, Ardent for Life Magazine
The magazine photographer was amazing to work with! She provided great direction and made everyone feel at ease. I loved how open she was to everyone’s ideas.
I initially went into this photoshoot thinking my dishes would just be photographed, so I was thrilled when the magazine told me they would like to include the recipes as well! Several weeks later I got the proofs from their designer and was floored to see that each recipe got a beautiful full page spread! And this story gets even better! A few days before going to print, I was notified by the magazine editor that my dish was selected to be the cover for the Summer 2022 issue of the magazine!
If you were to tell me 12 years ago that one day, I would have some of my recipes published AND on the cover of a magazine I would have had you locked up because it just seems utterly insane. This was such an amazing experience, and I am so grateful to have been given this opportunity. I am excited to share with you the featured article, Brunch with a Splash of Denim and Lemons. Feel free to click through the article and recipes above.
It never fails, anytime I serve watermelon at a BBQ or party I end up with a ton leftover. Not that it’s a bad thing, especially when you can make some amazing watermelon margaritas! This cocktail is the perfect summer drink, it’s light and so refreshing. I just love the combination of the sweet watermelon with lime and if you put a little Tajin around the rim, it just takes it up a notch with a nice little kick of spice. Nothing says summer like a fresh and fruity cocktail!
Notes: This recipe makes two margaritas which is great because cocktails always taste better when shared with a friend! Since the juice content varies from watermelon to watermelon you may have extra juice after blending. The recipe calls for 1 1/2 cups of the strained juice.
INGREDIENTS 4–5 c seedless watermelon, cut into chunks (you will need 1 1/2 cups juice) 1/2 c silver tequila 1/4 c lime juice, fresh squeezed 1 tbsp agave or simple syrup lime wedges (optional) tajin or salt for the rim (optional)
STEPS
Add the chopped watermelon to a blender or food processor and blend fully.
Pour the blended watermelon through a sieve or fine strainer into a large measuring cup to separate out the pulp.
Pour some tajin or salt on a small plate. (optional)
Rub a lime wedge around the rim of two glasses and dip the glasses into the tajin or salt to coat.
In a drink shaker, combine 1 1/2 cups of the strained watermelon juice, tequila, lime juice, agave, and ice and shake well.
Hello grilling season! It is great to have you back in my life! (And all of you amazing followers too!) Nothing says summer like lazy days with friends, sun shining on your skin, hot grilled meat, and some tasty side salads!
With 4th of July just around the corner it feels like the perfect time to share one of my favorite summer side dish recipes with y’all. This Red White and Blue Potato salad is packed with all my favorite flavors and by favorite flavors, I mean bacon and blue cheese.
This salad is an amazing complement to any bbq dish, but we especially love it with a nice steak and some red wine. Just something about the way all those flavors come together is top notch. *chef’s kiss*
Note: I like to set aside some of the bacon, blue cheese crumbles, and green onions to garnish the top of the salad with.
INGREDIENTS 3 lbs baby red potatoes, chopped into 3/4” cubes 1/2 cup mayonnaise 1/2 cup sour cream 1/2 tsp dill 1/2 tsp salt 1/4 tsp ground mustard 1/2 tsp onion powder 8 slices bacon, cooked and chopped 3/4 c blue cheese 1/2 c green onion, sliced
STEPS
Place the chopped potatoes into a large pot and cover with water.
Bring to a boil and cook for approximately 12–15 minutes, or until the potatoes are soft and tender.
Drain the potatoes and transfer them into a large bowl and allow to cool for 30 minutes.
In a medium bowl mix together the mayonnaise, sour cream, dill, salt, ground mustard, and onion powder.
Add the bacon, blue cheese, and green onion to the bowl with the potatoes.
Pour the dressing over the top of the potatoes and other ingredients and stir to combine.
Cover and chill for at least 2 hours before serving.
Here are some other amazing summer side dishes to try out!
This recipe is a must for your next dinner party or a day of poolside lounging. It makes a nice sized pitcher, perfect to share with friends. When I had a little party back in August, this was the signature cocktail served and it was a huge hit! We served it in some cute pitchers along with grapefruit wedges and sprigs of rosemary.
Grapefruit juice has always been one of my favorite cocktail mixers. It is just the right amount of sweet and tart and is so refreshing. I am pretty sure this cocktail is what sunshine would taste like, if sunshine had a flavor.
There are all sorts of variations of greyhound recipes, and this is one of my faves. The vanilla gives you this nice little bit of sweetness that cuts the tartness of the grapefruit and the soda water really lightens it up. I like the subtle flavor the rosemary garnish adds but if you like a stronger rosemary flavor you can infuse the vodka with it
Note: If you want to prepare this ahead of time, mix together all the ingredients EXCEPT the soda water. Don’t add the soda water until right before serving or it will go flat. overnight.
INGREDIENTS 2 c vodka 3 1/2 c grapefruit juice 2 tbsp vanilla 1 1/2 c soda water rosemary sprigs for garnish
STEPS
Mix vodka, grapefruit juice, vanilla, and soda water in a large pitcher and stir well.
Last year in my garden we were harvesting more tomatoes than we knew what to do with! We were having Panzanella Salad and Marinated Tomatoes almost every week. Once my jalapenos came in, I was all about that fresh salsa! Who doesn’t love that fresh salsa flavor!? Store bought salsa just does not compare.
This recipe is pretty much goof proof. You just add all the ingredients to the blender and blend. Yes, it really is that simple!
Just serve up with a side of some crispy salty tortilla chips or along with your favorite tacos or burritos.
Note: If you over blend your salsa, it can become sort of frothy. If this happens, just cover and store in the fridge for a couple of hours and it should settle. Fresh salsa can last in the fridge covered for up to two weeks. The flavors get better and better with time.
INGREDIENTS 1/4 white onion 2 tsp garlic, minced 1 jalapeno 4–6 medium sized tomatoes 1/4 tsp salt 1/4 tsp ground cumin 1/2 c fresh cilantro leaves juice from 1 lime pinch of sugar (optional, to balance the acidity of the tomatoes)
STEPS
Add the onion, garlic, and jalapeno to a food processor or blender and pulse a few times to chop.
Add all the remaining ingredients to the blender and blend to desired consistency.
Refrigerate for 30 minutes to allow the flavors to really come together. (Optional)