Sauces

Recipe—Basil Pesto Sauce

If you follow me on Instagram, you have probably seen my backyard pride and joy, my little garden. One of the first springs in our home I had my dad and husband build me this big, beautiful redwood garden box. It has been a couple of years of figuring out what grows good and what doesn’t. Tomatoes, zucchini and pesto thrive during the hot California summer months.  

Well, this year by spry little basil plants turned into full on basil bushes in a matter of a couple of weeks. They were thick, tall, and bushy and I knew they had to be harvested before they went to flower and became bitter and tough. Homemade pesto coming right up!

While I absolutely love store bought pesto nothing beats the freshness of making your own. It can be a little pricey with the cost of pine nuts, quality parmesan, and extra virgin olive oil but it is absolutely worth it! Plus, it is so easy to make. Load all the ingredients in the blender, and blend!

With how much basil I harvested I actually made a massive batch but you certainly don’t need to make that much at a time unless you are sitting on a big basil harvest yourself. The recipe below is written for a single batch.

One thing that is really great about pesto is that it freezes great! I proportion it out into larger containers for pasta dinners and then smaller containers that work great for pizza sauce like when I make my Shrimp Pesto Pizza

What makes my pesto unique is I like to add some fresh lemon juice to the mix. I find it helps serve as a natural preservative, gives it a great flavor, and also helps to keep the vibrant green color.

INGREDIENTS
2 c basil leaves, packed
3/4 c parmesan cheese, shredded
1 c extra virgin olive oil
1/2 c pine nuts
3 cloves garlic
juice from one lemon
1/2 tsp salt
1/4 pepper

STEPS

  • Combine all the ingredients in the blender and blend string periodically if needed.
  • Add additional olive oil if you need more liquid to blend.
Sweet Treats

Recipe—Glazed Lemon Cookies

We are on Day 4 of 5 of my Christmas Cookie Week! That’s right, this week I will be posting 5 of my favorite Christmas Cookie recipes!

Glazed Lemon Cookies

We have the cutest little lemon bush in our back yard and it holds a special place in my heart as it was a housewarming gift from some of our friends when we built our house 6 years ago. Every year come December, it never fails, the lemons are ready for picking. For that reason, these glazed lemon cookies have become a staple in our holiday cookie rotation. They are so soft and light and I just love the zestiness the fresh lemon brings to them. While I love making these around the holidays they are also perfect for spring or summer.

Note: I recommend placing some paper towels or wax paper under the cooling rack before taking the cookies out of the oven. When you do the glazing you will get some drippage and the paper towels or wax paper will help to catch that excess sticky goodness that make cleanup so much easier.  

COOKIE INGREDIENTS
2 1/4 c flour
1 tbsp cornstarch
1/2 tsp baking soda
1/2 tsp salt
3/4 c butter, softened
1 1/4 c granulated sugar
zest from 2 lemons
2 eggs
2 tbsp lemon juice
1 1/2 tsp vanilla extract

GLAZE INGREDIENTS
1 c powdered sugar
2 tbsp fresh lemon juice

STEPS

  • Preheat oven to 350º.
  • In a medium bowl, stir together the flour, cornstarch, baking soda, and salt.
  • In a large bowl beat together the butter, sugar, and lemon zest on medium-high speed for 3 minutes.
  • Add the eggs, lemon juice, and vanilla to the butter mixture and continue to beat until evenly incorporated.
  • Gradually add in the dry ingredients until combined.
  • Form small balls with the dough and place at least 2 inches apart on a parchment paper lined baking sheet.
  • Bake for 8–10 minutes or until they just start to get a light golden color on the bottom.
  • Allow cookies to sit on the baking sheet for a couple of minutes before transferring to a cooling rack.
  • Once the cookies have completely cooled, whisk together the powdered sugar and fresh lemon juice to make the glaze. (You want to be able to drizzle the glaze so add a tad bit more lemon juice or water if needed to thin it, or more powdered sugar if you need it thicker.)
  • Transfer the glaze to a transfer to a piping bag with a very small opening or a Ziploc bag. (If using a Ziplock bag, you will want to cut a small tip off one corner.)
  • Drizzle the glaze back and forth over the cookies.
  • Allow the cookies to rest for at least an hour so the glaze has time to set.
  • Enjoy!
Beverages

Recipe—Strawberry Sangria

Recipe—Strawberry Sangria

We have had a hot streak out here in California with every day last week being over 100º and being that it is strawberry season I figured it was time to whip up a batch of refreshing sangria using some of my favorite seasonal fruit! This sangria is so perfect for sipping on in this summer sun. It is light, refreshing, and ridiculously easy to make! You just stir together a bottle of wine, some silver rum, a little sugar, and a splash seltzer. You can certainly make it and drink it right away but I like to let mine sit in the fridge for about an hour so that the wine really takes on those strawberry flavors. Mmmm…mmm… tastes like summer in a glass!Recipe—Strawberry Sangria

And if you like this recipe then be sure to also check out my Red Wine Sangria or Summertime White Sangria.

Notes: 

  • If you are watching your carbs or don’t like drinks that are too sweet, feel free to leave out the sugar all together. I made it that way the other day and it was still delicious! You get lots of natural sweetness from the fruity wine and fresh strawberries.
  • For the white wine I used Pomelo’s sauvignon blanc (one of my favorite summer wines). It has a nice refreshing grapefruit flavor. Anything with citrus notes will give you wonderful results. I recommend using a pinot grigio, rosé, or sauvignon blanc for this recipe. Something fruity and light.

INGREDIENTS
750 ml bottle of sauvignon blanc (see above note)
1/3 c silver rum
1/4 c sugar
1 lemon, sliced
2 c fresh strawberries, sliced
1 1/2 c seltzer

STEPS

  • Pour the wine, rum, and sugar into a large pitcher.
  • Stir until the sugar is dissolved.
  • Add the sliced lemons and strawberries to the pitcher and refrigerate until ready to serve.
  • Add the seltzer right before serving.
  • Pour over ice and enjoy!


Dinners

Recipe—Creamy Lemon Chicken Pasta

Recipe—Creamy Lemon Chicken Pasta

Right now, I am drowning in youth sports. My son is currently playing soccer and baseball which takes up about 5–6 days a week and sometimes we have both on the same day. I lost my sanity a few weeks ago.

Don’t get me wrong, I absolutely love it! It just means that I need to be diligent in my menu planning and have some recipes that allow me to have dinner on the table quickly. We certainly have nights where dinner consists of sandwiches, Kraft Mac N Cheese, or takeout, but I try and cook a real dinner at least 4–5 nights a week. That means whatever I am making needs to be quick!

This recipe takes less than 30 minutes to make and costs about $15, assuming you have the basic stuff on hand. It is so simple, fast, and tasty! My family loves this recipe!  The chicken comes out so juicy and flavorful after simmering in the creamy lemon sauce. Hope you enjoy it as much as we do!

Recipe—Creamy Lemon Chicken Pasta

INGREDIENTS
4–5 boneless, skinless chicken breasts
salt and pepper
1/4 c flour
2 tbsp butter
2 tbsp olive oil
1 lb penne
1 c chicken broth
3 lemons, 2 for juicing and 1 sliced
3/4 c heavy cream
1/4 c capers
parsley, chopped

STEPS

  • Season both sides of the chicken breasts with salt and pepper.
  • Place the flour in a large Ziploc bag and add chicken breasts.
  • Toss the chicken breast in the Ziploc bag until they are all evenly coated in the flour.
  • In a large skillet, heat the butter and olive oil over medium-high heat.
  • Place the chicken breasts in the skillet.
  • Cook the chicken for 6–7 minutes per side or until cooked all the way through.
  • While the chicken is cooking, bring a large pot of water to a boil and cook the pasta per the package instructions.
  • Add the broth, juice from two lemons, sliced lemon, heavy cream, and capers to the skillet with the chicken.
  • Season the sauce with salt and pepper to taste.
  • Bring the sauce to boil and reduce heat to medium-low heat.
  • Continue cooking the sauce until it has thickened up, about 3–4 minutes.
  • Transfer the chicken breasts to a plate or cutting board.
  • Drain the pasta and add it to the skillet with the sauce, tossing to coat all the noodles.
  • Serve the pasta on plates and top with a chicken breast.
  • Sprinkle the dish with fresh chopped parsley and serve.
Salads, Side Dishes

Recipe—Asparagus and Feta Salad

divadicucina_asapargussalad1

California is one of the leading producers of asparagus in the United Stated. Asparagus is so big in California that the city of Stockton even throws an entire festival in honor of asparagus. True story! I grew up eating asparagus on a regular basis. (By the way, I am 33 and still crack up that it gives you stinky pee. I don’t think I will ever grow up.) I could eat asparagus every day. There are just so many ways to prepare it but I think I have found my favorite way to eat the lovely green spears, grilled asparagus and feta salad. Man this was awesome! My husband and I devoured the whole bowl so if you are cooking for more than 2 people just go ahead and double or triple the recipe. Trust me you will eat it all! There was just so much flavor in the salad and it was so light and refreshing. Perfect for spring or summer. We just served it with a simple grilled chicken breast seasoned with nothing more than salt and pepper and it was the perfect complement. This my friends, is good eating.

Want to know more about asparagus? Then check out this old post and you will be an asparagus pro!

divadicucina_asapargussalad2

INGREDIENTS
1 bunch thick asparagus, ends trimmed
3 tbsp olive oil, divided
1/4 tsp kosher salt
1/4 tsp pepper
zest from one lemon
1 tablespoon freshly squeezed lemon juice
1/2 c crumbled feta cheese

STEPS

  • Preheat the grill to about 325º.
  • Place the asparagus in a baking dish and coat with 2 tablespoons of the olive oil and then season with salt and pepper.
  • Place the asparagus on the grille making sure that they are perpendicular to the grates so that they don’t slip through.
  • Close the grill and cook for 3 minutes.
  • roll the asparagus over and cook for another 3 minutes.
  • Remove the asparagus and transfer to a cutting board.
  • Allow the asparagus to cool for 5–10 minutes.
  • Cut the spears into 1–2” pieces.
  • Place the cut asparagus into a medium bowl and toss with the remaining tablespoon of olive oil, lemon zest, lemon juice, and half of the feta.
  • Top the salad with the remaining asparagus and serve warm or at room temperature.

Recipe adapted from Once Upon a Chef.

Dinners

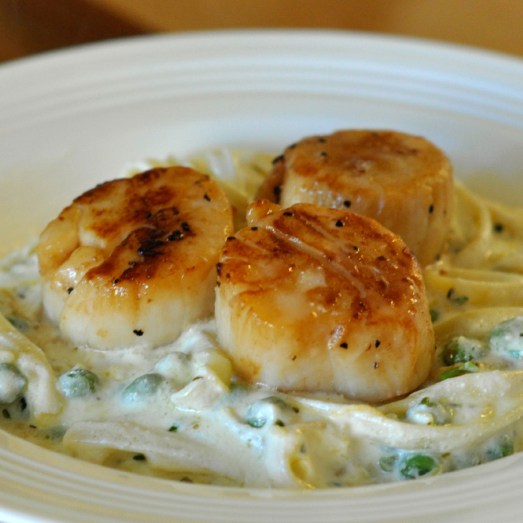
Recipe—Creamy Lemon Pasta with Seared Scallops and Peas

Quick and super easy recipes are always popular with me and it’s even better when I can actually find one that is delicious and somewhat gourmet. A meal like this makes the average day feel a little extra special. Scallops aren’t something I cook very often due to the price but they sure are awesome to indulge in every now and again. They are incredibly simple to cook and have a really mild flavor sure to please the whole family. This sauce is the perfect pasta sauce for summer. It’s light and super refreshing with all that lemon. Whether you are looking for a quick dinner for a work night or even an elegant one for company, this is a great go to recipe.

Note: Start with the lesser amount of lemon zest and lemon juice and adjust accordingly per your taste.

INGREDIENTS
1 lb fresh scallops
salt and pepper
lemon pepper
4 tbsp olive oil, divided
16 oz fettuccine noodles
1 tbsp butter
1/2–1 tsp lemon zest (depends how much you like lemon)
1/8–1/4 c fresh squeezed lemon juice
2 tbsp fresh thyme, minced
15 oz container ricotta cheese
1/2 c peas (if using frozen be sure they are defrosted)

STEPS

  • Bring a large pot of water on to boil.
  • Rinse scallops and pat dry.
  • Season the scallops with salt and lemon pepper.
  • Put the pasta on to boil and cook per package instructions.
  • Heat 1 tablespoon of olive oil and the butter over medium high heat in a large skillet.
  • Add the scallops to the skillet in a single layer.
  • Cook turning once until golden on the outside and no longer opaque in the center, about 3 minutes per side.
  • Transfer the scallops to a large plate.
  • Add the remaining 3 tablespoons of olive oil to the pan along with the lemon zest, lemon juice, thyme, and additional salt and pepper.
  • Stir in the ricotta until you have a nice creamy sauce and then add in the peas.
  • Drain the noodles and add them to the skillet.
  • Toss to coat.
  • Transfer the pasta to a serving dish and top with the seared scallops.

Recipe adapted from Crumb.

Appetizers

Recipe—Creamy Smoked Salmon Dip

Are you on the hunt for an elegant and absolutely delicious hours devours? If so the hunt can come to an end. This dish takes less than 10 minutes to make and is the perfect snack to serve at the next function you have coming up. Salmon is an incredibly popular fish here on the West Coast and I really enjoy the flavor combination of smoked salmon, cream cheese, and capers. This has all those wonderful flavors plus a nice refreshing zest of lemon and a little bite from the shallot. One of the things that is great about this recipe is that it can be whipped up minutes before your social function or even made ahead a day or two ahead of time. This appetizer truly is perfect for an afternoon or evening social, or even spread on your bagel for breakfast.

Note: You can serve this dip with crackers, toasted bread, sliced cucumber, pretty much anything, but what I love is this dip served with everything crackers or bagel chips. Just something about all those wonderful flavors really takes this already awesome dip to the next level.

INGREDIENTS
4–6 oz smoked salmon
1/3 c extra virgin olive oil
1/2 c mayonnaise
1/2 c cream cheese
1/2 c grated parmesan cheese
2 tsp capers
1 tsp garlic, minced
1 1/2 tbsp shallot, minced
1 tsp lemon juice
1 tbsp white wine
1/2 tsp lemon pepper
1 tbsp chives, minced

STEPS

  • Place all ingredients except for the salmon in a blender or food processer and blend until well incorporated.
  • Add the smoked salmon to the blender and pulse until desired consistency.
  • Transfer the dip to a small bowl and refrigerate until ready to serve.
  • Serve with some toasted crostini or your favorite crackers.
Dinners

Recipe—Buttery Lemon Dill Salmon

A couple times a year I like to complete an 11-day cleanse. It is just a way to flush out all these impurities and reset my digestive system. The weight loss is a huge perk too (Down 8 lbs! Wahoo!). For some reason during this last round I was craving salmon! And I mean REALLY craving it, like every day! I was daydreaming about a big slab of salmon covered in butter, lemon, and dill. I knew that would be one of the first dinners I would prepare for myself once I was done with the cleanse. This recipe did not disappoint. The fish was super moist and all the flavors and buttery goodness really seeped into the meat. I was shocked when even my 3-year old son devoured a huge chunk of the tasty fish. This recipe for oven baked salmon is ridiculously easy to make and super quick to get on the table. It also makes for a beautiful presentation. This may just be on the menu at my next dinner party.

INGREDIENTS
1 salmon filet (1 1/2–2 lbs)
2 tbsp butter, softened
1/4 c white wine
2 tbsp lemon juice
1/2 tsp kosher salt
1/2 tsp lemon pepper
1/2 tsp dried dill
lemon slices (optional)

STEPS

  • Preheat oven to 425º.
  • Pat the salmon dry and place it in a greased baking dish.
  • Rub the butter all over the fish.
  • Combine the wine and lemon juice in a small bowl and stir.
  • Pour the liquid over the fish.
  • Sprinkle the salt, lemon pepper, and dill over the fish.
  • If you are using the lemon slices place over the top of the fish.
  • Bake the fish for 20–25 minutes or until the fish flakes off easily with a fork.
Sweet Treats

Recipe—Lemon Crackle Cookies

The other day when I dropped my son off at daycare there was a signup sheet for a bake sale. I signed up because, well… I love doing that sort of thing! I didn’t even pay attention to the date until I got to work and went to write it on my calendar. Holy smokes! It was the next day! That meant that after I got off working a long day I had to pick up my husband from work, go get my car from the shop (this is why I had to pick up the husband from work that day), go to the grocery store, swing by daycare to get the munchkin, cook dinner, bathe the little rascal, and THEN bake something for the bake sale! And being a mom there is always dishes and laundry in the mix too. What had I gotten myself into?!? I am not one to flake out so I just decided I had to come up with one heck of a quick and easy item to make. That’s when I had remembered seeing easy chocolate cake cookies. Basically you use boxed cake mix as the base for the cookies.

There always seems to be plenty of chocolate at bake sales so I mixed it up and made what I am calling Lemon Crackle Cookies. These were so incredibly quick and easy to make. They were super cheap and they turned out really good! Think of a fluffy version of a lemon bar. This recipe makes between 3 and 4 dozen cookies so they are perfect for a bake sale or even a cookie exchange. I recommend you give them a shot whether or not you are strapped for time.

INGREDIENTS
2-18.25 oz boxes Duncan Hines lemon cake mix
4 eggs
2/3 c vegetable oil
grated rind from one lemon
2 tbsp fresh lemon juice
1 1/2 c powdered sugar

STEPS

  • Preheat oven to 375º.
  • In a large bowl mix together dry cake mix, eggs, oil, lemon rind, and lemon juice.
  • Put the powdered sugar in a shallow bowl or plate.
  • Form small balls with the dough and then roll them in the powdered sugar. Be sure the cookies have a really thick coating of the sugar if you want them to have that crackle look.
  • Place at least 2 inches apart on a parchment paper lined baking sheet.
  • Bake for 7–9 minutes or until golden brown on the bottom.
  • Allow cookies to sit on the baking sheet for a couple of minutes before transferring to a cutting board or cooling rack.