Quick one pot dinners are some of my faves. My husband’s too since he does the dishes. Ha ha! Basically, any noodle bowls are a hit with my family and I love them because they are usually quick, easy, and they are a great way to get an assortment of veggies into the mix. This recipe takes less than 30 minutes to make and it is so versatile. You can swap out the beef for shrimp or chicken and you can really use any veggies you want. I also recommend snow peas, bell peppers, zucchini, and mini corn as great options. The sauce has lots of great flavors that the noodles, meat, and veggies all take on. Just the perfect balance of sweet, salty, and spicy. We also like to serve this with a side of egg rolls or pot stickers to get that whole “take out” vibe.
If you follow me on Instagram, you have probably seen my backyard pride and joy, my little garden. One of the first springs in our home I had my dad and husband build me this big, beautiful redwood garden box. It has been a couple of years of figuring out what grows good and what doesn’t. Tomatoes, zucchini and pesto thrive during the hot California summer months.
Well, this year by spry little basil plants turned into full on basil bushes in a matter of a couple of weeks. They were thick, tall, and bushy and I knew they had to be harvested before they went to flower and became bitter and tough. Homemade pesto coming right up!
While I absolutely love store bought pesto nothing beats the freshness of making your own. It can be a little pricey with the cost of pine nuts, quality parmesan, and extra virgin olive oil but it is absolutely worth it! Plus, it is so easy to make. Load all the ingredients in the blender, and blend!
With how much basil I harvested I actually made a massive batch but you certainly don’t need to make that much at a time unless you are sitting on a big basil harvest yourself. The recipe below is written for a single batch.
One thing that is really great about pesto is that it freezes great! I proportion it out into larger containers for pasta dinners and then smaller containers that work great for pizza sauce like when I make my Shrimp Pesto Pizza.
What makes my pesto unique is I like to add some fresh lemon juice to the mix. I find it helps serve as a natural preservative, gives it a great flavor, and also helps to keep the vibrant green color.
INGREDIENTS 2 c basil leaves, packed 3/4 c parmesan cheese, shredded 1 c extra virgin olive oil 1/2 c pine nuts 3 cloves garlic juice from one lemon 1/2 tsp salt 1/4 pepper
STEPS
Combine all the ingredients in the blender and blend string periodically if needed.
Add additional olive oil if you need more liquid to blend.
Last year in my garden we were harvesting more tomatoes than we knew what to do with! We were having Panzanella Salad and Marinated Tomatoes almost every week. Once my jalapenos came in, I was all about that fresh salsa! Who doesn’t love that fresh salsa flavor!? Store bought salsa just does not compare.
This recipe is pretty much goof proof. You just add all the ingredients to the blender and blend. Yes, it really is that simple!
Just serve up with a side of some crispy salty tortilla chips or along with your favorite tacos or burritos.
Note: If you over blend your salsa, it can become sort of frothy. If this happens, just cover and store in the fridge for a couple of hours and it should settle. Fresh salsa can last in the fridge covered for up to two weeks. The flavors get better and better with time.
INGREDIENTS 1/4 white onion 2 tsp garlic, minced 1 jalapeno 4–6 medium sized tomatoes 1/4 tsp salt 1/4 tsp ground cumin 1/2 c fresh cilantro leaves juice from 1 lime pinch of sugar (optional, to balance the acidity of the tomatoes)
STEPS
Add the onion, garlic, and jalapeno to a food processor or blender and pulse a few times to chop.
Add all the remaining ingredients to the blender and blend to desired consistency.
Refrigerate for 30 minutes to allow the flavors to really come together. (Optional)
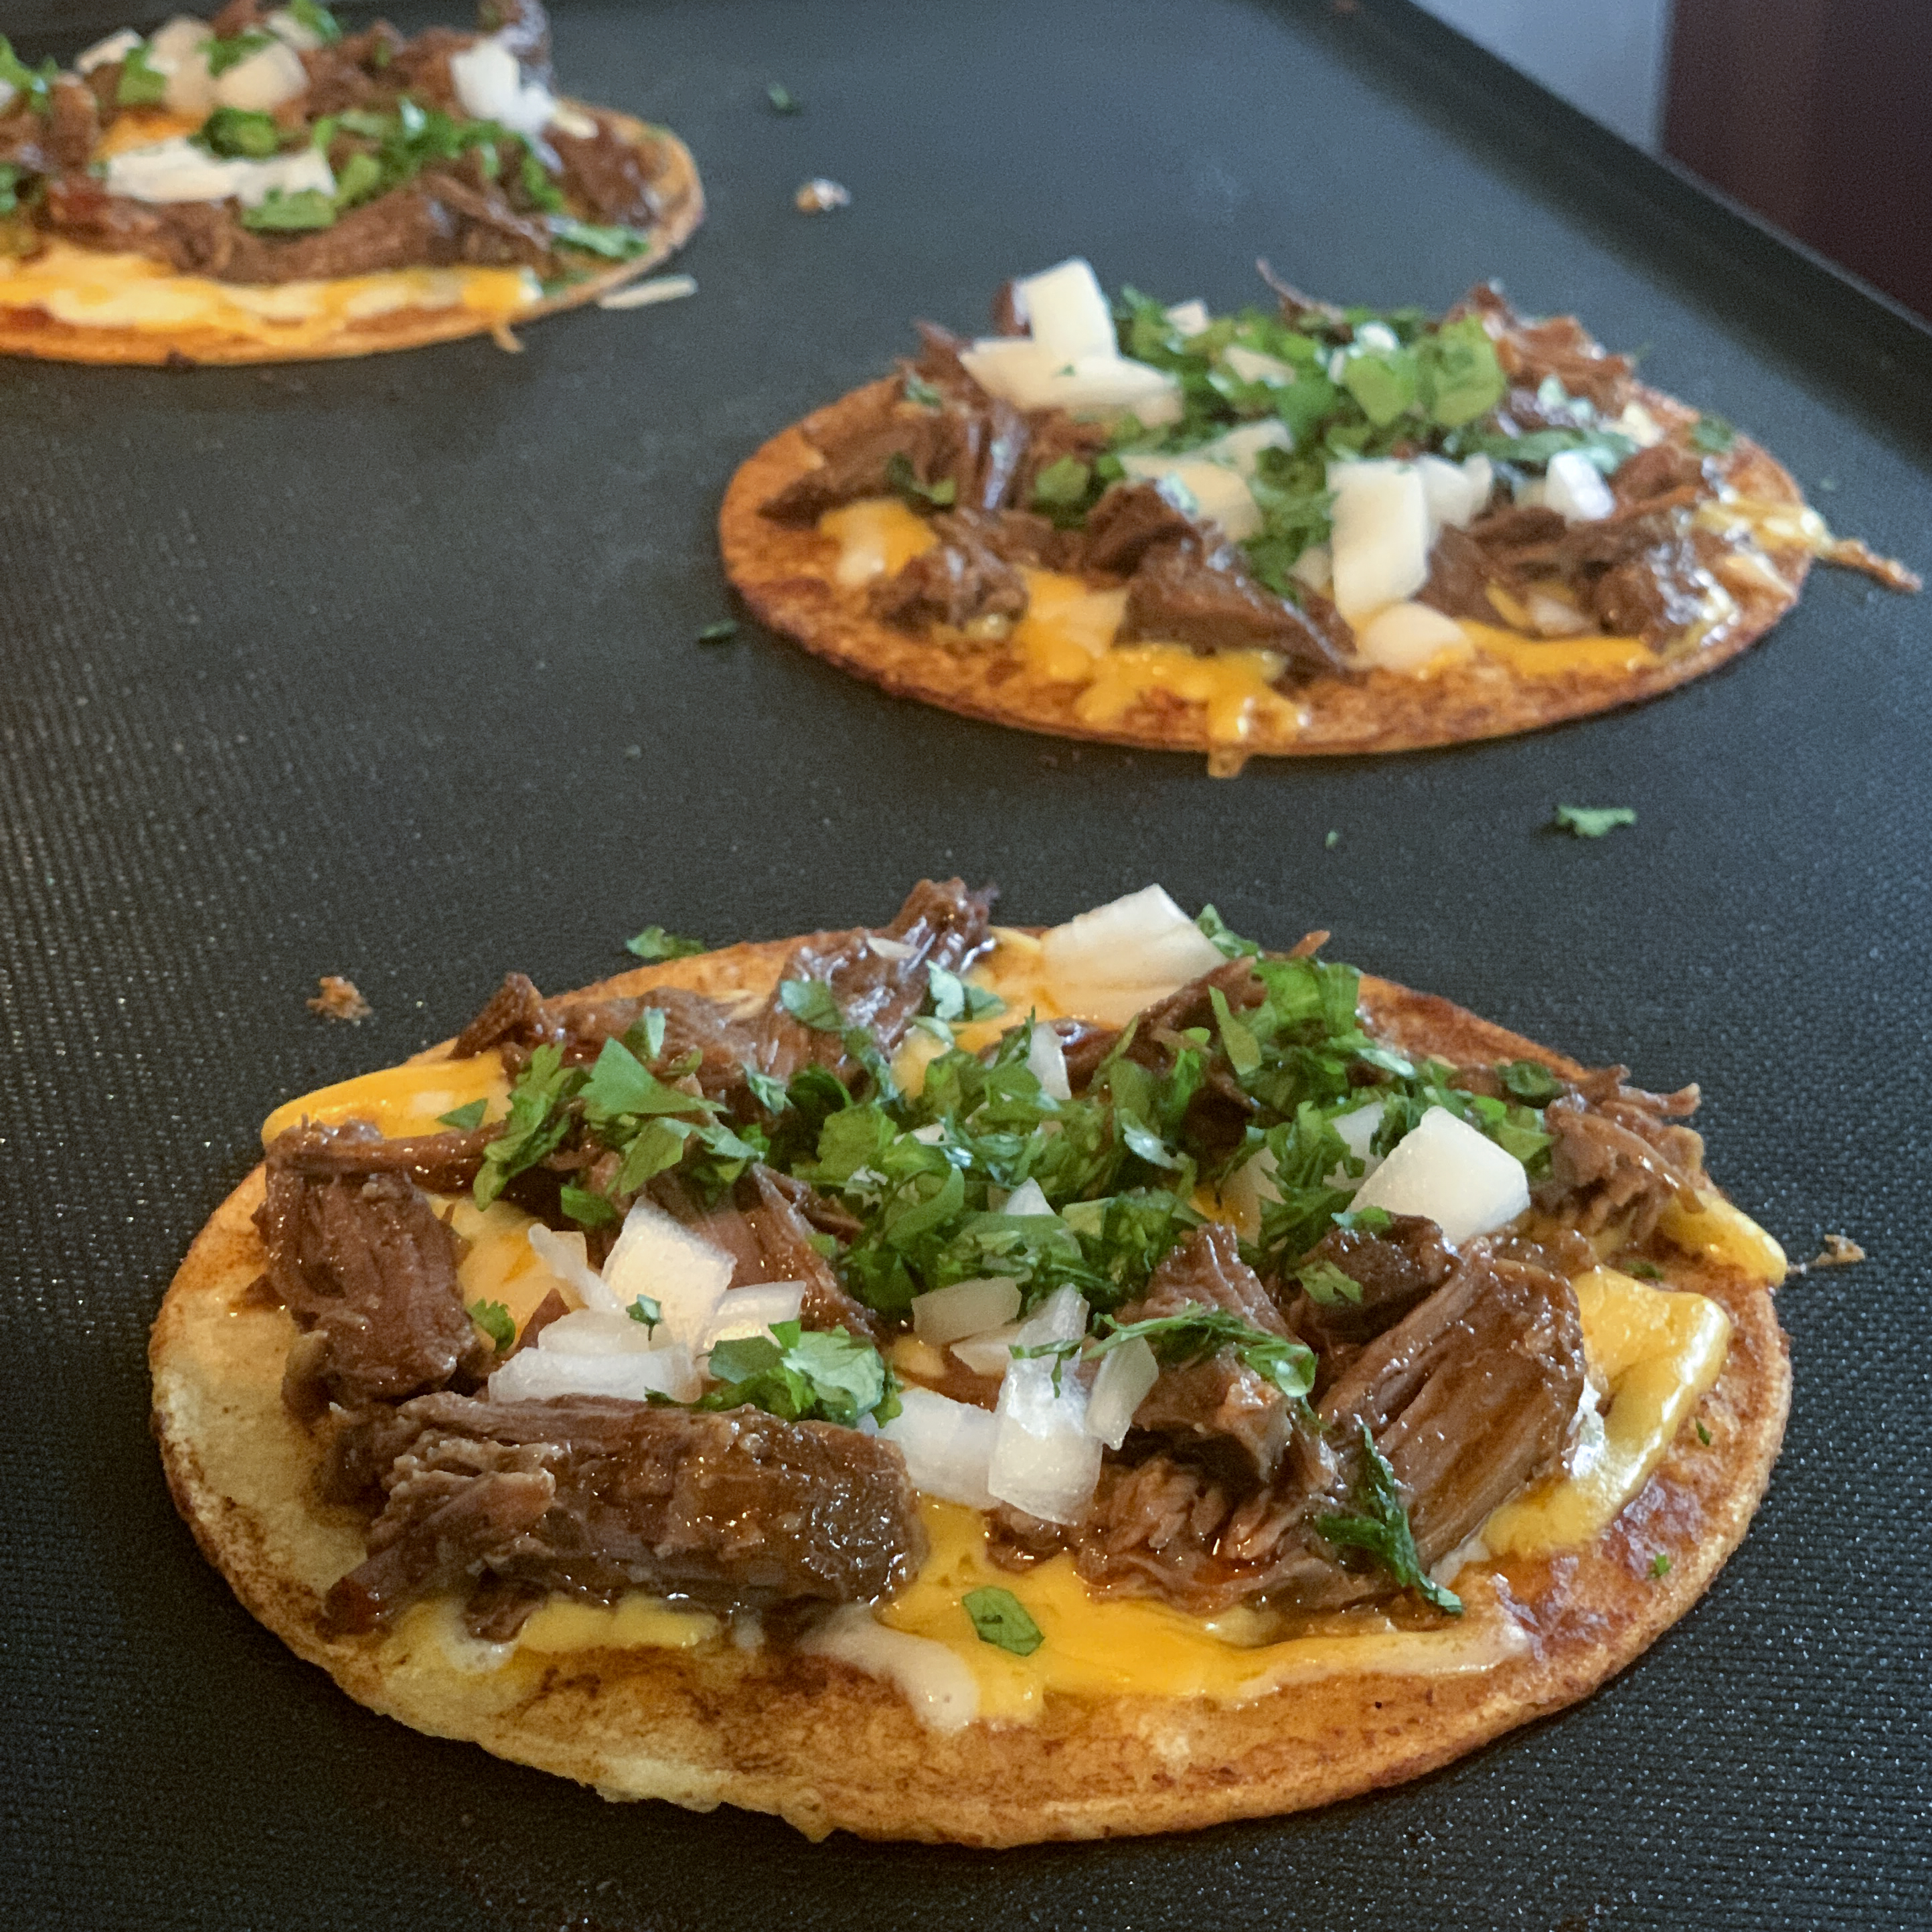
I follow a LOT of foodies on social media and over the last year I have seen this trend of people posting photos of these delicious looking meat and cheese filled tacos served up with a dish of red sauce for dipping. This delicious looking meal is called birria or quesabirria tacos and now it seems like you see them everywhere! I scoped out some of our local Mexican restaurants and could not find anywhere that had birria tacos on the menu, but I had to have them! Sooooo… to Pinterest I went!
I found quite a few recipes out there and of course every one of them was different, but none of them had me sold. Being who I am, I picked and pulled elements from several different recipes and came up with my own recipe.
I was absolutely thrilled with how these tacos turned out. The meat was flavorful and juicy and the broth was so rich and just the right amount of spicy. I served my husband, son, and I each up with three tacos to start with but we kept going back to the grill for another one, and another one, and another one until we were about to pop. These seriously lived up to all the hype. I can honestly say, these were not only the best tacos I have ever made, but also the best tacos I have ever eaten!
Note: These are relatively easy to make but time consuming since you slow cook the meat on the stovetop. It is the perfect recipe to make on a rainy Sunday while you watch some football and just want to indulge in some good food.
BIRRIA INGREDIENTS 3 lbs short ribs (bone in) 1 large white onion skin removed, halved and cut into 1/2″ thick slices 1 garlic bulb with skin on, top cut off 2 carrots, cut into quarters 5 bay leaves 8 dried guajillo chiles, stems cut off and seeds removed 3 chicken bouillon cubes 2 tsp chili powder 1 tsp oregano 1 tsp ground cumin 1 tsp salt
TACO INGREDIENTS corn tortillas jack cheese, shredded white onion, chopped cilantro, chopped cotija cheese, crumbled
STEPS
In a large pot add meat, onion, garlic, carrots, bay leaves, and dried peppers and cover with water.
Add the chicken bouillon, oregano, cumin, and salt.
Bring the pot to a boil over medium high heat.
After 30 minutes of cooking, skim any foam off the top of the water.
Remove the peppers, onions, and carrots and place them in a blender.
Squeeze the garlic cloves from the bulb into the blender and add 1 cup of the liquid from the pot.
Puree the ingredients in the blender until smooth.
Pour the vegetable puree back into the pot.
Add the lid to the pot and simmer over medium-low heat for 3 hours stirring every 30 minutes or so.
Transfer the meat and bones to a large cutting board.
Remove the meat from the bones and discard the bones.
Using two large forks, shred the meat and set aside.
Heat a large skillet or griddle over medium heat.
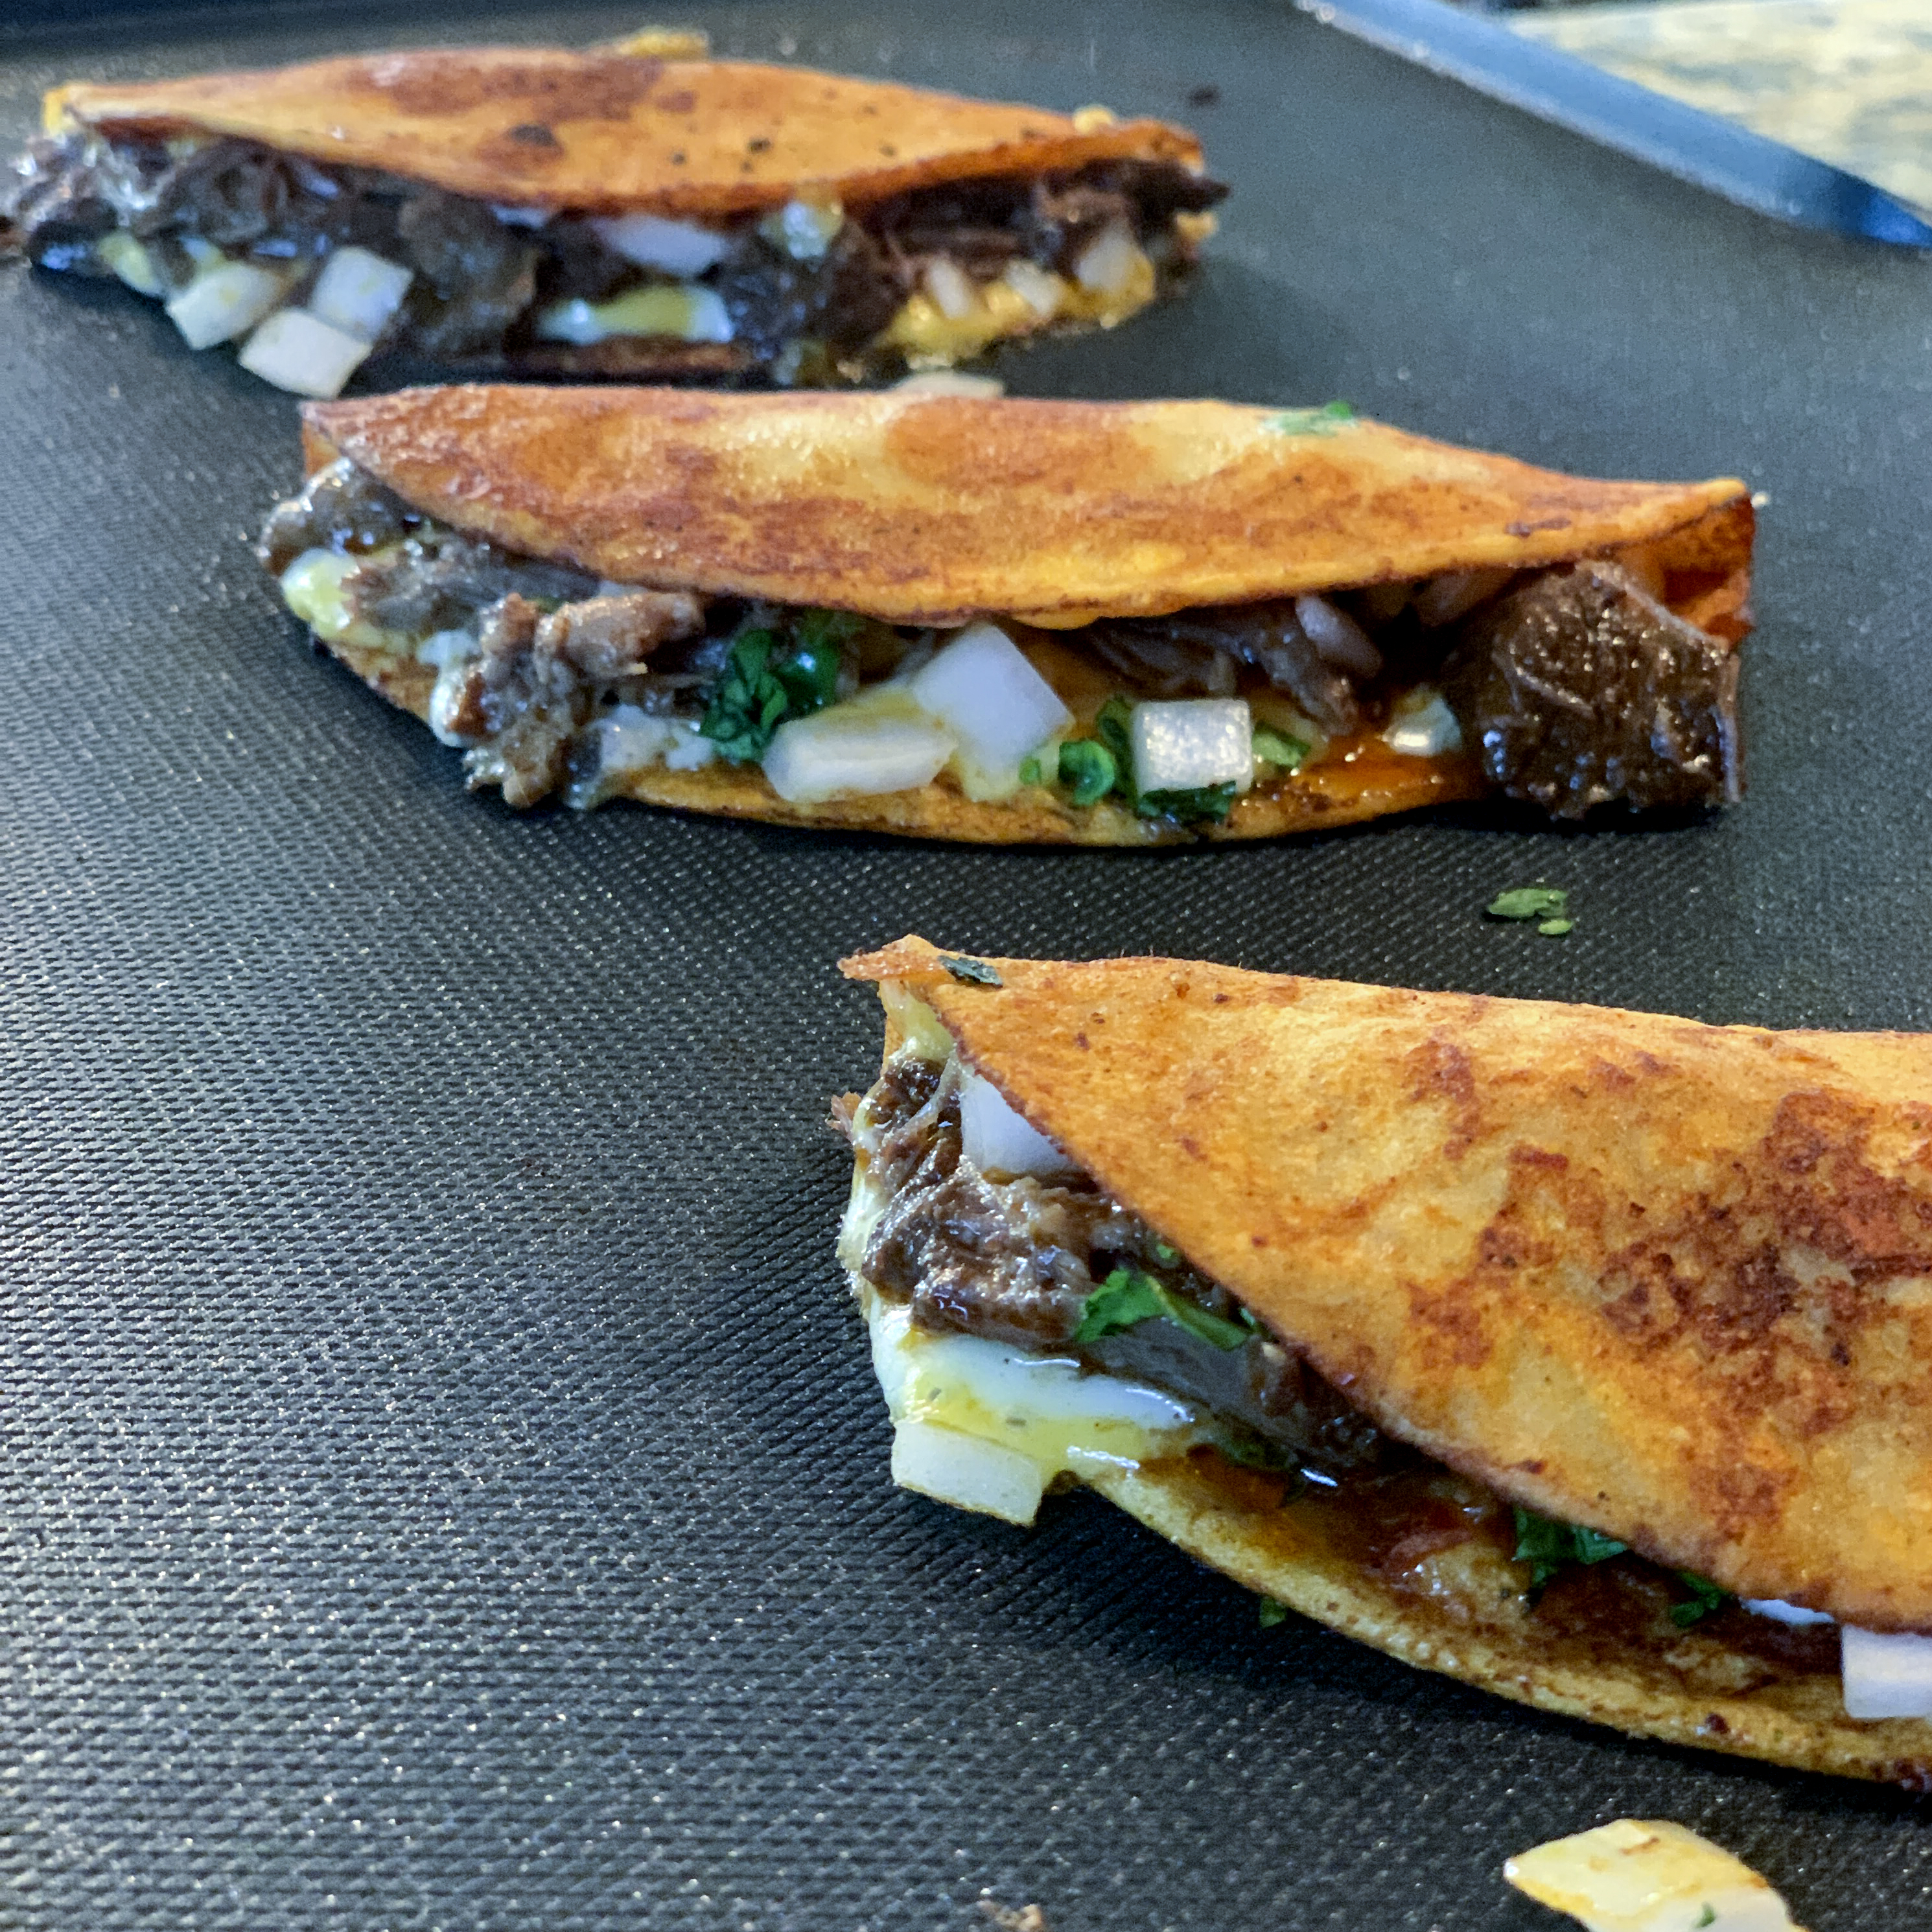
Dip a corn tortilla into the broth left in the pot and place the tortilla on the griddle.
Top the tortilla with jack cheese, chopped meat, diced white onion, and some cilantro.
Fold the taco in half and press down with the back of a spatula.
Continue cooking until the tortilla is golden and cheese is melted, about 2–3 minutes.
Flip the taco and continue cooking the other side.
Transfer the tacos to a plate or serving dish as you finish them.
Garnish the finished tacos with cilantro and crumbled cotija cheese.
Ladle some of the broth into a ramekin and top with fresh onions and more cilantro and serve with the tacos.
Dip the tacos into the broth and enjoy each and every sauce-soaked cheesy bite.
The first time I actually made this recipe was Christmas Eve. Some of you might be thinking, who makes a crock-pot meal on Christmas Eve? The answer is, this lady! Why is it that people feel the need to spend half the day in the kitchen and half their paychecks on holiday dinners? You can have an amazing meal with minimal time in the kitchen and by spending less than $25. Thennnnnnn you can use that money you saved on groceries and buy some nice red wine that will compliment this dinner perfectly.
That Christmas Eve I just wanted to be able to fully relax and enjoy the day with my family. I didn’t want to be in the kitchen for most of the day slaving over the oven. And guess what, this dinner was just as good as many of the dinners I spent the entire day making. And best of all, my family loved it!
The meat had so much flavor and was so juicy! The sauce is a very mild tomato-based sauce that goes so fabulously with the parmesan risotto. This is probably in the top 5 recipes I have ever made. It is so filling and hearty. A perfect comfort meal for the cooler weather. I love that this recipe is “fancy” enough for a special occasion or a holiday but is quick and easy enough that you can pull it off on a Thursday night after a long day of work. Literally an all occasion dinner.
POT ROAST INGREDIENTS
3 lb beef chuck roast
1 tbsp dried minced onion
2 tbsp garlic, minced
1 (.6 oz) package au jus mix
1 (.7 oz) package dried Italian salad dressing mix
2 tsp black pepper
1 pinch cayenne pepper
1 1/2 c tomato juice (like V8)
RISOTTO INGREDIENTS
3 tsp olive oil
1 lb arborio rice
6 c chicken broth, room temperature
1 c parmesan cheese
1 tsp onion powder
ground pepper
In a bowl, whisk together all the remaining pot roast ingredients.
Pour the tomato mixture over the top of the roast.
Cook on low heat for 8–10 hours, or high heat for 5–6 hours.
When the roast is done cooking, transfer it to a cutting board and allow it to rest for 5 minutes.
Using two forks, shred the roast and place back into the crock-pot.
Cover the crock-pot and keep on low.
While the meat is soaking in all that yummy sauce, begin to prepare the risotto by putting the olive oil in a large saucepan over medium high heat.
Add the rice and stir to evenly coat the rice with the oil.
Cook for about 2–3 minutes.
Add 1 cup of the broth and simmer, stirring constantly, until the broth has completely reduced and the pan is nearly dry, about 3 minutes.
Repeat the above step incrementally using 1 cup of broth at a time. The gradual addition of broth is key to getting the rice to develop a nice and creamy sauce.
Once all the broth is cooked down, stir in the cheese and onion powder and season with pepper.
Scoop a large spoonful of risotto into a serving dish and top with the shredded meat, additional parmesan cheese, and some parsley.
Right now, I am drowning in youth sports. My son is currently playing soccer and baseball which takes up about 5–6 days a week and sometimes we have both on the same day. I lost my sanity a few weeks ago.
Don’t get me wrong, I absolutely love it! It just means that I need to be diligent in my menu planning and have some recipes that allow me to have dinner on the table quickly. We certainly have nights where dinner consists of sandwiches, Kraft Mac N Cheese, or takeout, but I try and cook a real dinner at least 4–5 nights a week. That means whatever I am making needs to be quick!
This recipe takes less than 30 minutes to make and costs about $15, assuming you have the basic stuff on hand. It is so simple, fast, and tasty! My family loves this recipe! The chicken comes out so juicy and flavorful after simmering in the creamy lemon sauce. Hope you enjoy it as much as we do!
INGREDIENTS
4–5 boneless, skinless chicken breasts
salt and pepper
1/4 c flour
2 tbsp butter
2 tbsp olive oil
1 lb penne
1 c chicken broth
3 lemons, 2 for juicing and 1 sliced
3/4 c heavy cream
1/4 c capers
parsley, chopped
STEPS
Season both sides of the chicken breasts with salt and pepper.
Place the flour in a large Ziploc bag and add chicken breasts.
Toss the chicken breast in the Ziploc bag until they are all evenly coated in the flour.
In a large skillet, heat the butter and olive oil over medium-high heat.
Place the chicken breasts in the skillet.
Cook the chicken for 6–7 minutes per side or until cooked all the way through.
While the chicken is cooking, bring a large pot of water to a boil and cook the pasta per the package instructions.
Add the broth, juice from two lemons, sliced lemon, heavy cream, and capers to the skillet with the chicken.
Season the sauce with salt and pepper to taste.
Bring the sauce to boil and reduce heat to medium-low heat.
Continue cooking the sauce until it has thickened up, about 3–4 minutes.
Transfer the chicken breasts to a plate or cutting board.
Drain the pasta and add it to the skillet with the sauce, tossing to coat all the noodles.
Serve the pasta on plates and top with a chicken breast.
Sprinkle the dish with fresh chopped parsley and serve.
I don’t know why I am so late to the game but I recently discovered a love of ramen. Not just the generic pack of dry noodles, but meat and veggie packed delicious ramen. It’s like Top Ramen on flavor packed steroids. I have a couple different recipes that I have been trying out but this one is the most recent one I have come to enjoy. It takes a bit of time to prep in the morning, but then it comes together in about 15 minutes when you get around to cooking it all up. Perfect for all those with busy lives who want a fast and tasty quality meal. By the way, you won’t believe how amazing the marinade smells. I think my mouth was watering the entire time I was making this recipe. Heck, my mouth is watering just writing about it.
Note: I made this recipe using new york steaks and it yielded a very tender meat. You can certainly use a one-pound flank steak for a more budget friendly recipe. If you are short on time in the morning (I mean who isn’t), you can prepare the marinade and slice the meat the night before keeping them separate and then add them to the ziploc bag in the morning. Just don’t marinade the meat overnight.
MARINADE INGREDIENTS
1/4 c vegetable oil
3 tsp garlic, minced
2 tbsp red wine vinegar
1/4 c honey
1/2 c soy sauce
1 tbsp parsley (dried or fresh with both work
2 new york steaks, fat trimmed
OTHER INGREDIENTS
3 tbsp cornstarch
2 tbsp olive oil
2 tbsp sesame oil
1/4 c brown sugar
1/2 tsp grated ginger
2 tbsp soy sauce
1 c beef broth
1/4 c worcestershire sauce
3 c broccoli florets, chopped
3 (3 oz) packages ramen noodles
1/4 tsp crushed red pepper
1/4 c green onions, chopped
MARINADE STEPS
Mix together all the marinade ingredients (except the meat) in a small bowl and set aside.
Cut the meat against the grain in 1/4-inch-thick strips.
Place the meat in a ziploc bag and poor the marinade into the bag.
Seal up the bag and place in the fridge to marinade for at least 2–8 hours (no more than 12 hours).
COOKING STEPS
Bring a pot of water to a boil and cook the ramen for 2 minutes.
Strain the noodles in a colander and rinse with cold water.
Cut off a bottom corner of the bag over the sink and allow all the marinade to drain out.
Transfer the meat to a small bowl and toss with the cornstarch.
In a large skillet heat two tablespoons of olive oil over medium high heat.
Add in the meat and sear on both sides until the meat is cooked but still tender, about 2 minutes.
Transfer the steak to a plate.
Reduce the heat to medium and add the sesame oil, brown sugar, ginger, soy sauce, beef broth, and worcestershire sauce to the skillet and bring to a simmer.
Stir and cook uncovered until it thickens, about 5–7 minutes.
Add the broccoli to the skillet and cover with a lid cooking it for 3 minutes.
Remove the lid and add in the meat and pasta.
Toss everything to coat and heat for an additional 1–2 minutes.
Transfer to bowls or plates and season with crushed red peppers and green onions.
Every couple of months I get together with a fabulous group of ladies for a book club meeting. I don’t know why we really call it a book club meeting because about 20% of the time is spent discussing the book we read and the other 80% is spent drinking fabulous wines, eating delicious foods, and catching up with some good old fashioned girl talk. Maybe wine and food club meeting would be more appropriate? Either way, we always end with an awesome variety of the most wonderful treats. Our last meeting was on a Friday night right around dinnertime so I wanted to bring something filling and yet low carb (I try and cut out carbs from the food when I know I will be consuming plenty in the wine.) These were absolutely wonderful! They were light yet completely filling. The meatballs were packed full of wonderful Mexican flavors and they really complemented the turkey nicely. The refreshing creamy cilantro lime sauce is actually from a recipe I shared a couple months back for shrimp taco cups. I LOVED that sauce and wanted to make it again. I could put that sauce on everything. So tasty!
CREAMY CILANTRO LIME SAUCE INGREDIENTS
1/3 c mayonnaise
1/2 c sour cream
2 tbsp milk
2 oz. canned diced green chilies
2 tbsp lime juice
1/2 tsp ground cumin
1/4 tsp kosher salt
1/4 c fresh cilantro, chopped
MEATBALL INGREDIENTS
1.25 lbs lean ground turkey
1 jalapeño, deseeded, deveined, and chopped
1 tsp garlic, minced
2 green onions, chopped
1/4 c cilantro, chopped
1/4 c panko or breadcrumbs
1 egg
1 tsp cumin
1/4 tsp oregano
salt and pepper
SAUCE STEPS
To make the sauce combine all sauce ingredients except the cilantro in a blender and puree until smooth.
Add in cilantro and pulse until combined.
Refrigerate sauce until ready to use.
MEATBALL STEPS
Preheat oven to 400º.
In a large bowl combine all meatball ingredients.
Using your hands mix well.
Using a large spoon, scoop a spoonful of the meat mixture and shape into 1”–1 1/4” round meatballs.
Place the formed meatballs into a greased baking dish making sure they don’t touch.
Bake for 16–20 minutes.
Serve hot with the cool cilantro lime dipping sauce.
The other night we were going to a friend’s house for a Mexican feast and I was put on appetizer duty. I wanted something besides plain ol’ bean dip that I could make ahead of time and assemble there, something light, refreshing, and elegant with a Mexican flare. These bite size shrimp taco cups were perfect! I must admit the sauce totally makes this dish. It is sooooo good! I think I will be making it in the future as a salad dressing. It would be great with a spicy chicken breast over a bed of greens. It just has so many flavors and each ingredient really shines through. Enjoy!
Note: Since these had to travel I was able to cook the won ton cups and shrimp at home and assemble them at my friend’s house. These are perfect if you are hosting a social gathering since all the prep can be done ahead of time and just quickly assembled once your guests arrive, which means more time for socializing! Perfect for the upcoming holidays.
CREAMY CILANTRO LIME SAUCE INGREDIENTS
1/3 c mayonnaise
1/2 c sour cream
2 tbsp milk
2 oz. canned diced green chilies
2 tbsp lime juice
1/2 tsp ground cumin
1/4 tsp kosher salt
1/4 c fresh cilantro, chopped
SHRIMP CUP INGREDIENTS
24 small won ton wrappers
2 tbsp olive oil, divided
24 medium shrimp, peeled and deveined
1/2 tsp salt
1 tsp chili powder
1 lime
1 c shredded cabbage
STEPS
To make the sauce combine all sauce ingredients except the cilantro in a blender and puree until smooth.
Add in cilantro and pulse until combined.
Refrigerate sauce until ready to use.
Preheat oven to 350º.
Lightly brush wonton wrappers with olive oil and arrange in a mini muffin pan making sure to press down flat in the bottoms.
Bake for 5–7 minutes or until golden brown and crisp.
Toss the shrimp with 1 tbsp of olive oil, salt, and chili powder.
Roast shrimp on a baking sheet in the oven for 6–8 minutes or until cooked through.
Remove shrimp from oven and squeeze the juice from the lime over the shrimp.
To assemble fill each wonton cup with a bit of shredded cabbage, add a spoonful of the sauce, and top with one shrimp.
When it comes to Christmas dinner this girl loves her beef. Every year we either cook prime rib or beef tenderloin. This recipe calls for beef tenderloin but feel free to try the seasoning and sauce recipe with prime rib. Both turn out fantastic! I prepare this recipe every year and it has never disappointed. The roasted garlic horseradish sauce is spectacular! For lunch the next day spread some of the sauce on a roll with leftover meat and there will be fireworks in your mouth. Oh how I can’t wait for Christmas dinner and the leftovers that come with!
Note: I recommend making the sauce the night before so that it has time to chill and thicken. This large of a tenderloin will serve 12–16 people. Plan on 1/3–1/2 lb per person. Feel free to half the rub recipe and use a 3 lb tenderloin but be sure to adjust the cooking times. The temperature is really what you need to pay attention to.
ROASTED GARLIC HORSERADISH CREAM SAUCE INGREDIENTS 1 large head of garlic, left intact
1 1/2 tbsp olive oil
1 tsp salt
2 c heavy cream
1/4 c drained bottled horseradish
1/8 tsp white pepper
STEPS
Put oven rack in middle position and preheat oven to 400°.
Cut off and discard top fourth of garlic head and place on a large sheet of foil.
Drizzle exposed garlic with oil and sprinkle with 1/2 tsp salt.
Wrap the seasoned garlic head tightly in foil.
Roast garlic until tender, about 1 hour, then open foil and allow to cool.
While garlic is cooling, simmer the cream in a heavy saucepan, stirring occasionally, until reduced to about 3/4 c, about 20–25 minutes, then transfer to a bowl.
Squeeze the garlic cloves into a small bowl, discarding skins, and mash together with horseradish, pepper, and the remaining 1/2 tsp of salt.
Stir together pepper, bouillon, salt, cornstarch, oregano, garlic powder, and paprika in a small bowl.
Rub oil over tenderloin, and then cover with seasoning mixture, rubbing it into meat.
Put tenderloin on a rack in the roasting pan and roast for 15 minutes.
Reduce the oven temperature to 425° and cook until thermometer inserted into the center of the meat registers 130° for medium rare, probably 50–60 minutes.
Let beef stand on rack in pan for 10 minutes before carving.
Cut beef into 1/4-inch thick slices and serve with the roasted garlic horseradish cream sauce.