Dinners

Recipe—Bruschetta Chicken

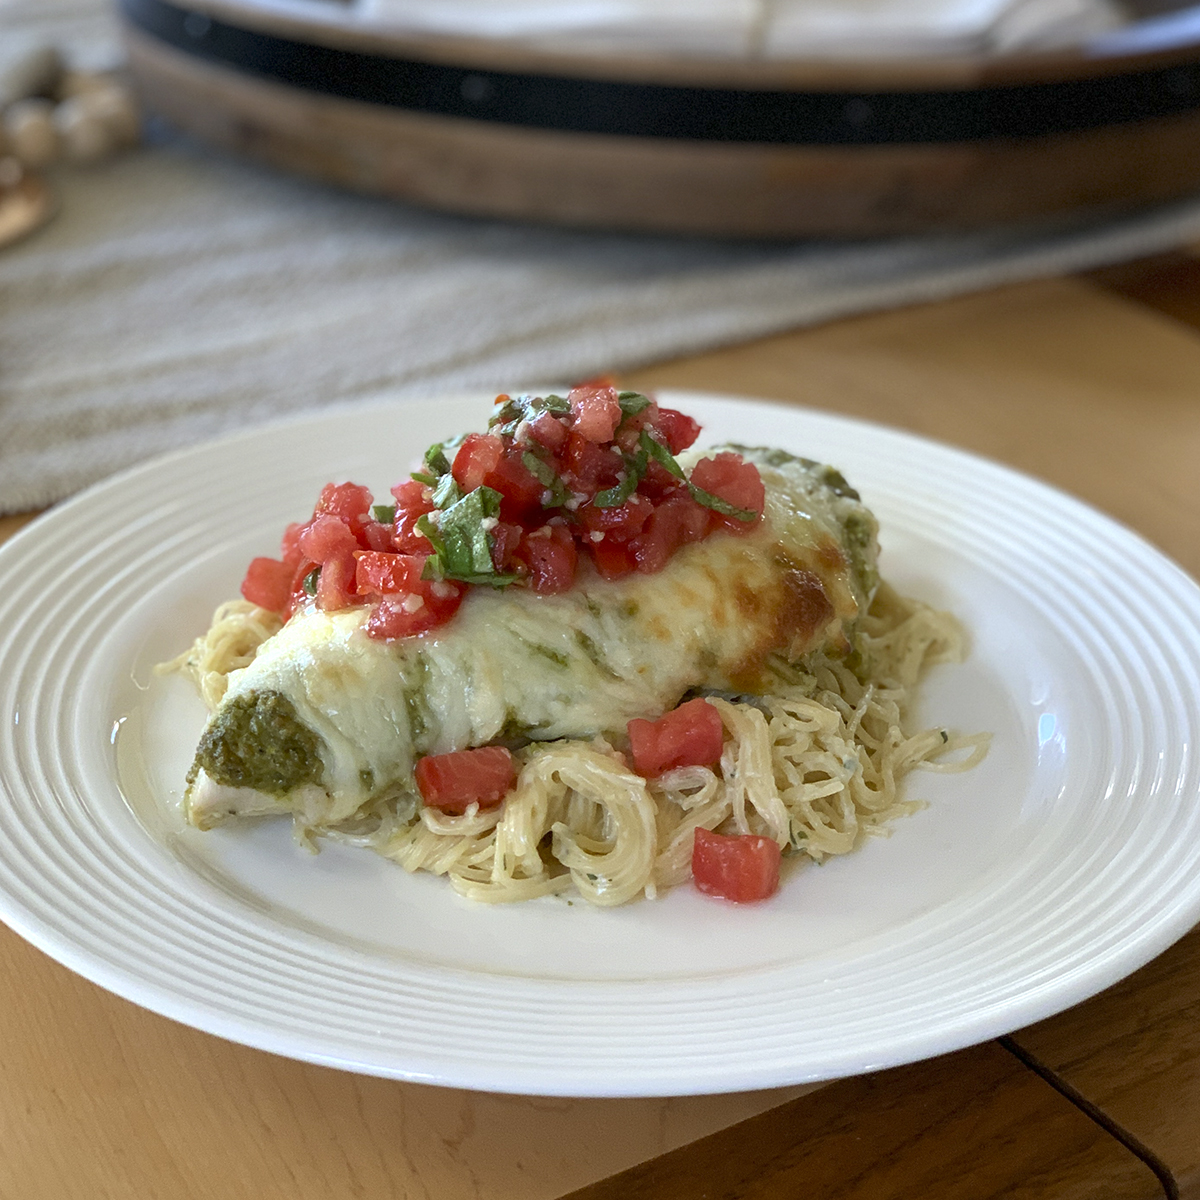
Tomatoes and basil are like an Italian match made in heaven. You can almost guarantee that anything made with those two ingredients will be amazing. One of my favorite ways to bring them together is in a classic bruschetta made up of tomatoes, basil, garlic, and olive oil. So simple but so damn good! Now imagine that fresh bruschetta spooned over a juicy chicken breast smothered in zesty pesto and a layer of melted mozzarella cheese. That my friends, is one hell of a tasty main dish for dinner.

I like to just eat this chicken on it’s own but with the carb monsters I live with, I tend to serve it for them with a side of rice pilaf or over a bed of pasta alfredo. This recipe is so easy to put together, but it looks fancy enough, that you can totally serve it for dinner guests.

BAKED CHICKEN INGREDIENTS
3–4 boneless skinless chicken breast
salt & pepper
1 c pesto
2 c mozzarella, shredded

BRUSCHETTA INGREDIENTS
2 large ripe tomatoes, diced
8–10 basil leaves, chopped
1 tsp garlic, minced
2 tbsp extra virgin olive oil
salt & pepper

STEPS

  • Preheat the oven to 400º.
  • Place the chicken breasts in a lightly greased baking dish and season both sides with salt and pepper.
  • Spread the pesto over the tops of the chicken breasts and sprinkle with the mozzarella cheese.
  • Place the baking dish in the oven and bake for about 25 minutes or until the chicken is cooked completely through and mozzarella is just starting to brown up.
  • While the chicken is cooking, combine all the bruschetta ingredients in a medium bowl and stir to combine.
  • When the chicken is done cooking, transfer them to a plate and finish with a big scoop of that fresh bruschetta.
Dinners, Side Dishes

Recipe—Jalapeño Popper Mac N’ Cheese

Jalapeño Popper Mac N’ Cheese

My name is Rebecca and I am a cheesy jalapeñoholic. I will literally devour anything with cheese and jalapeños. I HAVE NO SELF CONTROL!

If it has popper in the name, I am game. Mac n’ Cheese with a crispy top is involved. No holding me back. I will literally fall off of any diet wagon for some good mac n’ cheese. That is a universal thing, right? Like, that goes for everyone?

Come on, you start with a creamy white sauce base, add in gobs of pepper jack cheese until it is thick, and creamy, and cheesy, and then add in cooked pasta. It could be perfect as is, but no. It gets better. You add a buttery panko topping that once crisp will replicate that of the exterior of deep-fried jalapeño popper. And then the sliced jalapeños on the top is literally the icing on the cake. SO. DAMN. GOOD!

This recipe goes fantastic with any sort of grilled meat but is totally sufficient as a standalone dish. What says comfort food more than a big ol’ bowl of spiced up mac n’ cheese? Nothing. Absolutely nothing people.

Note: If you do not have an oven safe skillet you can make this in whatever large skillet you have, and then transfer the noodles and cheese sauce to a baking dish before topping with the panko and sliced peppers. 

MACARONI INGREDIENTS
8 oz macaroni pasta, uncooked
3 tbsp butter
3 tbsp flour
3 c milk
3 c pepperjack cheese, crated
salt and pepper
1/2 tsp crushed red peppers

TOPPING INGREDIENTS
3 tbsp butter, melted
1/2 c panko
1/4 c jalapeño slices

STEPS

  • Preheat the oven to 400º.
  • Cook the pasta per the package instructions.
  • Drain and allow to sit.
  • Melt the butter in a large oven safe skillet over medium-high heat.
  • Whisk in the flour and cook it for about a minute while stirring continuously until it starts to lightly brown and is well combined.
  • Gradually whisk in the milk, about 1/2 cup at a time, making sure it is nice and creamy and starts to thicken after each addition. Continue this until the milk is finished.
  • Bring the mixture to a simmer and then reduce heat to low.
  • Whisk in the cheese, salt, pepper, and crushed red peppers and stir until it is all melted and creamy.
  • Add in the cooked pasta making sure all the noodles are evenly coated and remove skillet from heat.
  • Now for the topping!
  • In a small bowl mix together the melted butter and panko.
  • Evenly distribute the topping over the mac n’ cheese.
  • Top with sliced jalapeños.
  • Bake for 8–10 minutes or until the panko starts to turn a nice golden brown and the sauce is simmering around the edges.
  • Allow to rest for about 5 minutes.
  • Serve and enjoy!
Appetizers, Snacks

Recipe—Off the Chain Cheddar Crackers

INGREDIENTS
3/4 c sharp cheddar cheese, shredded
1/2 c butter, softened
1 c flour
1/2 tsp salt
dash of paprika

STEPS

  • Combine all ingredients in a bowl and mix thoroughly.
  • Cover and refrigerate dough for 45 minutes.
  • Preheat oven to 375º.
  • Shape the dough into 1″ balls and place a couple of inches apart on a parchment paper lined baking sheet.
  • Press down with a fork leaving hatch marks on top.
  • Bake for 12–14 minutes or until the edges just start to turn a nice golden color.
  • Leave on baking sheet to cool for 10 minutes.
  • Serve and enjoy!

Note: These crackers will stay fresh in an airtight container for several days.

Recipe adapted from Chef in Training.

Side Dishes

Recipe—Cracked Corn and Cheese Cornbread Muffins

Cracked Corn and Cheese Cornbread Muffins

I am not one to just make something out of the box without tinkering with it. I’m sort of like a dog, I want to make my mark, make it my own. I love the convenience of those little boxes of the Jiffy corn muffin mix but it’s fun to add a little pizzazz. This recipe takes a plain old-fashioned corn muffin and gives it a little extra oomph. I add some corn kernels, pepper jack cheese, and a handful of green onions. This gives them a nice texture with the bits of corn, a nice little bite, and the cheese is like a gooey surprise in the middle. The kids will flip over these!

Note: If you are concerned about the spice of pepper jack cheese just use regular jack. 

INGREDIENTS
8.5 oz package of Jiffy corn muffin mix
1/2 c pepper jack cheese cut into 1/4” cubes
1/2 c corn (frozen or canned will work)
2 green onions, chopped

STEPS

  • Preheat oven to 400º.
  • Prepare corn muffin mix per package instructions.
  • Stir in cheese, corn, and green onions.
  • Prepare muffin pan with liner cups and evenly distribute the muffin mix in each cup filling up about 2/3 of the way.
  • Bake for 18–20 minutes or until a toothpick comes out clean when inserted into the middle.
  • Remove from oven and allow to cool for a couple of minutes before serving.

Love this idea for corn muffins? Then perhaps you will like these!

Jalapeño Cheddar Corn Bread Muffins

Jalapeño Cheddar Cornbread Muffins

Dinners

Recipe—Bacon Cheddar Chicken (Copycat Version of Outback’s Alice Springs Chicken)

I am a bacon and cheese fanatic, which is why I am in LOVE with Outback Steakhouse’s Alice Springs Chicken. If you have never had this dish I speak of, let me tell you all about it. It is a juicy chicken breast cooked in a sweet and tangy honey mustard sauce, then topped with the most delicious things you can think of, sautéed mushrooms, bacon, and cheese, LOTS of cheese! Yummy-messy-goodness that’s what this is! I will admit though, I think mine is slightly better than Outback’s. Shhhhhh… don’t tell. While this dish does require a bit of prep I personally think it is well worth it.

Note: For best results be sure to allow adequate time for marinating the chicken breasts.

INGREDIENTS
1 c Dijon mustard
1 c honey
1/2 c mayonnaise
1 tsp lemon juice
4 boneless, skinless, chicken breasts
1 tbsp olive oil
2 tbsp butter
2 c white mushrooms, sliced
salt and pepper
paprika
8 slices bacon, cooked
1 c Monterey jack, shredded
1 c cheddar, shredded
2 tsp fresh parsley, chopped

STEPS

  • In a medium sized bowl mix together the mustard, honey, mayonnaise, and lemon juice until well combined.
  • Spoon out half of the marinade and place in a small bowl, cover, and chill until later.
  • Add the chicken breast to the large bowl with the marinade and toss to coat.
  • Cover the bowl and place in the fridge for 2–12 hours to marinade.
  • Preheat oven to 375º.
  • Heat the olive oil in a large skillet over medium heat.
  • Add the chicken to the skillet and discard the marinade that the chicken was soaking in.
  • Cook the chicken for 5–7 minutes per side or until golden brown.
  • While the chicken is cooking melt the butter in a small skillet over medium-high heat and sauté the mushrooms.
  • Transfer the cooked chicken breasts to a large baking dish and drizzle with some of the reserved honey mustard marinade. (Save the leftover marinade to serve alongside the finished dish.)
  • Season the chicken with salt, pepper, and paprika.
  • Place two pieces of bacon on each chicken breast and top with the sautéed mushrooms.
  • Sprinkle the Monterey jack on each breast and then the cheddar.
  • Bake the dish for 10–12 minutes or until the cheese is thoroughly melted and the chicken cooked through.
  • Remove the dish from the oven and sprinkle the chopped parsley over the melted cheese.
  • Serve each chicken breast with a small side of the honey mustard.

Recipe adapted from Favorite Family Recipes.

Dinners

Recipe—Cheesy Mexican Chicken

Saucy and cheesy, I love almost any dish with those qualities. This recipe has both of those and is also delicious and low-carb. And best of all there are only 5 ingredients! Win, win, win! A working mom’s dream come true! My saucy chicken is great all on it’s own, served over rice, with some warmed tortillas, or even as burrito filler. I love how quick and easy it is to put together, perfect for a week night. While I love red sauce my husband is a big fan of green. Next time I may try this with green enchilada sauce and pepper jack cheese just for something different.

INGREDIENTS
1 lb boneless skinless chicken breasts
1 pack taco seasoning or a batch of my homemade taco seasoning
10 oz can red enchilada sauce, mild (I love Las Palmas!)
1 c cheddar cheese, shredded
3 green onions, chopped

STEPS

  • Preheat oven to 350º.
  • Cut the chicken into cubes and sprinkle with the taco seasoning.
  • Sauté the chicken in a skillet over medium high heat stirring occasionally until cooked through, about 10 minutes.
  • Place the cooked chicken pieces in a greased 8” x 8” baking dish.
  • Drizzle the enchilada sauce over the top of the chicken and toss to coat.
  • Sprinkle the cheese over the chicken.
  • Bake for 15–20 minutes or until it is bubbling.
  • Remove from oven and sprinkle with the green onions.
Dinners

Recipe—Cheesy Sausage Pasta

I can make a mean batch of homemade macaroni and cheese but the classic dish just doesn’t cut it as a main course in our house. Sometimes you need a grown up version of the classic dish but with a little more substance. This right here fits that bill. It is a creamy cheesy pasta dish with bits of tomatoes and sliced up smoky beef sausage. Delish! This is the perfect meal for a busy day since the whole things takes less than 25 minutes AND it only uses one pot! I love meals like that! Makes dish duty so much easier. Who am I kidding? I don’t do dishes. That’s the hubby’s job, so this recipe makes his job easier. This comfort dish screams simplicity and is easy on the wallet too. What’s not to love?

Note: This recipe is written to use a cast iron skillet. If you don’t have one, no biggie. Just use whatever large skillet you have and before placing in the oven transfer the pasta to a large baking dish and then top with the green onions and cheese and finish off under the broiler.

INGREDIENTS
1 tbsp olive oil
1 package beef sausage cut into rounds
1 small yellow onion, diced
2 tsp garlic, minced
2 c chicken broth
14.5 oz can petite diced tomatoes
1/2 c heavy cream
1/4 tsp pepper
8 oz uncooked penne pasta noodles
2 c Monterey jack cheese, shredded
2 green onions, thinly sliced
salt

STEPS

  • Heat oil over medium high heat in a cast iron skillet.
  • Add the sausage and onion and cook until lightly browned.
  • Add in the garlic and cook for another minute.
  • Add the chicken broth, petite diced tomatoes, heavy cream, and pepper.
  • Bring to a boil.
  • Add pasta and simmer until the pasta is tender, about 12–15 minutes, stirring once or twice while cooking.
  • Turn on the oven broiler.
  • Remove the skillet from heat and stir in 1 cup of the cheese.
  • Add salt as needed.
  • Top with the green onions and remaining cheese.
  • Place skillet under the broiler and leave in the oven until the cheese is melted and lightly browned.
Dinners, Side Dishes

Recipe—Cheesy Broccoli Gratin

I love my raw veggies, I really truly do but sometimes it can be tough to get my little guy to eat enough of them. What better way to get kids to eat their broccoli than covering it in cheese, ooey gooey bubbling cheese? This is a totally decadent way to enjoy the little green trees. The sauce just melts into the broccoli florets and the top gets a perfect little crisp to it. While this is written as a broccoli gratin I added in carrots too since I had them on hand and they needed to get used. It goes great with or without them. I love serving this dish with a side of grilled meat. Yum! Talk about a perfect comfort food for this fall and winter.

Note: Leave out the panko and you have an indulgent low-carb side dish.

INGREDIENTS
1 lb fresh broccoli florets
2 carrots, thinly sliced (optional)
1/3 c mayonnaise
1/3 c milk
1 tsp mustard
1/4 tsp garlic powder
salt and pepper
1 1/2 c shredded cheddar or Swiss cheese
2/3 c panko or bread crumbs

STEPS

  • Preheat oven to 350º.
  • Steam broccoli and carrots for a few minutes making sure they still have a little crunch to them.
  • In a large bowl whisk together mayonnaise, milk, mustard, garlic powder, salt, and pepper.
  • Add in the cheese and stir until combined.
  • Gently mix in the cooked broccoli and carrots until they’re evenly coated.
  • Pour the broccoli mix into a 9” x 9” greased baking dish.
  • Sprinkle the panko over the top
  • Bake for 14–18 minutes or until the cheese is melted and bubbly and the panko is a golden brown.
Side Dishes

Recipe—Cheesy Mac Attack A.K.A. Macaroni N’ Cheese

When I think classic comfort food, I think of macaroni n’ cheese. Not the orange powdery stuff in a box that one might consider to be cheese, I’m talkin’ the real deal here. I’m talkin’ down right delicious oven baked mac n’ cheese that has a perfectly crunchy topping covering ooey gooey cheesy noodle goodness. If you are on a diet, do yourself a favor and don’t make this! You will not have the self-control to only eat one bite let alone resist it. Once you try this macaroni n’ cheese you will never need or want another recipe ever again. It is so good! It has now even become a regular item at our holiday dinners so keep it in mind come the holidays. I hope you and your family enjoy this favorite recipe of mine.

Note: I will warn you, this makes A LOT of ridiculously divine macaroni n’ cheese. It’s not a bad thing, just be warned! I actually follow the recipe and then split it into two 9”x 9” dishes and freeze one since it freezes great! The disposable foil containers you get at the grocery store are perfect for this and I love that they fit in the seal o’ meal bags allowing them to last well over 6 months in the freezer, not that it will last that long, but it could.

INGREDIENTS
1 lb pasta of choice (I like rotini because the cheese sticks to it really well)
2 c small curd cottage cheese
1 c sour cream
2 eggs
1 c Swiss cheese, shredded
3 c cheddar cheese, shredded
1 tsp salt
1/2 tsp garlic powder
1/4 tsp pepper
1 c bread crumbs (I like crushed croutons)

STEPS

  • Preheat oven to 375º.
  • Bring a large pot of water to a boil and cook pasta noodles al dente according to package instructions.
  • While pasta is cooking combine cottage cheese, sour cream, eggs, cheeses, and seasonings in a large bowl.
  • When your pasta is done cooking add it to the cheesy mixture and stir well.
  • Place macaroni n’ cheese in a 9” x 13” baking dish, or two 9” x 9” dishes if you wish to freeze one for later.
  • Top with breadcrumbs.
  • Place in oven and bake for 25–30 minutes or until bread crumbs are lightly browned on top.
  • Allow to cool for 5 minutes before serving. (Good luck waiting that long!)