‘Tis the season for indulging in tasty adult beverages and lots of fresh baked goodies. This time of year, I just love having a sweet night cap for dessert cuddled up next to the Christmas tree. Don’t get me wrong, I would honestly make these dessert shots any time of year. I actually made a big batch and served them for dessert at my party over the summer. They were a total hit paired up with a tray of chocolate chip cookies.
This is one of my favorite dessert shots. Every drop packs a punch and you get a nice little bit of cookie on the edge with each sip. This recipe makes two generous shots so there is one for you and one for a friend. Or even better, one for each hand. Enjoy!
Note: If you don’t have chocolate vodka, you can substitute regular vodka. If you plan on making these for a party, you can pre mix the alcohol but do not put into the shot glasses until you are ready to serve. Otherwise your cookie edge can get a bit soggy.
INGREDIENTS 1/2 oz Disaronno amaretto 3 oz Bailey’s irish cream 1 1/2 oz chocolate vodka 2 chocolate chip cookies, crushed for garnish chocolate cake frosting (for rimming the glasses) or light corn syrup
STEPS
Put a tbsp chocolate frosting or light corn syrup in a small bowl and add the cookie crumbs to a small plate.
Dip the rim of a shot glass into the frosting/corn syrup and then the cookie crumbs to coat the edge. Repeat with the other glass.
Fill a shaker with ice and add the amaretto, Irish cream, and chocolate vodka.
Shake well and strain into the prepared shot glasses.
I follow a LOT of foodies on social media and over the last year I have seen this trend of people posting photos of these delicious looking meat and cheese filled tacos served up with a dish of red sauce for dipping. This delicious looking meal is called birria or quesabirria tacos and now it seems like you see them everywhere! I scoped out some of our local Mexican restaurants and could not find anywhere that had birria tacos on the menu, but I had to have them! Sooooo… to Pinterest I went!
I found quite a few recipes out there and of course every one of them was different, but none of them had me sold. Being who I am, I picked and pulled elements from several different recipes and came up with my own recipe.
I was absolutely thrilled with how these tacos turned out. The meat was flavorful and juicy and the broth was so rich and just the right amount of spicy. I served my husband, son, and I each up with three tacos to start with but we kept going back to the grill for another one, and another one, and another one until we were about to pop. These seriously lived up to all the hype. I can honestly say, these were not only the best tacos I have ever made, but also the best tacos I have ever eaten!
Note: These are relatively easy to make but time consuming since you slow cook the meat on the stovetop. It is the perfect recipe to make on a rainy Sunday while you watch some football and just want to indulge in some good food.
BIRRIA INGREDIENTS 3 lbs short ribs (bone in) 1 large white onion skin removed, halved and cut into 1/2″ thick slices 1 garlic bulb with skin on, top cut off 2 carrots, cut into quarters 5 bay leaves 8 dried guajillo chiles, stems cut off and seeds removed 3 chicken bouillon cubes 2 tsp chili powder 1 tsp oregano 1 tsp ground cumin 1 tsp salt
TACO INGREDIENTS corn tortillas jack cheese, shredded white onion, chopped cilantro, chopped cotija cheese, crumbled
STEPS
In a large pot add meat, onion, garlic, carrots, bay leaves, and dried peppers and cover with water.
Add the chicken bouillon, oregano, cumin, and salt.
Bring the pot to a boil over medium high heat.
After 30 minutes of cooking, skim any foam off the top of the water.
Remove the peppers, onions, and carrots and place them in a blender.
Squeeze the garlic cloves from the bulb into the blender and add 1 cup of the liquid from the pot.
Puree the ingredients in the blender until smooth.
Pour the vegetable puree back into the pot.
Add the lid to the pot and simmer over medium-low heat for 3 hours stirring every 30 minutes or so.
Transfer the meat and bones to a large cutting board.
Remove the meat from the bones and discard the bones.
Using two large forks, shred the meat and set aside.
Heat a large skillet or griddle over medium heat.
Dip a corn tortilla into the broth left in the pot and place the tortilla on the griddle.
Top the tortilla with jack cheese, chopped meat, diced white onion, and some cilantro.
Fold the taco in half and press down with the back of a spatula.
Continue cooking until the tortilla is golden and cheese is melted, about 2–3 minutes.
Flip the taco and continue cooking the other side.
Transfer the tacos to a plate or serving dish as you finish them.
Garnish the finished tacos with cilantro and crumbled cotija cheese.
Ladle some of the broth into a ramekin and top with fresh onions and more cilantro and serve with the tacos.
Dip the tacos into the broth and enjoy each and every sauce-soaked cheesy bite.
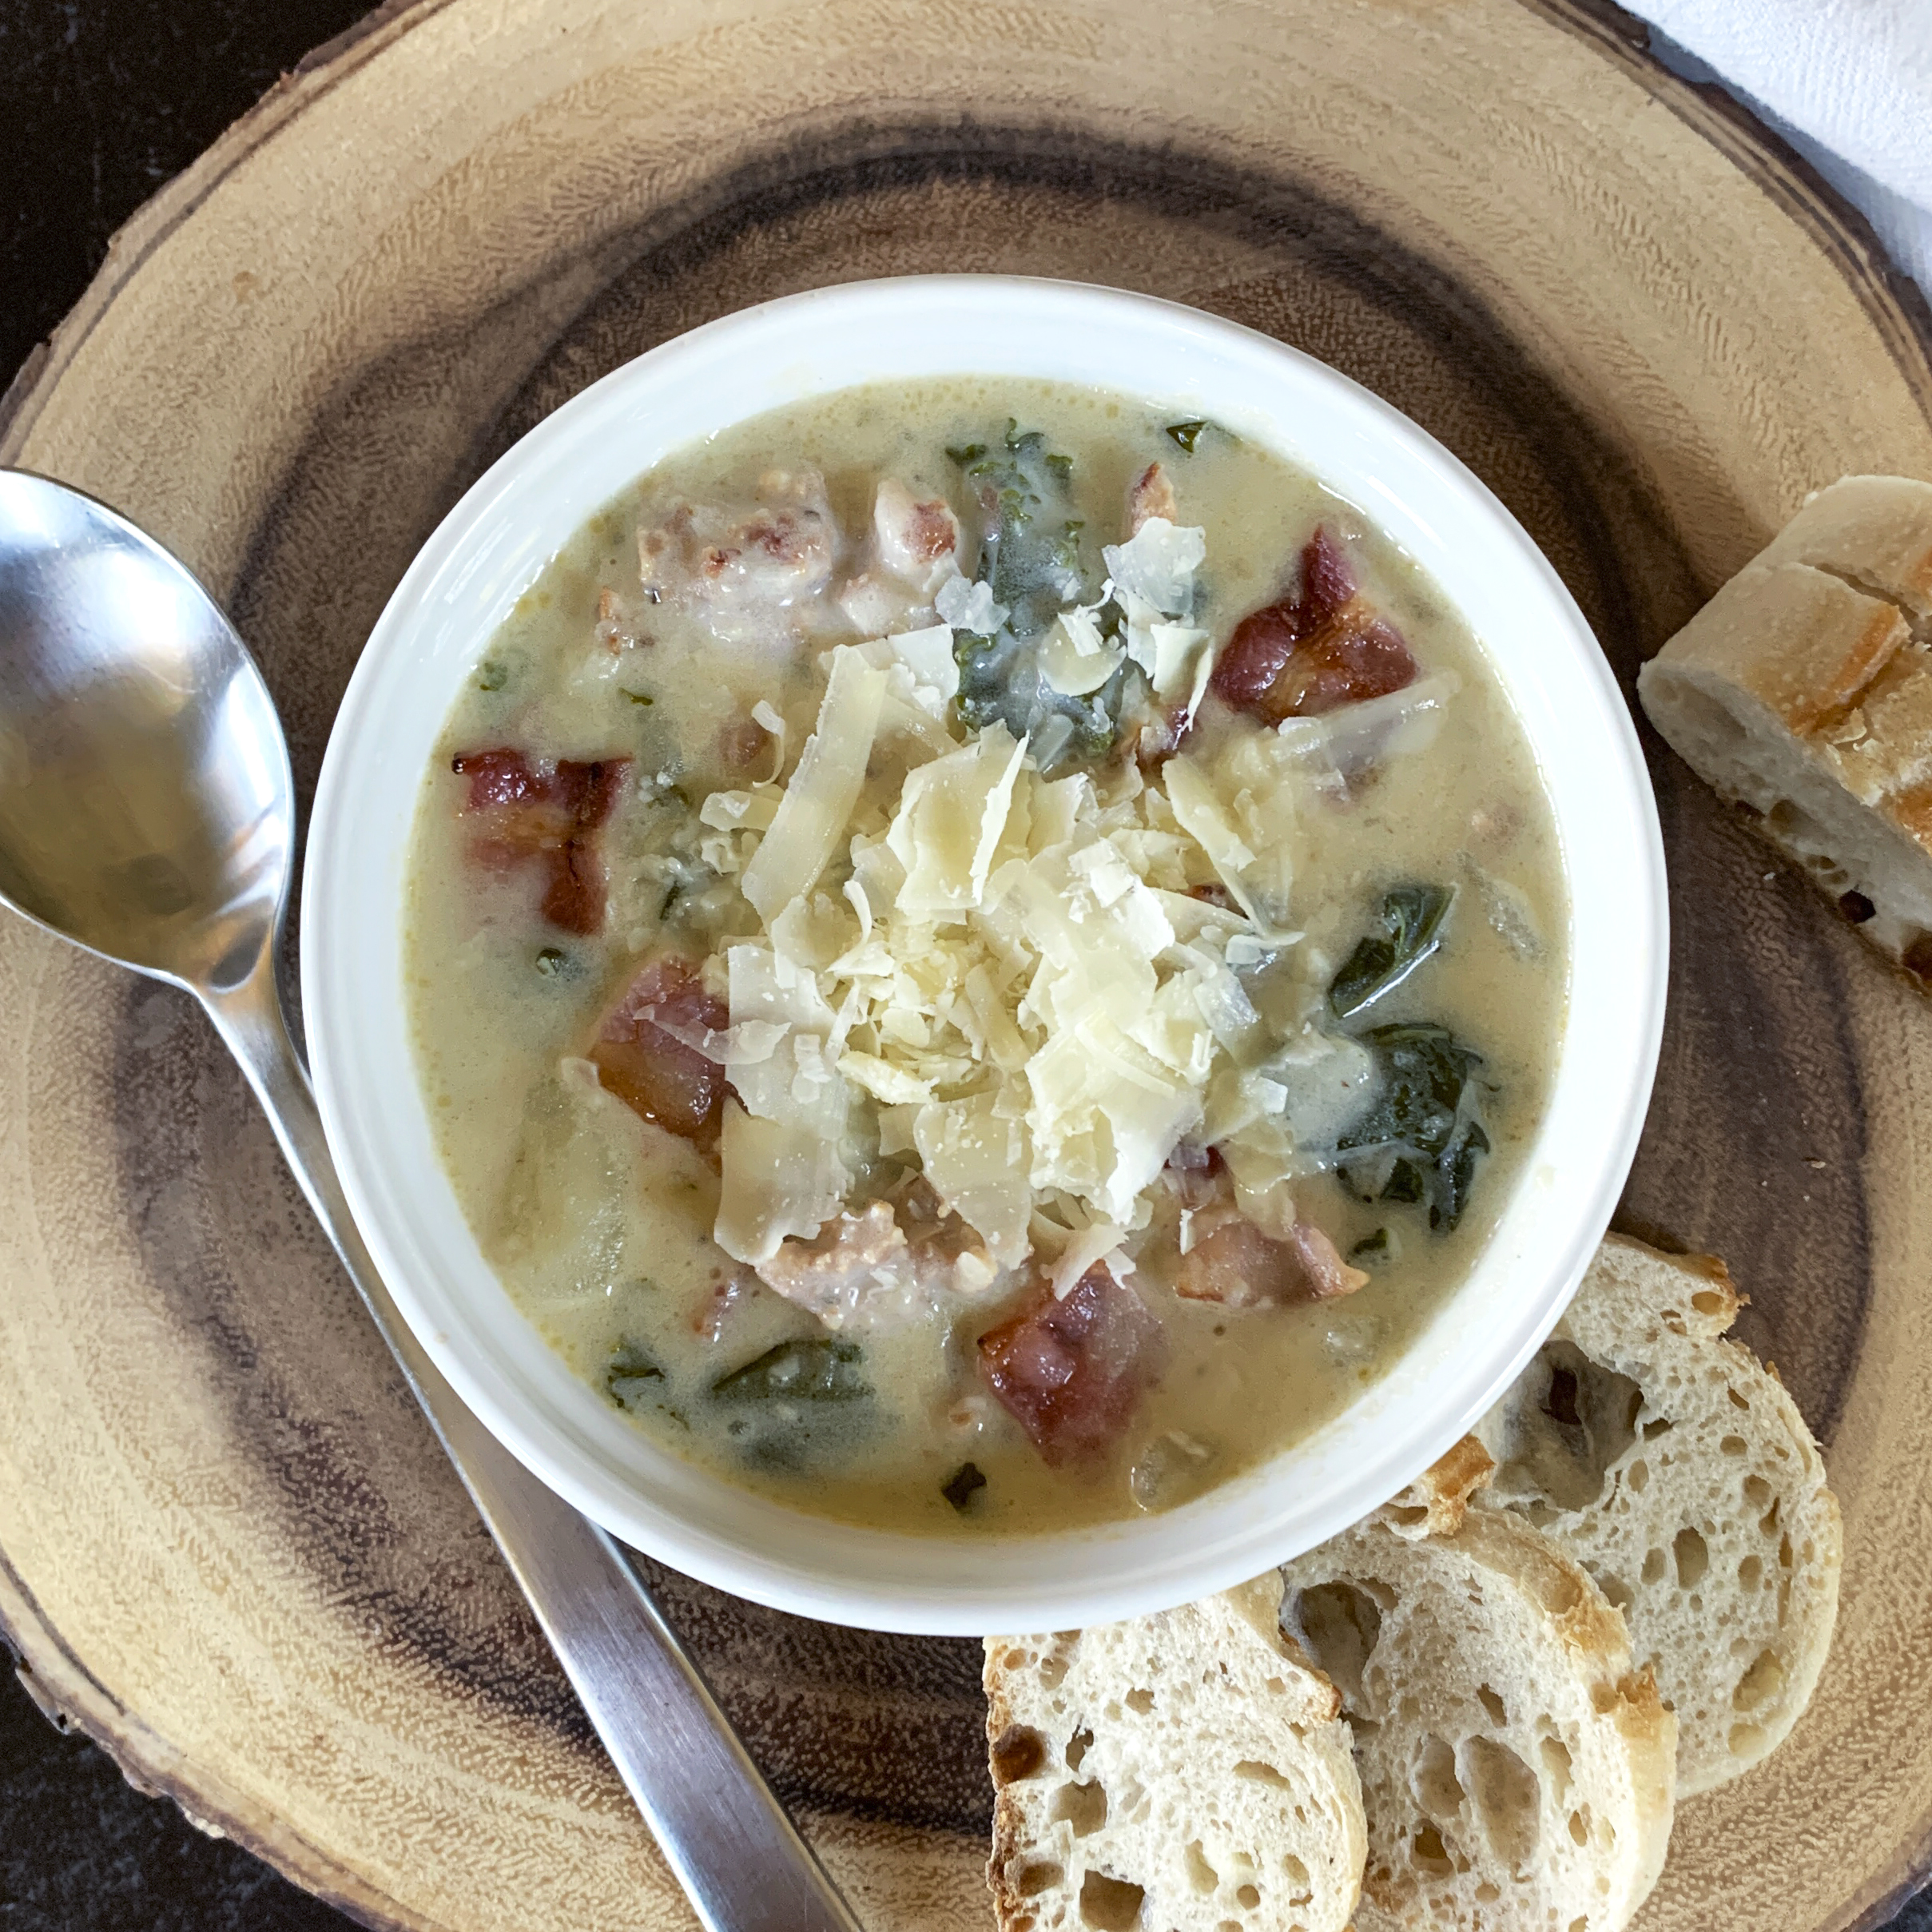
I have been sitting on this recipe for months now just waiting for the right time of year to share. After getting record amounts of rain in Sacramento this last weekend and it FINALLY feeling like fall, I think we are finally ready for one of the best soup recipes ever! Now I can’t even take credit for this soup recipe. My friend made this Olive Garden “copycat” soup for me back in July when I was recovering from a medical procedure, and I was absolutely smitten. I had to ask for the recipe and made it for my family less than a week later. It is now a family fave. I just absolutely love that spicy sausage with the rich creamy broth and the loads of kale. (Not gonna lie, the kale makes me feel like I am eating healthy.)
Note: If you are watching your carbs you can easily leave out the potatoes for a fantastic low carb soup.
INGREDIENTS
12 oz pack of bacon, chopped 16 oz hot Italian sausage, ground 1/2 yellow onion, chopped 2 tbsp garlic, minced 64 oz chicken broth 5 medium potatoes, cubed into 1/2″ squares 2 bunches kale, stems removed and leave chopped 1 pint heavy cream 2 tsp salt 1 tsp ground pepper freshly grated parmesan
STEPS
Add the bacon to a large pot and cook over medium-high heat.
When the bacon is cooked to desired doneness, remove it from the pot and set aside.
Add the sausage to the pot breaking it up as it cooks.
Once the sausage is cooked through, drain off most of the grease leaving about 1–2 tablespoons.
Add the chopped onions and garlic to the pot with the sausage and cook stirring occasionally until the onion starts to brown, about 5–6 minutes.
Add the broth and potatoes to the pot and bring to a boil.
Simmer the soup for about 15–20 minutes or until the potatoes are just fork tender.
Add the kale, cream, salt, and pepper to the pot and simmer for another 5–10 minutes.
There are some recipes that are summer staples, this recipe is one of those in our household. Zesty citrus grilled pork tenderloin medallions paired with cheesy grilled stuffed peppers. Looks and sounds amazing, doesn’t it?
One of the reasons we primarily make this in the summer is because that is when peppers are in season, and you can usually find pretty large ones at the store. The bigger the better when it comes to this recipe! That way you can pack them full of all the cheesy goodness.
I absolutely love pork tenderloins. They are so lean and are actually a really great grilling meat. With this recipe, the meat is so flavorful and juicy, and takes on really great citrusy and smoky flavor as it plumps up on the grill.
There are so many things to love about this recipe. It is relatively easy, looks amazing, tastes amazing, and all the components of this dish are cooked outside, so you don’t have to deal with a hot oven during warm summer nights. What’s not to love?
TENDERLOIN INGREDIENTS 4 tbsp apple cider vinegar 1 tsp dried oregano 1/2 c fresh squeezed orange juice 2 tsp olive oil 1 tbsp garlic, minced 1 lb. pork tenderloin
STUFFED PEPPER INGREDIENTS 3/4 c queso fresco, crumbled 3/4 c jack cheese, shredded 1/2 c cilantro leaves, chopped 1 small tomato, diced 4 anaheim or hatch chile peppers, sliced open lengthwise, seeds removed
GARNISH
1 lime, cut into wedges additional chopped cilantro
STEPS
Combine the apple cider vinegar, oregano, orange juice, olive oil, and garlic in a large resealable bag.
Add the tenderloin to the bag and marinade in the fridge for 2–12 hours.
In a medium bowl, mix together the queso, jack cheese, cilantro, and diced tomato.
Spoon the cheese mixture into each pepper half.
Preheat the grill to 400º.
Add the pork tenderloin to the grill and cook for 10–12 minutes.
Flip the tenderloin and cook for another 10–12 minutes or until the internal temperature reaches 145º.
Remove the pork from the grill and allow it to rest.
While the tenderloin in resting, add the stuffed chiles to the grill and cook for 10–12 minutes or until the cheese is nice and melted.
Slice the pork and serve with the grilled chiles and sliced lime and garnish with additional fresh chopped cilantro.
The other day as we were driving into our subdivision, we spotted a little pop-up fruit stand with the most vibrant red strawberries on the side of the road. They were so fresh and ripe that you could smell the sweet strawberry aroma from over 10 feet away. It literally just drew me in.
It was the first really warm weekend of the year so making some homemade strawberry ice cream just seemed obvious. Fresh churned old fashioned strawberry ice cream is just an iconic summer treat and the key is ripe fresh strawberries. The kind that you can only find in the warmer months and that are a deep red throughout.
Now the trick to getting a really good creamy strawberry ice cream, is to make it with an egg/custard base. Strawberries have so much juice in them that your ice cream can take on an icy texture if you just use milk and cream. So, this recipe may be a bit more work than others, but it is so worth it. The final product will be so creamy and decadent. Absolutely worth it!
So as the weather really starts to warm up as summer creeps in, and you start seeing your market and fruit stands flooded with ripe strawberries, make sure to keep this recipe in mind. It is the perfect dessert to make this summer.
Note: This recipe requires that you make a custard egg mixture over the stove that needs to be completely chilled before being placed in the ice cream maker. The steps below guide you to put the custard in the fridge for 4–5 hours. However, if you don’t have the time, you can place the bowl of warm custard in a second large bowl filled with ice water and stir frequently. This will allow your mixture to cool within 30–40 minutes. Just make sure to keep it well stocked with ice.
INGREDIENTS 4 large egg yolks 3/4 c sugar, divided 1/4 c brown sugar 1/4 tsp kosher salt 2 c heavy cream 1 cups whole milk 1 tsp vanilla 4 c strawberries, sliced 1 tbsp lemon juice
STEPS
In large bowl, whisk together the egg yolks, 1/2 cup of the sugar, brown sugar, and salt until it is nice and smooth and set aside.
In a large saucepan combine the heavy cream, milk, and vanilla and heat over medium heat until it begins to simmer.
Remove the pot from heat and VERY slowly add the egg mixture to the pot while whisking the entire time. (By slowly mixing in the egg mixture and whisking continuously you are tempering the eggs but not cooking them.)
Return the saucepan with the creamy egg mixture to the stove and heat through over medium heat.
Stir the mixture frequently until it just starts the slightly thicken. You do not want to overdo it or the eggs will begin to cook/scramble.
Once the custard mixture is done, transfer it to a large metal or glass bowl, cover it with plastic wrap or a lid, and place it in the fridge for 4–5 hours until it is well chilled.
When you are ready to start making the ice cream, combine the strawberries, lemon juice, and 1/4 cup of the sugar in a large bowl.
Using a metal masher, break up the strawberries until they are really saturated in their juices.
Add the mashed strawberries to the custard mixture, stirring to combine.
Pour the final ice cream mixture into your ice cream maker and churn according to your device’s directions.
Transfer the finished ice cream to an airtight container and store in the freezer.
If you like this recipe, make sure to also check out my recipe for Blackberry Ice Cream, another favorite in our house.
To me, spring means transitioning those hearty comfort foods to lighter more refreshing dishes. Gotta start getting this body bikini ready! Just kidding, this mom bod hasn’t rocked a bikini in over 11 years. A good ol’ tankini is more my style. LOL In reality, I just crave lighter foods as the weather warms up, and the produce section of the grocery store transitions with the season. Everything just seems more vibrant and robust.
This cauliflower tabbouleh is perfect for warmer weather as it requires no cooking, so you can leave that hot stove off. The flavors in this dish are so refreshing as it is PACKED with herbs! You have lemon zest, mint, garlic, and red pepper. Freaking delish!
This dish is one of those that actually gets better as it sits. I like to make it the day before I plan on eating it so the cauliflower bits really take on all those yummy flavors. It is one of those perfect dishes to make on Sunday to have for lunches throughout the week. You know I am all about that meal prep! (Just beware, you may have some garlic breath so pack some gum too.)
While traditional tabbouleh is made from bulgar wheat, I actually use a bag of riced cauliflower in this recipe making it keto friendly and low calorie. It goes fantastic with some grilled Greek chicken and tzatziki!
INGREDIENTS 10 oz bag frozen riced cauliflower, thawed cucumber, peeled and chopped 1 cup small tomatoes, cut in half 1 c fresh parsley, chopped 1/4 c mint leaves, chopped 2 green onions, thinly sliced 1 tsp garlic, minced 2 tbsp extra virgin olive oil 1/4 tsp lemon zest 2 tbsp lemon juice 1/4 tsp crushed red pepper flakes 1 tsp salt
STEPS
Combine all ingredients in a large bowl and stir to combine. (Yes, it really is that easy.)
There is something so fun about whoopie pies. That creamy marshmallow filling sandwiched between two fluffy chocolate cakes. Yes, please!
The other day I saw an article about the history of whoopie pies and it is too cute not to share. According to legend, Amish wives would take leftover cake batter and make the tiny cakes. Husbands and kids would then find the little “pies” in their lunch boxes the next day and would exclaim “Whoopee!” Cute right? That would probably be my reaction if I found one of these in my lunch too.
They may seem complicated but actually are super easy to make. You basically make cookies out of cake batter and just bake them for a few minutes, let them cool, and then fill them with gooey goodness. Oh, and then add a glass of milk or a good stout.
Notes:
This recipe makes about 10–12 assembled pies.
You can put the marshmallow filling between the cakes just by scooping it on, or I like to use a piping bag with a large tip to get really smooth edges. You can have fun using decorative piping tips too.
Store uneaten whoopie pies in an airtight container in the fridge for best results. Then allow them to come to room temperature for about 10–15 minutes. This will allow the cake to soften back up. My husband and son actually like to keep them in the freezer and they eat them frozen so they are like a super indulgent ice cream sandwich.
CAKE INGREDIENTS 1/2 c unsweetened cocoa 2 c flour 1 1/2 tsp baking soda 1/2 tsp baking powder 1/2 tsp salt 1/2 c vegetable oil 1 c sugar 1 egg 1 c whole milk 2 tsp vanilla
MARSHMALLOW FILLING INGREDIENTS 1 c powdered sugar 1/2 c unsalted butter, softened 1 tsp vanilla extract 1 1/2 c marshmallow creme/fluff
STEPS
Preheat the oven to 400º.
Line a couple of baking sheets with parchment paper or a silicone mat.
Stir together the cocoa, flour, baking soda, baking powder, and salt in a medium bowl and set aside.
In a separate mixing bowl, beat together the vegetable oil, sugar, egg, milk, and vanilla extract until well integrated.
Slowly add the dry ingredients to the mixing bowl and beat until just combined.
Scoop large equal sized spoonfuls of batter onto the lined baking sheet keeping them a couple of inches apart.
Bake the “cakes” for about 6–7 minutes. Make sure they are puffed up and looked cook through but don’t overcook them.
Using a spatula, immediately transfer the cakes to a cooling rack and allow them to cool completely.
Prepare the marshmallow filling by beating together all the powdered sugar, butter, and vanilla until nice and smooth. Gradually add the marshmallow creme until it is mixed in. (If the frosting doesn’t seem thick enough, add in a bit more powdered sugar a little at a time. You want it to be about the consistency of frosting.)
Take one of the cakes, turn it upside down, and put a nice sized dollop of the marshmallow filling in the center of the underside of the cake. (If your filling is squishing out from the weight of the cake on top, you can place the filling in the fridge for about 30 minutes. The butter chilling will help to thicken it up.)
Place a matching cake flat side down on top of the filling and push it down to spread the filling evenly from edge to edge. I like my filling to be about 1/2” thick.
Repeat until all the pies are complete!
If you like this recipe, check out my recipe for Carrot Cake Whoopie Pies which are made with a cream cheese marshmallow filling.
Hello cold weather! It is finally starting to feel like winter out here in California. Just this week we finally have some back to back days of rain and some serious wind going on and I freaking love it! It’s the kind of weather that just makes you want to wrap yourself in a heavy blanket and eat hearty bowls of soup all day long. This soup recipe is awesome because there is so much good flavor and it is really filling, and best of all, it is one of those meals that you can have on the table in 20 minutes. You do not have to be a well-versed chef to make this. You are basically just adding ingredients to a pot and letting your stove do the rest of the work. Sounds like the perfect lazy rainy-day meal to me!
Note: If you have a busy week ahead, chop the onion, carrots, and celery over the weekend and store in a container or a zip loc bag so they are ready to go!
INGREDIENTS
1 tbsp olive oil
1 (12.8-ounce) package smoked andouille sausage, thinly sliced
3 cloves garlic, minced
1 onion, diced
3 carrots, peeled and diced
2 stalks celery, chopped
6 c chicken broth
2 (15-ounce) cans Great Northern beans, drained and rinsed
1/2 tsp dried oregano
2 bay leaves
salt and pepper
3 c baby spinach
STEPS
Heat the olive oil in a large pot over medium high heat.
Add the sausage to the pot and cook until lightly browned, about 3-4 minutes making sure to stir occasionally.
Add the garlic, onion, carrots, and celery to the pot and cook for another 3–4 minutes making sure to stir occasionally.
Add the broth, beans, oregano, bay leaves, salt and pepper to the pot and bring to a boil.
Reduce the heat to medium low and allow it to simmer for 8–10 minutes.
Add the baby spinach to the pot and continue cooking for another 1-2 minutes or until the spinach has wilted.
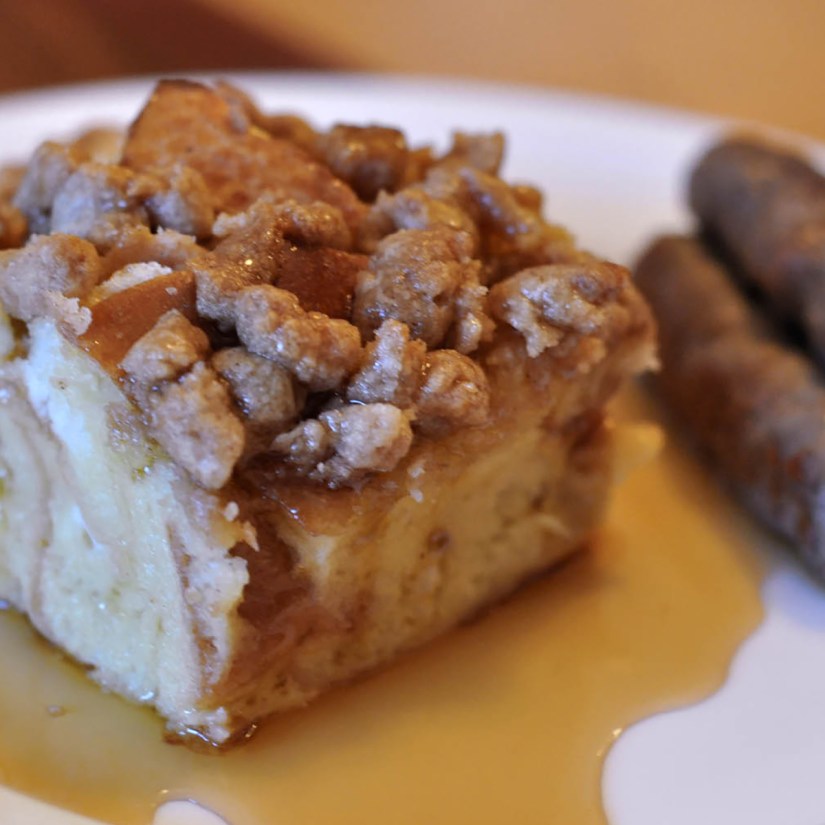
Christmas morning can sometimes be a bit chaotic with hustle and bustle of gift giving, cleaning up of all the shreds of paper and ribbon, and then sometimes the mad dash to clean the house before relatives arrive for round two of Christmas. At least that’s how it is in our home. However, on Christmas morning I always want to sit down and have a nice breakfast with my crew, I just don’t always have the time to make a big Christmas worthy breakfast. However, I do have the time to throw a casserole in the oven. So here you have French Toast Casserole to save the morning!
Several years back I posted a recipe for Blueberry French Toast Casserole. Not to toot my own horn, but toot toot! It’s amazing if you haven’t given it a try. What I love about french toast casserole is you can prep the dish the day before, throw it in the oven in the morning, and boom! Just like that you have a hot and delicious breakfast with almost no work. This recipe has all that delicious cinnamon goodness baked into a sweet bread pudding with a crispy streusel topping. It is so tasty!
So if you are looking for a quick and easy breakfast that you can make in advance, then this is the recipe for you.
INGREDIENTS
12 slices sourdough bread (or a sourdough loaf), cut into 1” cubes
10 eggs
2 c milk
1/2 c heavy cream
2 tbsp vanilla extract
1/2 c sugar
1 c brown sugar, divided
1/2 c flour
1 tsp cinnamon
1/2 c cold butter, cut into small pieces
STEPS
Cut the loaf of sourdough into cubes and distribute them in a greased 9” x 13” pan.
In a large bowl whisk together the eggs, milk, cream, and vanilla.
Whisk in a 1/2 cup of the brown sugar and all the granulated sugar to the egg mixture
Pour the egg mixture over the bread.
Using your fingers or the back of a spatula gently press all of the bread pieces down into the egg mixture.
Cover the baking dish with foil and place in the fridge 8 hours or overnight.
For the streusel topping, in a medium bowl, mix together the other 1/2 cup of brown sugar, flour, cinnamon.
Add the cut-up butter to the topping mix and using a large fork or pastry cutter mix it all together until it is a nice crumbly consistency.
Store the streusel in a Ziploc bag in the fridge until ready to bake.
When ready to bake, remove the casserole dish and streusel from the fridge and allow it to sit on the counter for about 30 minutes.
Preheat oven to 350º.
Sprinkle the streusel topping over the french toast.
Cover the dish back up with foil and bake for 45 minutes.
Remove the foil and continue baking until the top is a nice golden brown and the egg mixture is set, about an additional 15–20.
Remove from oven and allow it to cool for 5 minutes.
Cut and serve with a pat of butter and some warm syrup.
One of my favorite things about Christmas is all the traditions that go along with it. Gingerbread house building, baking, listening to Christmas music, hanging the stockings, you catch my drift. There is just so much magic in the month leading up to Christmas. Well, ever since my son with 10 months old we have taken him for annual photos with Santa. They are all framed and sit in chronological order (have a mentioned I have OCD tendencies before? LOL) along the entertainment center leading up to Christmas.
This year he is 10 years old and he still wanted to go take a pick with Santa. With COVID I didn’t think we could make that happen but sure enough, we found a place that was doing physically distanced photos by appointment only. Yay! Anyways, ever since my son could talk he would make sure to ask Santa what kind of cookies he wanted us to leave out for Christmas, it never fails, he ALWAYS says oatmeal. Now one thing I will fess up to is that I despise raisins! I cannot eat them! Even as an adult I will pick them out of trail mix. I refuse to contaminate a good oatmeal cookie with raisins! However, I do love me some craisins. So, ever since that first time Santa said he wanted oatmeal cookies, this recipe made it into the baking rotation. These are delicious, buttery, and just the right amount of chewy and sweet. To me, these cookies are the cookie of Christmas and I guarantee you they are Santa approved!
INGREDIENTS 1 1/2 c flour
1 tsp baking soda
1/2 tsp salt
1/2 c + 6 tbsp butter, softened
3/4 c brown sugar
1/2 c granulated sugar
2 eggs
1 tsp vanilla
3 c oats uncooked
1 c craisins
11 oz white chocolate chips
STEPS
Preheat oven to 350°F.
In a medium bowl, stir together flour, baking soda, and salt and set aside.
In a large bowl, using an electric mixer, beat together the butter and sugars until creamy.
Add eggs and vanilla to the butter mixture.
Gradually start to fold in the flour ingredients into the butter mixture.
Add oats, craisins, white chocolate chips and mix well.
Drop dough by the spoonful onto a parchment paper lined baking sheet.
Bake for 8–10 minutes or until light golden brown.
Allow cookies to sit on the baking sheet for a couple of minutes before transferring to a cutting board or cooling rack.