Dinners

Recipe—Shrimp in Creamy Red Pepper Sauce Over Linguine

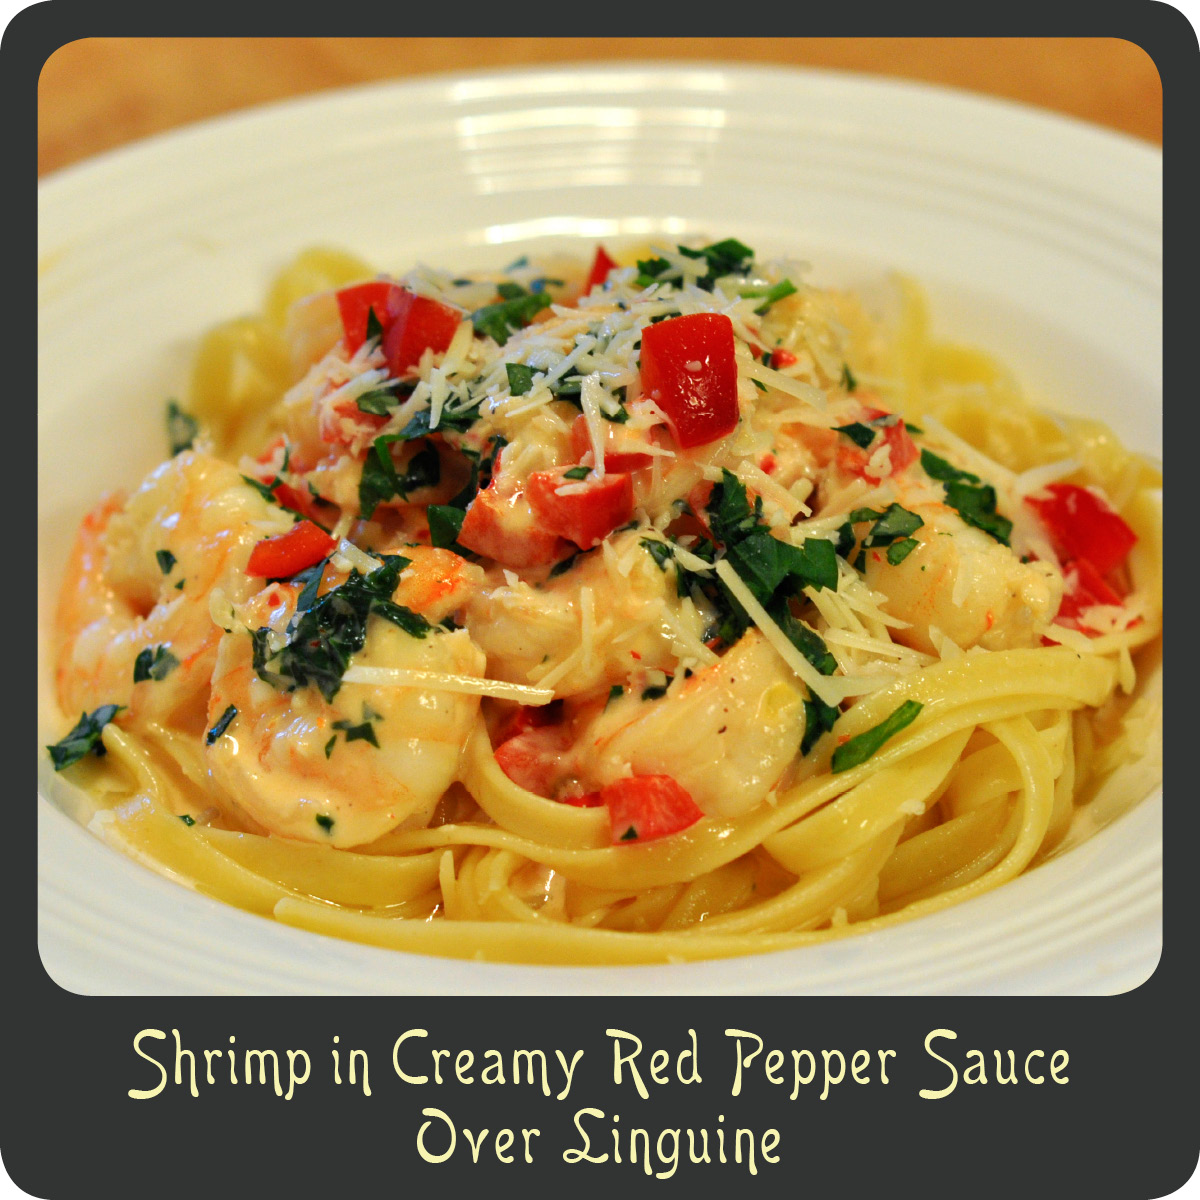
A couple weeks back I was having my good friend Sarah over for dinner on a work night. Work nights are already crazy so I needed something snazzy but yet quick and easy so I wouldn’t be spending our whole night together in the kitchen. Well one thing that cracks me up about Sarah is that she eats whole bell peppers like an apple. This girl loves her bell peppers! So I knew I wanted a dish that had a nice red pepper flavor. This one was it! The pepper flavor is very mild and goes great with the rich creamy wine sauce and of course shrimp cook super quick. We had a winner! This recipe was a huge hit. I served this pasta dish with a green salad and a fresh baguette for a quick and impressive dinner you’d think came out of a restaurant.

INGREDIENTS
2 tbsp olive oil
2 tsp garlic, minced
1 1/2 lb large shrimp, peeled and deveined
salt and pepper
1/4 c white wine
1 red bell pepper, chopped
2 tsp chili paste (more if you like things on the spicy side)
1 pt whipping cream
1/4 c fresh bail, chopped

STEPS

  • Heat the olive oil in a large skillet over medium-high heat.
  • Add the garlic and heat through for about 1 minute making sure not to burn it.
  • Add the shrimp and season with salt and pepper.
  • Sauté the shrimp and cook most of the way through, about 3–5 minutes.
  • Transfer the cooked shrimp to a bowl and cover with foil.
  • Pour the wine to the skillet and cook until it reduces by half.
  • Add the bell pepper, chili paste, and cream.
  • Simmer for 5–6 minutes or until the cream begins to thicken.
  • Add the shrimp back into the skillet and simmer in the sauce for another 3 minutes.
  • Stir in the majority of the basil leaving some for garnish.
  • Serve the shrimp and a spoonful of the sauce over cooked linguine and garnish with some of the leftover chopped basil.
Dinners

Recipe—Honey Spice Glazed Pork Chops

There is just something ultra tasty about a nice cut of tender pork in a savory sweet sauce. This recipe is so incredibly quick and easy that it is the perfect dinner on a work night and yet still classy enough for a dinner party. All the spices give the sauce a nice little pop. This dinner is perfect for everyone in the family. Even the pickiest of eaters will love the sweet flavor of the sauce. My three year old ate almost an entire pork chop. This sauce is also great with a ham steak or chicken breast, heck it would be good on a piece of leather! Try this honey glazed pork chop tonight, the whole family will be begging for more.

INGREDIENTS
1/2 c honey
4 tbsp Dijon mustard
1 tsp ground ginger
1/2 tsp cinnamon
1/4 tsp ground cloves
3 tbsp olive oil
4 boneless thick cut pork chops (or 6–8 think cut)
salt and pepper

STEPS
Note: If using thin cut pork chops, cooking time will need to be adjusted since they will cook much quicker.

  • In a bowl mix together the honey, mustard, ginger, cinnamon, and cloves.
  • Season the pork chops with salt and pepper.
  • Heat the olive oil in a large skillet over medium-high heat.
  • Add the pork chops and cook for 3 minutes per side.
  • Pour the honey mustard sauce over the pork chops and cook for an additional 10–12 minutes or until cooked through flipping the chops halfway through.
  • Transfer the pork chops to a plate and spoon the sauce over the chops.
Appetizers

Recipe—Bacon Jalapeño Cheese Ball

I have always loved the idea of cheese balls, but have been turned off by the fake processed taste of the premade ones you get at the store. Well cheese balls seem to be redeeming themselves with all the creative gourmet versions popping up all over the place. I recently threw my husband a little birthday bbq and wanted an appetizer that could be prepared ahead of time and then just set out once the party started. When I saw this recipe on Pinterest I knew it was exactly what I was looking for! My husband loves bacon, and of course loves the spice of jalapeños. (Don’t all men? Okay I guess vegetarians may be repulsed by the bacon but there are substitutes for that.) Once I had the bacon cooked and the jalapeños chopped this recipe came together in about 5 minutes. It was super quick and easy. A perfect recipe for any social events you may have coming up. By the end of the night I had several people asking for the recipe, which, in my mind, is a very good sign.

Note: This can be made a day ahead of time and stored in the refrigerator until ready to serve.

INGREDIENTS
8 oz cream cheese
3/4 c cheddar cheese, shredded
2 tbsp green onions, chopped
1 tsp garlic, minced
1/4 tsp cumin
1/4 tsp salt
dash cayenne pepper
1 tsp lime juice
1/2 tsp Worcestershire sauce
2 jalapeños, deseeded, deveined, and finely chopped, divided
6 slices of bacon, cooked and crumbled, divided
1/4 c pecans, chopped

STEPS

  • In a medium mixing bowl stir together the cream cheese, cheddar cheese, green onions, garlic, cumin, salt, cayenne pepper, lime juice, and Worcestershire sauce.
  • Fold in half of the chopped jalapeños and half of the crumbled bacon until well blended.
  • On a large plate combine the remaining jalapeños, remaining bacon, and the pecans and mix together.
  • Using your hands shape the cream cheese mixture into a large even ball.
  • Once you have formed the ball roll it in the pecan mixture until it is evenly coated.
  • Place the finished cheese ball on a plate and refrigerate for at least an hour before serving.
  • Serve with your favorite crackers.

Recipe adapted from Tracey’s Culinary Adventures.

Salads

Recipe—Potato Salad

The weather is warming up which means one thing—BBQs! No BBQ is complete without a big bowl of potato salad. It’s just un-American! Whenever we have a BBQ and my friend Casey asks what she can bring I say potato salad.  I don’t know what it is that she does, but it is amazing! By far the best ever! While I don’t have her recipe I have tried endlessly to recreate it. I think this batch is my closest ever! It turned out so good. I ended up using equal parts sour cream and mayonnaise and it was just the right balance of creaminess, not overly oily like some of the store bought ones. And I added bacon. Bacon makes everything good. Next time you are looking for a classic American side dish give this recipe a try.

Note: This salad can be made 24 hours in advance and kept in the fridge until ready to serve. 

INGREDIENTS
5–6 large potatoes, peeled and diced into 1/2” pieces (I like to leave the skin on a couple of potatoes)
3/4 c mayonnaise
3/4 c sour cream
2 tbsp mustard
1 tsp salt
1/2 tsp pepper
1/2 tsp celery seed
4 hardboiled eggs, chopped
red bell pepper, chopped
3 stalks of celery, chopped
3 green onions, chopped
6 slices bacon, cooked and crumbled
2.25 oz can sliced black olives
paprika

STEPS

  • Bring a large pot of lightly salted water to a boil.
  • Add the diced potatoes and cook for 7–10 minutes or until fork tender.
  • While the potatoes are boiling mix together the mayonnaise, sour cream, mustard, salt, pepper, and celery seed.
  • When the potatoes are done cooking drain them in a colander and transfer to a large bowl.
  • Add the hardboiled eggs, bell pepper, celery, green onions, bacon, and olives. (I like to save some of the green onions, bacon, and olives to add to the top of the salad for garnish.)
  • Pour the dressing over the veggies and toss to coat.
  • Sprinkle with some paprika and garnish with the green onions, bacon, and olives if you saved any.
  • Cover with a lid or saran wrap and refrigerate for at least 4 hours.
Brunch

Recipe—Breakfast Portobellos

This is one of those recipes I found on Pinterest and have been meaning to make for quite some time. I only wish I would have made it months ago! It was absolutely delish! Being a semi-frequent low-carb eater I am always looking for new and exciting breakfast recipes. This was completely decadent and unlike anything I had ever had before. The portobellos have this great earthy flavor that is perfectly complemented by the sallty prosciutto, and if you cook them just right you get a nice little bit of yolk to sop up with the mushroom. So I If you are looking to make a fabulous breakfast then give this recipe a try. It would be the perfect dish to serve mom for Mother’s day!

Note: If you end up with shallow mushrooms the eggs may try to slide out of the caps when you put them in, so if you have the ability to examine the underside of the mushrooms look for ones that have a deeper well and are even in depth.

INGREDIENTS
2 large portobello mushrooms (4”–5” in diameter)
olive oil
salt & pepper
3 ounces of sliced prosciutto
4 eggs
1 tbsp fresh chopped parsley

STEPS

  • Preheat oven to 375º.
  • Wash the portobello caps and pat dry.
  • Using a spoon scrape out the stem and all the gills creating a well in the mushroom cap.
  • Rub the mushrooms with olive oil and then season with salt and pepper.
  • Line each mushroom cap with a couple of slices of the prosciutto making sure to go up the sides. (This will help keep the eggs in if your well isn’t quite large enough to hold two eggs.
  • Place the mushrooms in a glass baking dish.
  • Carefully crack two eggs into each mushroom cap.
  • Carefully place the baking dish in the oven and bake for 20–30 minutes. (Cooking time will depend on the thickness of your mushrooms and how you like your eggs cooked.)
  • Remove the eggs from the oven and garnish with the chopped parsley and additional salt and pepper.

Recipe adapted from Paleo Spirit.

Dinners

Recipe—Macadamia Nut Crusted Halibut

One of my all time favorite restaurants in Sacramento is Scott’s Seafood. They are known for stunning presentation and of course their out-of-this-world fish dishes. One of my all time favorite meals that they serve is their melt in your mouth macadamia nut crusted halibut. It is incredible! They take an already awesome piece of fish and seem to make it more awesome then you can possibly imagine. Lucky for me (and you I suppose), they have some of their more popular recipes on their website. The other night I decided to attempt to make their popular halibut dish on my own. It did not disappoint, it was awesome! The brown butter gives the dish a salty and nutty flavor and the macadamia nuts themselves give the fish a mild sweetness and great texture. My husband, son, and I chowed down and we were in heaven! If you have a little extra time and money on your hands, and you want to impress, try this decadent recipe. It is an incredible way to enjoy halibut.

Note: This recipe is written to use an oven safe skillet. If you don’t have one, no biggie. Just use whatever large skillet you have and then transfer the fish to a large baking dish and finish off in the oven.

INGREDIENTS
4-6 oz halibut filets, skin removed
1/2 c panko
1 1/2 c macadamia nuts
1/2 lb salted butter
4 tbsp olive oil

STEPS

  • In a large saucepan bring the butter to boil over medium heat, stirring constantly until it just starts to turn a golden brown color. Be sure not to burn it!
  • Remove the pan from the heat and set aside.
  • Preheat oven to 350º.
  • Place the panko and the macadamia nuts on a baking sheet keeping them separated.
  • Toast both the panko and nuts for 3–4 minutes or until just starting to brown.
  • Transfer the toasted panko to a plate or shallow bowl.
  • Using a food processor, or by hand, chop the macadamia nuts.
  • Add half of the chopped nuts to the toasted panko and mix.
  • Place the other half of the chopped nuts in the brown butter and stir.
  • Turn the oven up to 375º.
  • Coat the halibut filets in the panko and nut mixture making sure to cover as much of the fish as possible and set aside.
  • Heat the olive oil over medium high-heat in a large oven safe skillet.
  • One by one add the breaded fish.
  • Cook until golden brown on the bottom and then flip to cook the other side.
  • Once both sides have turned a golden brown place the skillet in the oven to finish cooking, about 5–8 minutes depending on the thickness of the filets. When the fish is cooked through it should flake off easily with a fork.
  • When the halibut is cooked, stir the brown butter and nut mixture and then ladle it over the top of the fish.
  • Serve and enjoy!

Recipe adapted from Scott’s Seafood Grill & Bar.

Sweet Treats

Recipes—Craisin White Chocolate Chip Pudding Cookies

The first time I made these cookies was actually around the holidays. They turned out delicious! So good that I even included them in my annual holiday goodie boxes. While cranberries and white chocolate are perfect for the holiday season, I think they are equally perfect for any time of year. Cranberry and white chocolate is such an awesome flavor combo, why only enjoy during the winter months? Pudding cookies are great because they turn out super moist and are some of the softest cookies you will ever have! The pudding really helps to hold them all together so you end up with perfect little mounds of deliciousness!

INGREDIENTS
2 1/4 c flour
1 tsp baking soda
3/4 c butter, softened
3/4 c brown sugar
1/4 c sugar
3.4 oz vanilla instant pudding mix (dry, do not prepare)
2 eggs
1 tsp vanilla
3/4 c craisins
3/4 c white chocolate chips

STEPS

  • Preheat oven to 350º.
  • In a medium mixing bowl stir together flour and baking soda. Set aside.
  • In a separate bowl, mix together the butter and sugars.
  • Add in dry pudding mix and beat until well blended.
  • Add eggs and vanilla and mix well.
  • Slowly incorporate flour mixture until well combined.
  • Mix in craisins and white chocolate chips.
  • Roll the cookie dough into 1² balls and place on a greased baking sheet.
  • Bake cookies for 8­12 minutes or until just turning golden on the edges.

Recipe adapted from Chef in Training. 

Dinners

Recipe—Chile Verde Stuffed Poblano Chiles

Trying to squeeze in another Mexican dish before Cinco de Mayo this Sunday. This recipe has got to be one of the best Mexican dishes I have ever made! Mind blowing good! The roasted poblanos have a mild roasted flavor that goes great with the green chile sauce and salty pork. Veggies stuffed with meat of any kind are great if you are watching your carbs or restricted to a gluten free diet. My only regret with making these was that there weren’t more! They were a little bit more work then most of my recipes but completely worth it. Take a break from the ordinary Mexican dish and try this extraordinary one.

Note: My recipe calls for Del Real brand chile verde but you can use any shredded meat. I have been using Del Real products for several years because it is so quick, convenient, and affordable. 

INGREDIENTS
4 poblano (pasilla)chiles
16 oz package of Del Real Chile Verde
1 1/2 c pepper jack cheese, shredded
sour cream
3 tbsp fresh cilantro, chopped
2 tbsp red onion, diced
1 tbsp jalapeño, diced

STEPS
Note: If you have never before roasted peppers see this previous post on how to roast peppers for some additional guidance.

  • Prepare the chile verde per package instructions.
  • While the pork is cooking place the poblano chiles on a baking sheet.
  • Broil in the oven and turn every 5–7 minutes until all sides begin to blacken.
  • Remove from the oven and transfer the roasted peppers to a large bowl.
  • Cover the bowl with saran wrap and set aside for 10 minutes.
  • Set the oven to 350º.
  • While the peppers are sitting use a slotted spoon to remove the pork from the green chile sauce and transfer the meat to a cutting board.
  • Use a fork to shred the pork and place it back in the sauce and let it sit.
  • Gently peel the skin off the peppers.
  • Using a sharp knife make a slice down one side and carefully remove the majority of the seeds.
  • Holding the pepper in your hand place a handful of the pork inside the pepper and top off with a handful of the shredded cheese and fold the pepper around the filling.
  • Place the stuffed pepper in a large baking dish open side up and secure with a toothpick or two to help hold it closed.
  • Continue stuffing the remaining peppers.
  • Drizzle the peppers with half of the green chile sauce that the meat was in.
  • Bake the stuffed peppers in the oven for 15–20 minutes or until all the cheese is melted.
  • Place the peppers on a plate and garnish with the sour cream, cilantro, onion, and jalapeño.
Uncategorized

Cinco de Mayo Menu Ideas

CincoDeMayo

Time to bust out your sombrero, and crank up the mariachi music, Cinco de Mayo is just around the corner! If you are looking to throw a fiesta, or even just cook a festive dinner for the fam, I have some awesome Cinco de Mayo menu ideas for you.  I hope you take the day to kick back, relax, enjoy a margarita (or three), and celebrate this Mexican holiday. ¡Feliz Cinco de Mayo!

Refreshing Adult Beverages

Blended Mango Margarita

Grapefruit Margarita on the Rocks

Let’s Get this Fiesta Started!

Shrimp Taco Cups With Creamy Cilantro Lime Sauce

Mango Salsa

Queso Fundido

Chubby Chicken Taquitos

Main Courses

Shrimp Tacos

Cheesy Mexican Chicken

Jalapeño Cheddar Chicken Burger With Guacamole

Crock-Pot Shredded Beef Tacos

Green Chile Chicken Enchiladas

Sweet Potato Burritos

Shrimp Enchiladas with Jalapeño Cream Sauce

Tasty Extras

Mexican Red Rice (Arroz Rojo)

Crock-Pot Chicken Enchilada Soup

Mexican Corn on the Cob

Jalapeño Cheddar Corn Bread Muffins

Jalapeño Cheddar Corn Bread Muffins

For the Sweet Tooth

Piña Colada Pie With Drunken Rum Sauce

Side Dishes

Recipe—Mexican Grilled Corn on the Cob

When planning out dinner menus I find it challenging to come up with Mexican side dishes beyond the typical beans and rice. And besides, when I am watching my carbs beans and rice just don’t work for me. I stumbled upon a recipe for Mexican grilled corn on Pinterest a few months back and have been meaning to try it. Boy am I happy I did! It was delicious! And by delicious I mean, the best corn on the cob I have ever eaten. While I normally just cover my ear of corn with butter and salt this was a welcomed change. The sour cream gave the corn a nice creaminess and the flavors of the smoky chili powder and zest of lime really fired up my taste buds. Sour cream has less than a third of the calories that butter does, so this corn not only tasted awesome, but it is also way healthy! Low calorie, low carb, and tastes amazing! Win, win, and win!

Note: If you want to try this recipe but don’t feel like firing up the grill, you can boil the corn. To boil corn, place the shucked corncobs in a large pot of boiling water and cover it. Cook for 4–6 minutes. Remove the corn from the water with tongs and continue seasoning by following the last 3 steps.

INGREDIENTS
4 ears of corn
1/2 c sour cream
chili powder
salt
pepper
4 lime wedges

STEPS

  • Cut of both ends of the corn so that the cob is exposed on one end and most of the stalk cut gone from the other, leaving the husk on.
  • Fill your sink or a large pot with water.
  • Soak the corn in the water for 15 minutes. (This allows some water to get inside so that the corn steams while on the hot grill, and also makes the husks wet so that they don’t catch fire.)
  • While the corn is soaking, preheat the grille to 350º.
  • Remove the corn from the water and shake off most of the moisture.
  • Cook the corn over direct heat for 15–20 minutes, making sure to turn every 5 minutes.
  • Remove the corn from the grille.
  • Carefully shuck the corn, remove all of the husks and corn silk. (I use an oven mitt to grasp one end to keep from burning my hands.)
  • Using your fingers or a butter knife spread a thin layer of sour cream all over the entire cob.
  • Sprinkle the corncob with the chili powder, salt, and pepper.
  • Spritz with fresh squeezed limejuice.
  • Devour!

Recipe adapted from Ezra Pound Cake.