Dinners

Recipe—Herb Roasted Chicken

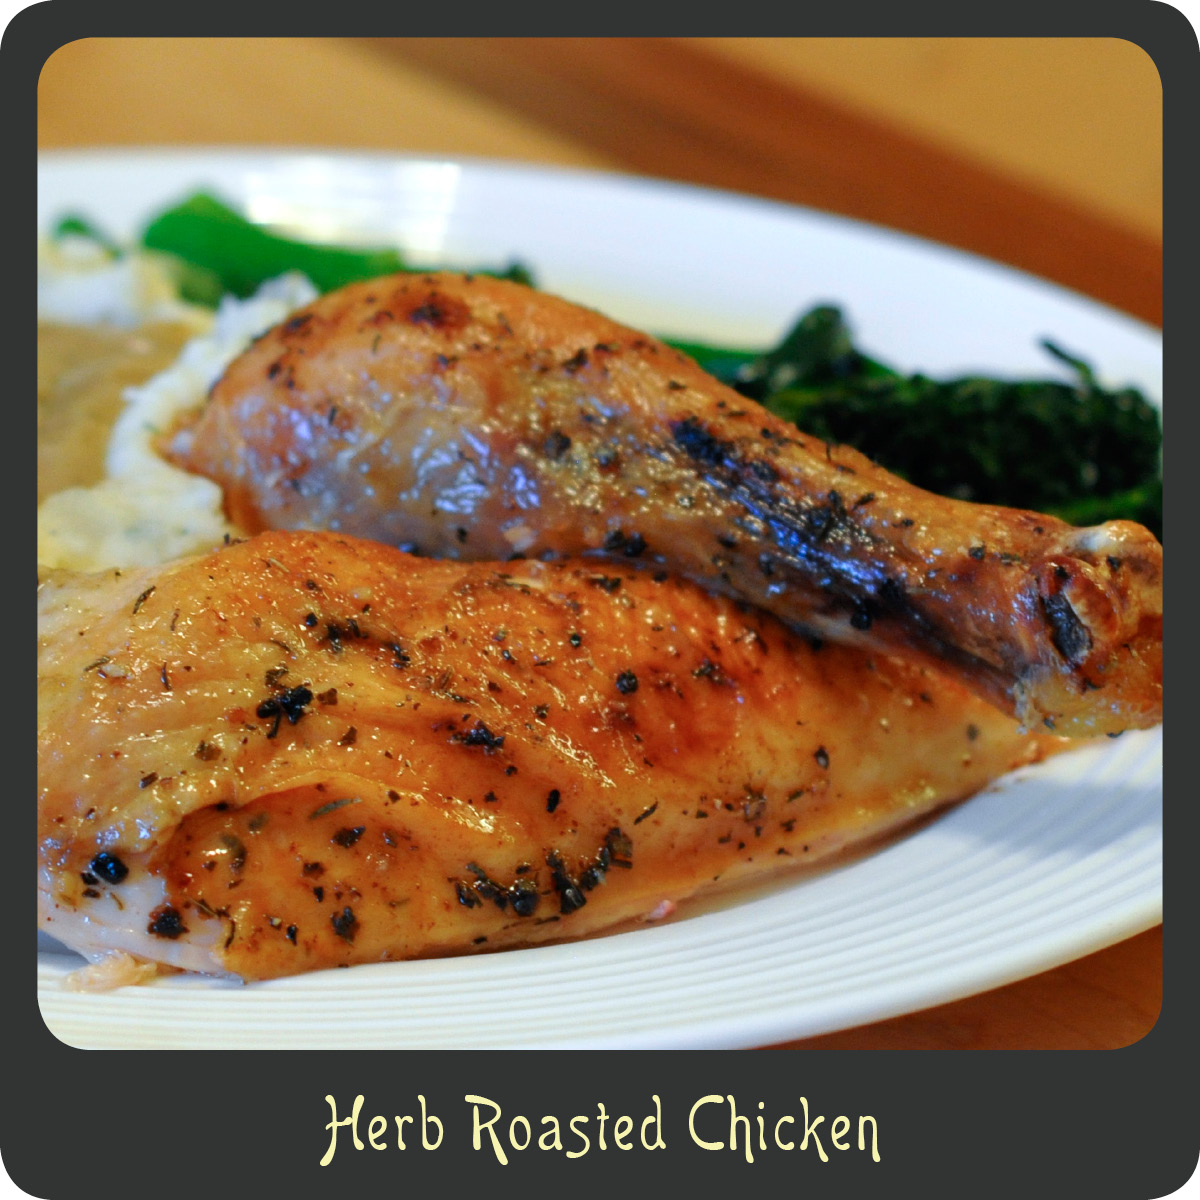
I would say 95% of the time when I am cooking chicken I am working solely with the breast. Boneless skinless breasts seem to be the quickest and easiest to work with, but you pay a little bit more for the convenience factor. However, there isn’t really anything special or fancy about a plain chicken breast. On occasion I really do enjoy cooking a whole chicken. It just seems much more impressive to roast the whole thing. While the ingredients are incredibly simple in this recipe, it is the most fabulous and flavorful chicken you will ever have. I’m not one to typically sit there and eat the skin off a chicken but when I am carving up this chicken I can’t stop eating it once I start. The skin has just the perfect amount of crispiness and more flavor than you can imagine. You are lucky if there is any skin left on your piece of chicken by the time it makes it to the table. It is that good! Once you make this recipe you will understand. I guarantee this will be the best roasted chicken you will ever have.

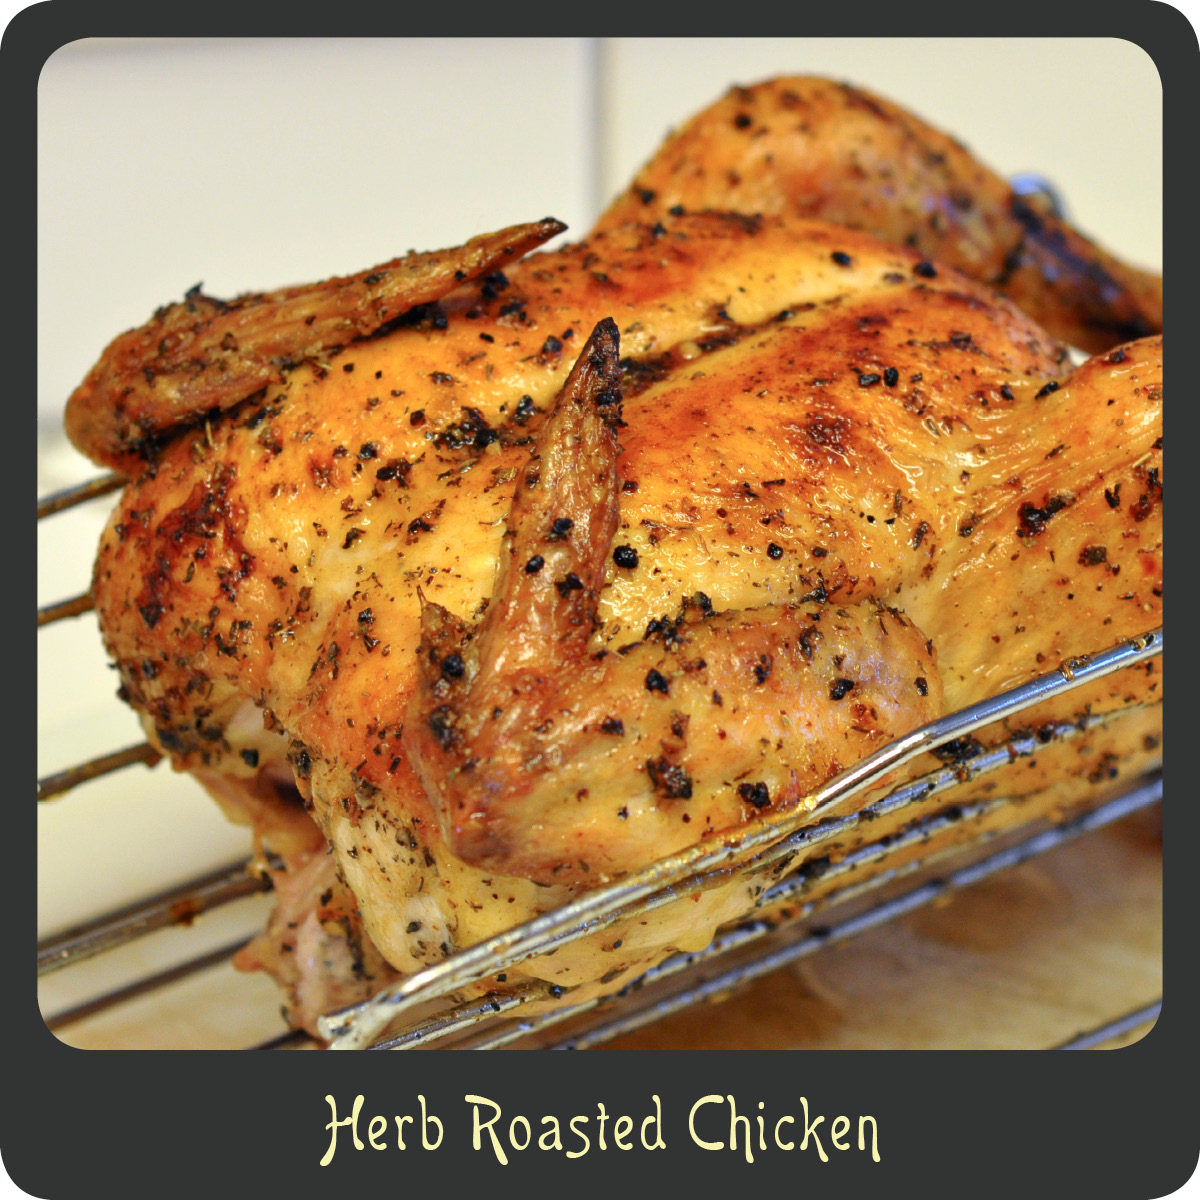
Note: The most complicated part of this recipe is brining the chicken, which really isn’t complicated at all, people just think it is. If you aren’t familiar with brining I will bring you up to speed. Brining a chicken is when you soak it in salt water for a good amount of time. Giving it this “salt bath” ensures your chicken will be moist and juicy and it also allows the salt to soak into the meat, which really enhances the chicken’s natural flavors. I personally feel it makes a huge difference in the taste. In my opinion, brining is the difference between a good chicken, and a great chicken.

INGREDIENTS
3–4 lb chicken
1/2 c kosher salt
2 tbsp butter, melted
2 tsp garlic, minced
1 tsp dried basil
1/2 tsp dried sage
1/2 tsp dried thyme
1/2 tsp salt
1/4 tsp pepper

STEPS

  • Remove the neck and giblets from the chicken and place it in a large pot.
  • Pour the kosher salt over the chicken and fill the pot with water until it is submerged.
  • Cover the pot with the lid and place in the fridge for 4–8 hours.
  • Remove the chicken from the pot, rinse with cold water, and pat dry.
  • Place the chicken on a rack in a shallow roasting pan breast side down. (If you do not have a rack just place it in a large baking dish.)
  • Preheat the oven to 375º.
  • Combine the melted butter and garlic in a small bowl.
  • Combine the basil, sage, thyme, salt, and pepper in a second small bowl.
  • Use a basting brush or your hands to lather the chicken in half of the garlic butter.
  • Sprinkle half of the herb mixture over the chicken.
  • Flip the chicken over so that it is now breast side up.
  • Repeat with remaining butter and herb mixture.
  • Roast the chicken uncovered for 1.5–1.75 hours or until cooked through. (I like to baste mine every 20–30 minutes.)
  • Allow the chicken to sit for 5–10 minutes and then transfer to a cutting board to be carved.
Side Dishes

Recipe—Cauliflower and White Cheddar Gratin

I was never much of a cauliflower fan growing up and now as an adult I just can’t get enough of the stuff. Sorry mom, but I think you were making it all wrong! The trick is to smoother it in cheese and all sorts of other wonderful flavors. I made this dish the other night and I’m embarrassed to admit that my husband, son, and I finished off the entire dish. All of it! Okay, so my son probably only ate it because I told him it was mac n’ cheese. Is that bad? Apparently we just couldn’t get enough of the creamy cheese sauce and crispy panko topping. We enjoyed this with some cooked greens and a juicy steak. It was delish! If you are having a hard time getting your kids (or even your spouses) to eat their cauliflower, give this recipe a try.  Maybe you’ve just been making it wrong. 😉

INGREDIENTS
1 large head cauliflower, cut into florets
2 tbsp olive oil
salt and pepper
4 tbsp butter, divided
3 tbsp flour
1 1/2 c milk
1/4 tsp ground nutmeg
1 c white cheddar cheese, shredded
1/2 c panko

STEPS

  • Preheat oven to 400º.
  • Place the cauliflower florets on a large baking sheet.
  • Drizzle with olive oil and season with salt and pepper.
  • Toss cauliflower to coat.
  • Roast the cauliflower until lightly browned, about 20–25 minutes.
  • Reduce the oven temperature to 350º.
  • In a large saucepan melt 3 tablespoons of the butter over medium heat.
  • Whisk in the flour and let it cook until it starts to turn a light golden color.
  • Whisk in the milk, nutmeg, cheese, and some salt and pepper.
  • Cook until the cheese is completely melted and the sauce thickens.
  • Add the roasted cauliflower to the cheese sauce and transfer to a square-baking dish (9” x 9” or 8” x 8” works great).
  • In a small microwave safe bowl melt the remaining tablespoon of butter.
  • Add the panko crumbs to the melted butter and stir to combine.
  • Sprinkle the buttered panko over the cheesy cauliflower.
  • Bake the gratin in the oven until it is bubbling and the panko is golden brown, about 15–20 minutes.
Uncategorized

Father’s Day Meal Ideas (My Hubby’s Top 12 Picks)

Fathers Day Menu Ideas

Father’s day is just around the corner and there are going to be some hungry men hoping to get a day off in the kitchen or on the grille. While many people may enjoy going out, my hubby is more partial to a nice home cooked lunch or dinner with the fam. Rather trying to guess what recipes I think the men in our lives would like I went straight to the source and got a male perspective. I asked my husband to sort through my entire archive of recipes and pick out his top 12 favorite recipes that I have featured on my blog. So if you are looking for some ideas on what to cook for dad this year, here are some great ideas that work for lunch or dinner. Give any of these a try and you will make the man or men in your life extremely happy.

Hubby's Top 12 Pick's

  1. Crab Cakes with Spicy Remoulade
  2. Western Bacon Jalapeño Poppers
  3. Chocolate Covered Peanut Butter Truffles
  4. Toffee Apple Dip
  5. Crock-Pot Shredded Beef Tacos
  6. Limoncello Chicken
  7. Macadamia Nut Crusted Halibut
  8. Chicken and Cheese Stuffed Sammy
  9. Crock-Pot Pale Ale BBQ Chicken Sandos
  10. Cheesy Mac Attack A.K.A. Macaroni N’ Cheese
  11. Loaded Baked Cauliflower
  12. Mexican Grilled Corn on the Cob
Sweet Treats

Recipe—Banana Toffee Cookies

We have over ripened left over bananas at our house on a pretty frequent basis. I’m not one to let things go to waste so I’m always finding new ways to use them. My typical go to recipe is my banana nut bread but last week I still had several loaves in the freezer. I happened to have on hand, some leftover white chocolate chips and toffee bits so like a mad scientist I went to work on creating something new. Now normally I have the self-control to wait for cookies to cool but when these came out of the oven they were practically going straight to my mouth. Totally irresistible sugar bombs are what these are! Super sweet and totally addicting! The banana flavor definitely comes through and then there were these fabulous little chewy toffee bits mixed in. Okay, I could so go for another batch right now. If you like bananas and have a sweet tooth then this is the recipe for you!

INGREDIENTS
1/2 c butter, softened
1/3 c bananas, smashed
1 tsp vanilla
18.25 oz box of Duncan Hines Butter Golden cake mix
3/4 c white chocolate chips
1/2 c Heath Toffee Bits for baking

STEPS

  • Beat together the butter, bananas, and vanilla.
  • Stir in the dry cake mix and mix thoroughly.
  • Fold in the chocolate chips and toffee bits until evenly distributed.
  • Place the dough in the freezer and chill for 30 minutes. (This makes it much easier to work with.)
  • Preheat oven to 350º.
  • Roll the dough into 1” cylinders and place on a parchment paper lined baking sheet making sure to give them adequate space. (I found that my dough spread out a lot while baking when I made them into circles so I made them more vertical and they did not spread out as much.)
  • Bake the cookies for 10–12 minutes making sure not to overcook them. They will still look undercooked but they will set as they cool.
  • Leave the cookies on the sheet for 3–5 minutes before transferring to a cooling rack or a parchment paper lined cutting board.
  • Enjoy!


Are you bananas over bananas? Perhaps you would love these other fabulous recipes!

Moist Banana Nut Bread

Chunky Monkey Cookies

Banana Split Pie

Dinners, Sandwiches

Recipe—Lamburgers

Growing up my dad used to live on the edge of Wyoming, right up against the Idaho border. I would go out and visit him several times a year. He lived in this gorgeous 3-story ranch house right next to a sheep farm. I always loved looking at the sheep. Especially in winter when those cute little white fluffy lambs were out in a snow-covered field. It wasn’t until I was a young teenager that I discovered that those cute little fluffy white sheep were raised to be someone’s dinner. I was appalled that anyone could eat such a cute little creature! That is, until I got my first taste of lamb. Yum-o! Sorry lamby, you taste too good not to eat.

Lamb is absolutely delicious and, in my opinion, like no other meat. It has this absolutely delicious rich flavor that is unlike any other meat. I have been wanting to try making lamburgers at home for sometime now but it can be difficult to find ground lamb. Just about every year my dad purchases and entire lamb from the sheep farm. When I saw him a couple of weeks ago he happened to still have some of the ground lamb leftover from his last purchase, so I bummed it off him just so that I could make these exotic burgers. These were mind blowing good. I felt so bad for my husband because he happened to have a cold when I made them and was unable to taste much of anything. Looks like I am going to have to make them again very soon. Aw shucks!

INGREDIENTS
1/2 c mayonnaise
2 tsp cumin
1–1 1/2 lb ground lamb
salt and pepper
olive oil
block of feta cheese sliced
red onion slices
green leaf lettuce
4 burger buns

STEPS

  • In a small bowl combine the mayonnaise and cumin and set in the fridge until ready to use.
  • Season the ground lamb with salt and pepper.
  • Form the ground meat into 4 thin patties.
  • Heat the olive oil in a large skillet over medium-high heat.
  • Add the meat patties to the hot skillet and cook for 3–4 minutes.
  • Flip the patties and add the slices of feta cheese to the patties.
  • Continue cooking the lamburgers for another 4 minutes.
  • While the meat is cooking, lightly toast the buns in the oven.
  • Reduce the heat to low, and while the cheese finishes melting spread a good amount of the cumin mayonnaise onto the cut side of both the top and bottom buns.
  • Arrange the lettuce and red onion on the bottom half of each bun.
  • Top with the most delicious lamburger patty ever.
  • Add the top of the bun to your masterpiece and enjoy!
Side Dishes

Recipe—Lemon Chive Rice

Sometimes pairing side dishes with entrees can be a daunting task. If you aren’t quite sure what to serve with a main course, consider rice. Rice is incredibly versatile! Just toss in a couple of ingredients that complement the flavors of your main dish and you’ve got it made! I actually made this rice dish the other night to pair with macadamia nut crusted halibut. I love fish with some fresh lemon! This had just the right amount of zest to it so it wasn’t an overpowering flavor. This rice would also go great with some baked or grilled chicken. I find myself cooking with lots of citrus throughout the warmer months of the year. There is just something so refreshing about fresh citrus of any kind. This is definitely a side dish that the whole family will enjoy.

INGREDIENTS
3 tbsp butter
1 yellow onion, chopped
2 c rice
1/4 tsp turmeric
1 tbsp lemon zest, divided
3 c chicken broth
2 tbsp chives, finely chopped
salt and pepper

STEPS

  • Melt the butter in a large skillet over medium heat.
  • Add the onions and sauté until transparent.
  • Add the rice and the turmeric and stir until all the grains of rice are coated.
  • Stir in half of the lemon peel and all of the chicken broth.
  • Bring to a full boil over medium-high heat.
  • Cover and reduce heat to low.
  • Simmer for 20–25 minutes.
  • Remove from heat and let rice sit covered for 8–10 minutes.
  • Fluff rice with a fork.
  • Stir in remaining lemon peel, chives, salt, and pepper.
Dinners

Recipe—Chicken Parmesan Meatloaf

Chicken parmesan has got to be one of my favorite Italian dishes. I don’t make it very often because of the amount of work that it requires but I love the stuff! I also love meatloaf, the hubby not so much. Well I saw a recipe the other day for an Italian chicken meatloaf and I thought to myself, why not give it more of a kick and incorporate my favorite chicken parm qualities, flavorful marinara and melted mozzarella…and this gorgeous chicken parmesan meatloaf was made. I expected the loaf to be much dryer, but with the sauce and eggs, it was the moistest meatloaf I have ever made, hands down. The parsley and basil give the meat a nice Italian flavor but really took it over the top was the homemade sauce and fresh mozzarella smothering the top. Delish! I love that this recipe is not only tasted fantastic but it is light on carbs and low in calories. I was able to whip this recipe up in less than 15 minutes so the hardest part was waiting for it to bake. And best of all, the hubby liked it.

Note: I used panko instead of breadcrumbs to keep the carbs down but I imagine some Italian seasoned breadcrumbs would be wonderful!

INGREDIENTS
2 lb ground chicken meat
2 tsp garlic, minced
1/2 yellow onion, chopped
2 eggs
1–1 1/2 c panko
2 c marinara sauce, divided
1/2 c parmesan cheese, grated
1/2 c fresh basil, chopped, divided
1/4 c fresh Italian parsley, chopped
salt and pepper
8 oz fresh mozzarella ball, sliced

STEPS

  • Preheat oven to 375º.
  • In a large bowl combine the meat, garlic, onion, eggs, panko, a 1/2 cup of the marinara, parmesan cheese, a 1/4 cup of the chopped basil, Italian parsley, salt and pepper. (I start with a cup of the panko crumbs and add more as needed to help absorb some of the moisture.)
  • Mix until well combined.
  • Shape the meat mixture into a loaf shape and place in a large greased baking dish.
  • Bake for 40 minutes.
  • Remove loaf from oven and pour remaining marinara sauce over the top.
  • Layer the sliced mozzarella over the top and continue baking for an additional 20 minutes.
  • Turn on the broiler for 3–4 minutes to brown the cheese.
  • Remove the loaf from the oven and allow it to sit for 10 minutes.
  • Garnish the meatloaf with the remaining 1/4 cup of chopped basil and slice to serve.
Dinners

Recipe—Shrimp in Creamy Red Pepper Sauce Over Linguine

A couple weeks back I was having my good friend Sarah over for dinner on a work night. Work nights are already crazy so I needed something snazzy but yet quick and easy so I wouldn’t be spending our whole night together in the kitchen. Well one thing that cracks me up about Sarah is that she eats whole bell peppers like an apple. This girl loves her bell peppers! So I knew I wanted a dish that had a nice red pepper flavor. This one was it! The pepper flavor is very mild and goes great with the rich creamy wine sauce and of course shrimp cook super quick. We had a winner! This recipe was a huge hit. I served this pasta dish with a green salad and a fresh baguette for a quick and impressive dinner you’d think came out of a restaurant.

INGREDIENTS
2 tbsp olive oil
2 tsp garlic, minced
1 1/2 lb large shrimp, peeled and deveined
salt and pepper
1/4 c white wine
1 red bell pepper, chopped
2 tsp chili paste (more if you like things on the spicy side)
1 pt whipping cream
1/4 c fresh bail, chopped

STEPS

  • Heat the olive oil in a large skillet over medium-high heat.
  • Add the garlic and heat through for about 1 minute making sure not to burn it.
  • Add the shrimp and season with salt and pepper.
  • Sauté the shrimp and cook most of the way through, about 3–5 minutes.
  • Transfer the cooked shrimp to a bowl and cover with foil.
  • Pour the wine to the skillet and cook until it reduces by half.
  • Add the bell pepper, chili paste, and cream.
  • Simmer for 5–6 minutes or until the cream begins to thicken.
  • Add the shrimp back into the skillet and simmer in the sauce for another 3 minutes.
  • Stir in the majority of the basil leaving some for garnish.
  • Serve the shrimp and a spoonful of the sauce over cooked linguine and garnish with some of the leftover chopped basil.
Dinners

Recipe—Honey Spice Glazed Pork Chops

There is just something ultra tasty about a nice cut of tender pork in a savory sweet sauce. This recipe is so incredibly quick and easy that it is the perfect dinner on a work night and yet still classy enough for a dinner party. All the spices give the sauce a nice little pop. This dinner is perfect for everyone in the family. Even the pickiest of eaters will love the sweet flavor of the sauce. My three year old ate almost an entire pork chop. This sauce is also great with a ham steak or chicken breast, heck it would be good on a piece of leather! Try this honey glazed pork chop tonight, the whole family will be begging for more.

INGREDIENTS
1/2 c honey
4 tbsp Dijon mustard
1 tsp ground ginger
1/2 tsp cinnamon
1/4 tsp ground cloves
3 tbsp olive oil
4 boneless thick cut pork chops (or 6–8 think cut)
salt and pepper

STEPS
Note: If using thin cut pork chops, cooking time will need to be adjusted since they will cook much quicker.

  • In a bowl mix together the honey, mustard, ginger, cinnamon, and cloves.
  • Season the pork chops with salt and pepper.
  • Heat the olive oil in a large skillet over medium-high heat.
  • Add the pork chops and cook for 3 minutes per side.
  • Pour the honey mustard sauce over the pork chops and cook for an additional 10–12 minutes or until cooked through flipping the chops halfway through.
  • Transfer the pork chops to a plate and spoon the sauce over the chops.
Appetizers

Recipe—Bacon Jalapeño Cheese Ball

I have always loved the idea of cheese balls, but have been turned off by the fake processed taste of the premade ones you get at the store. Well cheese balls seem to be redeeming themselves with all the creative gourmet versions popping up all over the place. I recently threw my husband a little birthday bbq and wanted an appetizer that could be prepared ahead of time and then just set out once the party started. When I saw this recipe on Pinterest I knew it was exactly what I was looking for! My husband loves bacon, and of course loves the spice of jalapeños. (Don’t all men? Okay I guess vegetarians may be repulsed by the bacon but there are substitutes for that.) Once I had the bacon cooked and the jalapeños chopped this recipe came together in about 5 minutes. It was super quick and easy. A perfect recipe for any social events you may have coming up. By the end of the night I had several people asking for the recipe, which, in my mind, is a very good sign.

Note: This can be made a day ahead of time and stored in the refrigerator until ready to serve.

INGREDIENTS
8 oz cream cheese
3/4 c cheddar cheese, shredded
2 tbsp green onions, chopped
1 tsp garlic, minced
1/4 tsp cumin
1/4 tsp salt
dash cayenne pepper
1 tsp lime juice
1/2 tsp Worcestershire sauce
2 jalapeños, deseeded, deveined, and finely chopped, divided
6 slices of bacon, cooked and crumbled, divided
1/4 c pecans, chopped

STEPS

  • In a medium mixing bowl stir together the cream cheese, cheddar cheese, green onions, garlic, cumin, salt, cayenne pepper, lime juice, and Worcestershire sauce.
  • Fold in half of the chopped jalapeños and half of the crumbled bacon until well blended.
  • On a large plate combine the remaining jalapeños, remaining bacon, and the pecans and mix together.
  • Using your hands shape the cream cheese mixture into a large even ball.
  • Once you have formed the ball roll it in the pecan mixture until it is evenly coated.
  • Place the finished cheese ball on a plate and refrigerate for at least an hour before serving.
  • Serve with your favorite crackers.

Recipe adapted from Tracey’s Culinary Adventures.