Salads, Sandwiches

Recipe—Low-Carb Egg Salad Wraps

I am constantly on the hunt for tasty low carb recipes. This wonderful blog I follow, Low Carb Jabberwockey, is always giving me inspiration for new ways to try classic recipes, but without the carbs. The other day she posted a recipe for an egg salad wrap, basically egg salad on a leaf of romaine with tomatoes and avocados. Genius, I thought! Well it just so happens I had an abundance of hard-boiled eggs after Easter. Imagine that! I decided to take the Jabberwockey’s idea and make it my own. These turned out phenomenal! I think this is a great recipe regardless of if you are watching your carbs. Who needs boring ol’ sliced bread anyways? Not this gal!

INGREDIENTS
6 hard-boiled eggs, chopped
1 celery stalk, diced
1 tbsp green onions or chives, chopped
1/4 tsp salt
1/8 tsp pepper
1/4–1/2 c mayo
2 tsp yellow mustard
4 leaves of romaine lettuce
8 slices of bacon, cooked
1/2 avocado, sliced

STEPS

  • In a medium bowl mix together eggs, celery, green onions, salt, pepper, mayo, and mustard.
  • On each piece of lettuce place 2 strips of bacon.
  • Top the bacon with a spoonful of the egg salad and a couple of the avocado slices.
  • Grab a napkin and enjoy!
Dinners

Recipe—Bacon Cheddar Chicken (Copycat Version of Outback’s Alice Springs Chicken)

I am a bacon and cheese fanatic, which is why I am in LOVE with Outback Steakhouse’s Alice Springs Chicken. If you have never had this dish I speak of, let me tell you all about it. It is a juicy chicken breast cooked in a sweet and tangy honey mustard sauce, then topped with the most delicious things you can think of, sautéed mushrooms, bacon, and cheese, LOTS of cheese! Yummy-messy-goodness that’s what this is! I will admit though, I think mine is slightly better than Outback’s. Shhhhhh… don’t tell. While this dish does require a bit of prep I personally think it is well worth it.

Note: For best results be sure to allow adequate time for marinating the chicken breasts.

INGREDIENTS
1 c Dijon mustard
1 c honey
1/2 c mayonnaise
1 tsp lemon juice
4 boneless, skinless, chicken breasts
1 tbsp olive oil
2 tbsp butter
2 c white mushrooms, sliced
salt and pepper
paprika
8 slices bacon, cooked
1 c Monterey jack, shredded
1 c cheddar, shredded
2 tsp fresh parsley, chopped

STEPS

  • In a medium sized bowl mix together the mustard, honey, mayonnaise, and lemon juice until well combined.
  • Spoon out half of the marinade and place in a small bowl, cover, and chill until later.
  • Add the chicken breast to the large bowl with the marinade and toss to coat.
  • Cover the bowl and place in the fridge for 2–12 hours to marinade.
  • Preheat oven to 375º.
  • Heat the olive oil in a large skillet over medium heat.
  • Add the chicken to the skillet and discard the marinade that the chicken was soaking in.
  • Cook the chicken for 5–7 minutes per side or until golden brown.
  • While the chicken is cooking melt the butter in a small skillet over medium-high heat and sauté the mushrooms.
  • Transfer the cooked chicken breasts to a large baking dish and drizzle with some of the reserved honey mustard marinade. (Save the leftover marinade to serve alongside the finished dish.)
  • Season the chicken with salt, pepper, and paprika.
  • Place two pieces of bacon on each chicken breast and top with the sautéed mushrooms.
  • Sprinkle the Monterey jack on each breast and then the cheddar.
  • Bake the dish for 10–12 minutes or until the cheese is thoroughly melted and the chicken cooked through.
  • Remove the dish from the oven and sprinkle the chopped parsley over the melted cheese.
  • Serve each chicken breast with a small side of the honey mustard.

Recipe adapted from Favorite Family Recipes.

Side Dishes

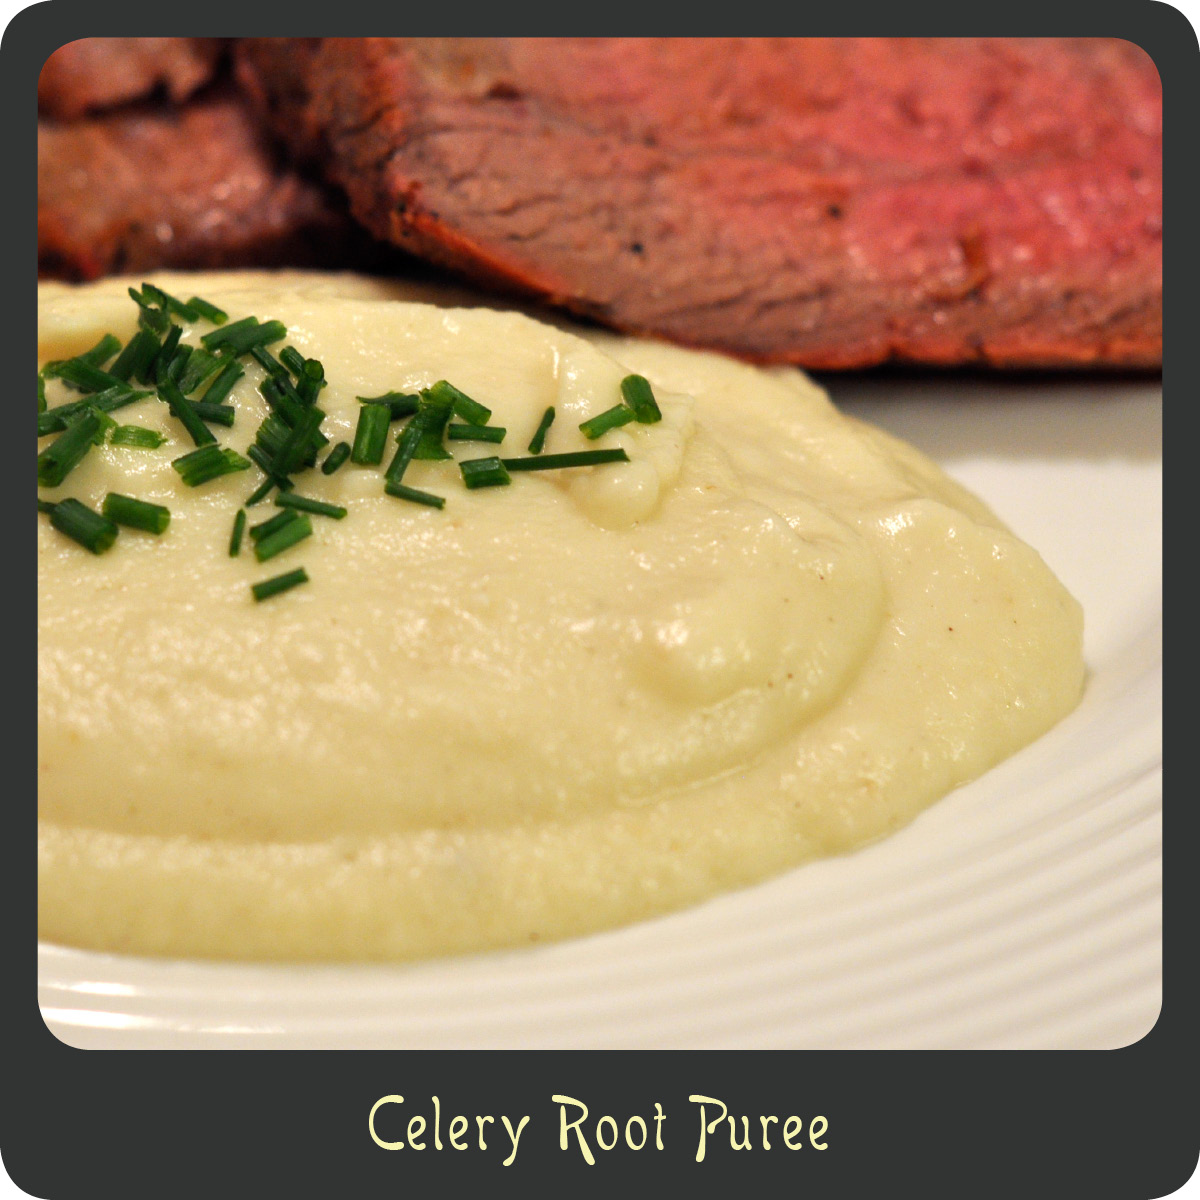
Recipe—Celery Root Puree

First time I ever had celery root puree was over at a friend’s house for an incredible dinner. Ever since then I have been in love with the creamy rich side dish. Celery root puree is a worthy competitor of mashed potatoes and takes a dinner from average to over the top. Don’t be intimidated by celery root, it is just as easy to prepare as mashed potatoes. While it may be gnarly and unattractive out the outside it has a very delicate and light flavor unlike anything else. By boiling the celery root in milk it gives it a silky texture that is just heavenly. This side dish goes a long way since it’s really rich. It goes magnificent with almost any kind of meat but I am especially fond of it with a nice cut of steak. Come on, be adventurous and give celery root a shot!

Note: This celery root puree can be made in advance and then reheated over the stove or in the microwave right before serving.

INGREDIENTS
1 1/2 c milk
1 1/2 c water
2 tsp salt
1 large celery root, peeled and cut into 1” cubes
1 medium russet potato, peeled and cut into 1” cubes
1/2 of a small yellow onion, quartered
3 tbsp butter, cut into 3 pieces
salt
1/4 tsp ground white pepper
1 tbsp fresh chives, chopped

STEPS

  • In a large saucepan bring the milk, water, and salt to a rapid boil over medium-high heat.
  • Add the chopped celery root, potato, and onion to the pot.
  • Reduce heat to medium and simmer until the vegetables are fork tender, about 25 minutes.
  • Drain off all of the liquid.
  • Place the cooked vegetables and the butter in a food processor or blender and puree until smooth. (Add a splash of cream or milk if needed.)
  • Season the puree with salt and white pepper.
  • Transfer the celery root puree to a serving bowl or plates and garnish with chopped chives.
Sweet Treats

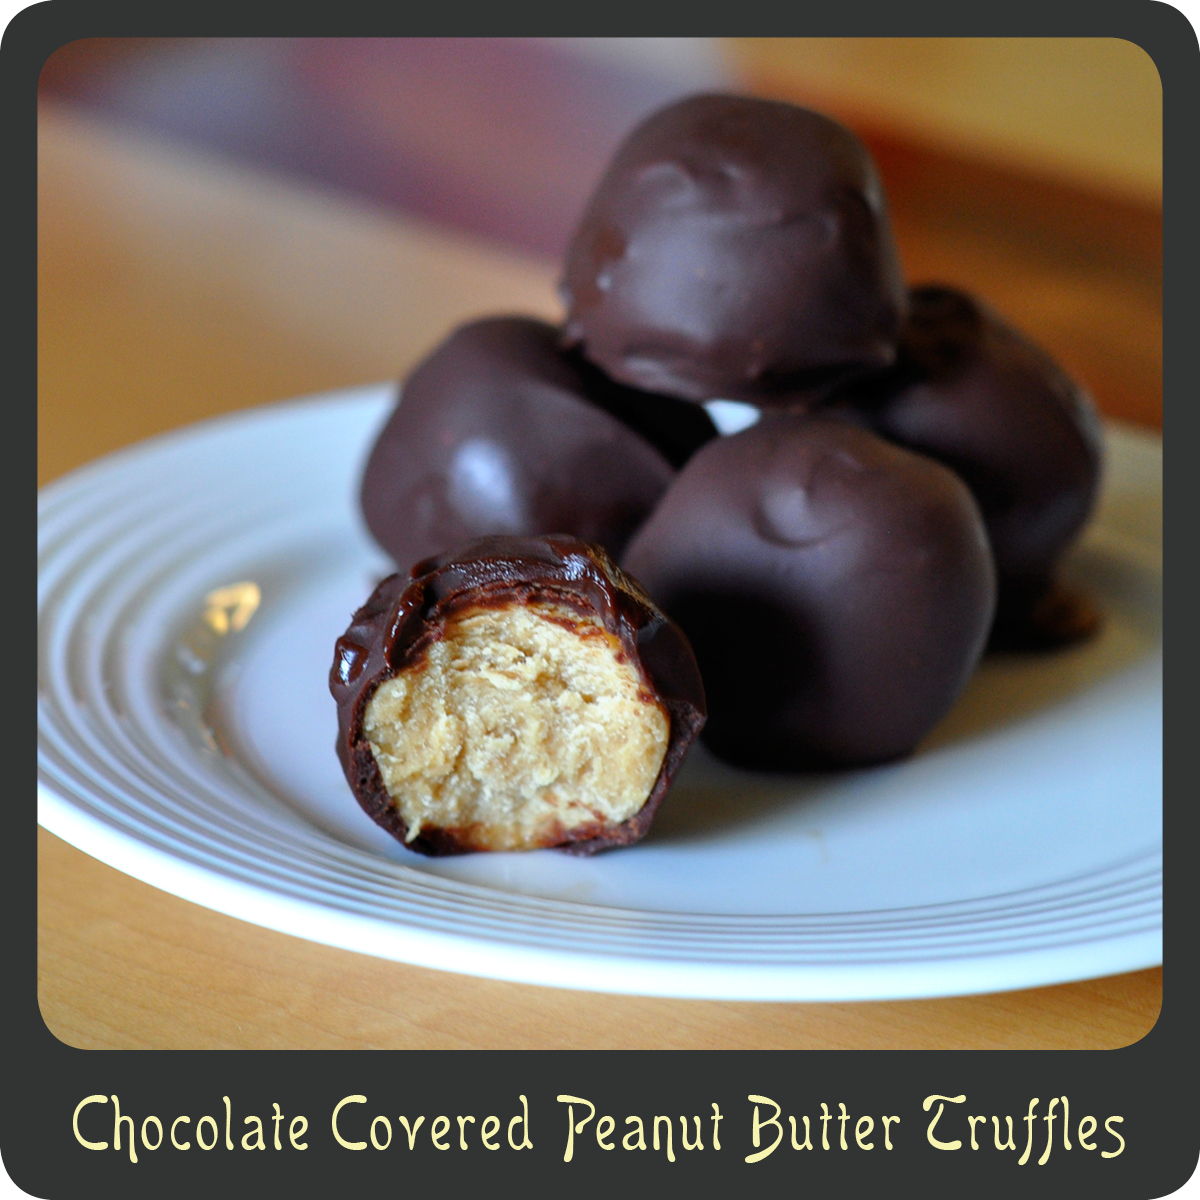
Recipe—Chocolate Covered Peanut Butter Truffles

This recipe is definitely an oldie and a goodie. The first time I made these was over 20 years ago when I was a Brownie. We made little boxes of these for our moms for Mother’s Day. (My mom was our troop leader so this is actually her recipe.) These are great for any occasion as individual truffles but you can also have fun with various shapes. Occasionally on Easter, my mom would make us homemade peanut butter eggs. I actually did that this Easter for my son’s teachers.

These are super easy to make and they blow Reese’s out of the water! Come on, you know anything with peanut butter and chocolate is going to be delicious. It is a fun and easy recipe to make, so get the kids involved. What kid doesn’t like to get in the kitchen and use their hands? I hope you and your family love these as much as mine.

Note: Finished truffles should be stored in the refrigerator or freezer. My hubby thinks they are best when frozen.

INGREDIENTS

1 1/2 c creamy peanut butter
4 tbsp butter, softened and divided
3 tbsp light corn syrup
1 tsp vanilla
4 tbsp heavy whipping cream
1 lb powdered sugar
24 oz bag of semi sweet chocolate chips

STEPS


  • In a large mixing bowl beat together the peanut butter, 2 tablespoons of the butter, corn syrup, vanilla, and whipping cream until well incorporated.
  • Add the powdered sugar to the bowl, and using your hands mix until everything is completely incorporated.
  • Pinch off bite size pieces and roll into balls. As you finish the balls place them on a wax paper lined baking sheet.
  • Place the baking sheet in the freezer for at least 30 minutes.
  • Once the balls are frozen, in a medium microwave safe bowl combine the chocolate chips, the remaining 2 tablespoons of butter, and 2 tbsp of water.
  • Microwave the chocolate for 1 minute.
  • Remove the chocolate from the microwave and beat with a fork. If there are still chunks, continue microwaving and stirring in 30 second increments.
  • Once your chocolate is smooth allow it to sit on the counter for a minute.
  • Dip each frozen ball into the melted chocolate and turn until evenly coated and place back on the wax paper covered baking sheet. (I find using a fork works great to remove the balls from the melted wafers so that the extra chocolate can drip off between the prongs.)
  • Once you have finished dipping all the balls place the baking sheet back in the freezer so that the chocolate can set.
  • Enjoy!

Dinners

Recipe—Buttery Lemon Dill Salmon

A couple times a year I like to complete an 11-day cleanse. It is just a way to flush out all these impurities and reset my digestive system. The weight loss is a huge perk too (Down 8 lbs! Wahoo!). For some reason during this last round I was craving salmon! And I mean REALLY craving it, like every day! I was daydreaming about a big slab of salmon covered in butter, lemon, and dill. I knew that would be one of the first dinners I would prepare for myself once I was done with the cleanse. This recipe did not disappoint. The fish was super moist and all the flavors and buttery goodness really seeped into the meat. I was shocked when even my 3-year old son devoured a huge chunk of the tasty fish. This recipe for oven baked salmon is ridiculously easy to make and super quick to get on the table. It also makes for a beautiful presentation. This may just be on the menu at my next dinner party.

INGREDIENTS
1 salmon filet (1 1/2–2 lbs)
2 tbsp butter, softened
1/4 c white wine
2 tbsp lemon juice
1/2 tsp kosher salt
1/2 tsp lemon pepper
1/2 tsp dried dill
lemon slices (optional)

STEPS

  • Preheat oven to 425º.
  • Pat the salmon dry and place it in a greased baking dish.
  • Rub the butter all over the fish.
  • Combine the wine and lemon juice in a small bowl and stir.
  • Pour the liquid over the fish.
  • Sprinkle the salt, lemon pepper, and dill over the fish.
  • If you are using the lemon slices place over the top of the fish.
  • Bake the fish for 20–25 minutes or until the fish flakes off easily with a fork.
Salads

Recipe—Mango and Bok Choy Salad

My produce box was filled with lots of fabulous goodies this week. I had almost all the makings for a delicious tropical salad, bok choy, mango, and cilantro. Yum! While many recipes that include bok choy have you cook the leafy green it is also great for salads or slaws. Bok choy is light, sweet in flavor, and has a nice crisp texture. The nutritional value is also a huge plus. It’s high in Vitamins A, C, and K as well as calcium, potassium, magnesium, and it is low in calories. The dressing for this salad is sort of a citrusy vinaigrette that keeps the salad light and refreshing. This salad was the perfect cooling component for the spicy prawns I served with it. With all these bright colors I can’t help but think that this is the perfect dish for the coming spring and summer seasons.

Note: You can use a regular head of bok choy or about 4 baby boy choy. Baby book choy has a milder flavor but both will work well with this recipe.

INGREDIENTS
4 c bok choy, mostly greens with some stalks thinly sliced
1 1/2 c red cabbage, thinly sliced
2 mangos, diced
3 stalks celery, thinly sliced
4 green onions, thinly sliced
1/4 c fresh cilantro, chopped
3 tbsp rice vinegar
4 tbsp limejuice
1 tbsp sugar
3 tbsp olive oil
2 tsp soy sauce
1/4 tsp salt

STEPS

  • Combine the bok choy, cabbage, mango, celery, green onions, and cilantro in a large bowl.
  • In a small bowl whisk together the rice vinegar, limejuice, sugar, olive oil, soy sauce, and salt until most of the sugar and salt are dissolved.
  • Pour the dressing over the salad and toss to combine.
Appetizers, Dinners

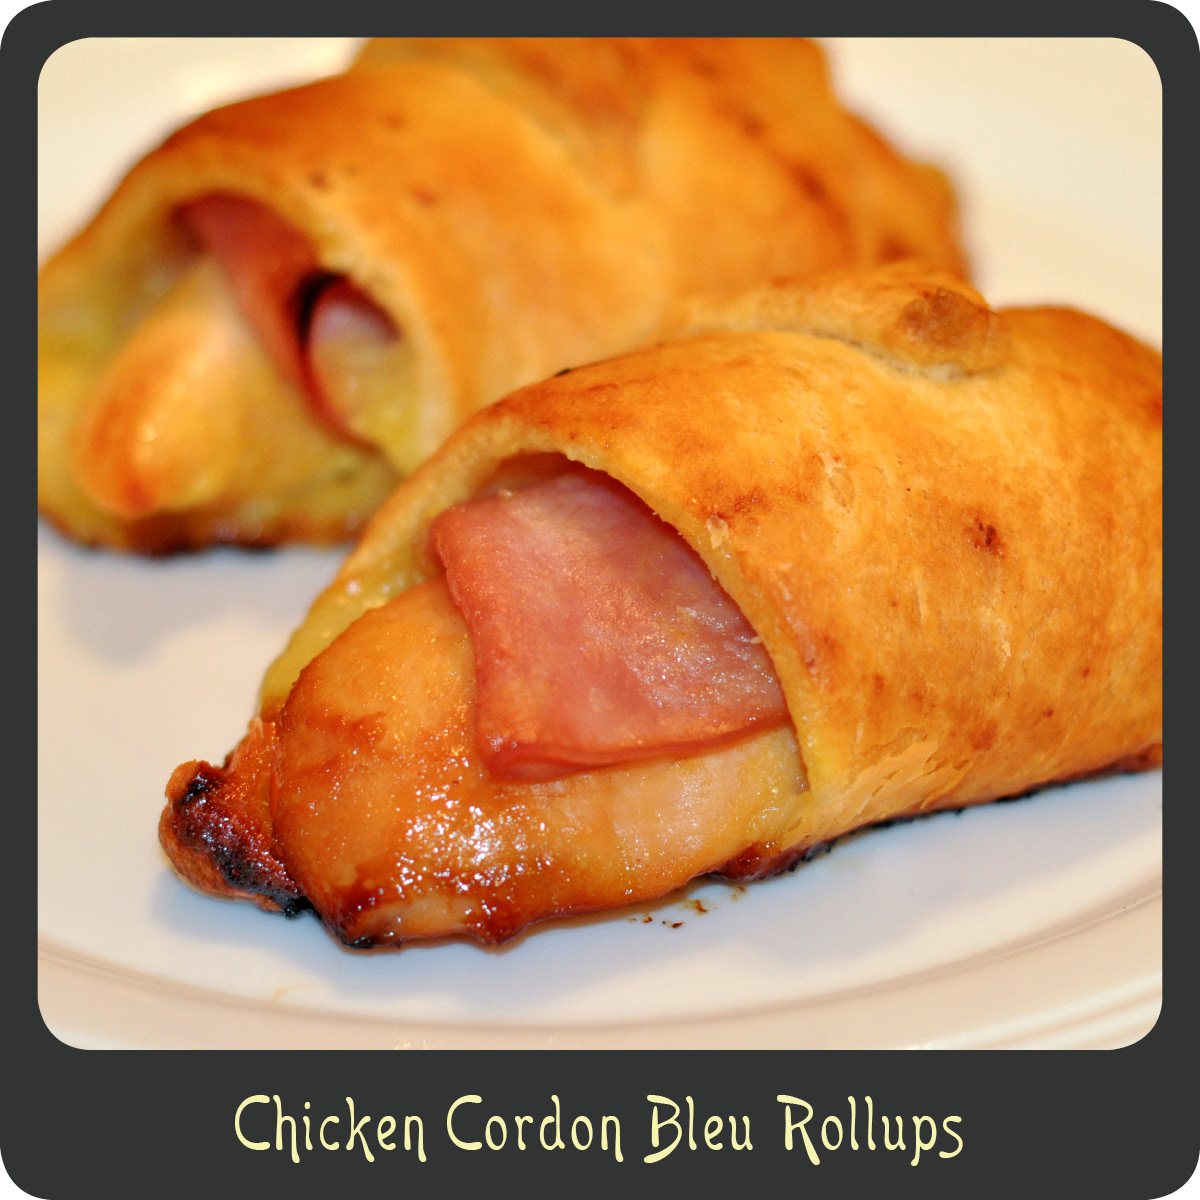
Recipe—Chicken Cordon Bleu Rollups

My son loves chicken strips dipped in honey mustard and he also loves croissants. (Who doesn’t, really?) I whole-heartedly made this for him because I knew it would be a hit with the munchkin. Turns out the whole family loved them! This recipe is so simple, quick, and cheap to make. My little guy was even a wonderful helper in assembling them, and of course he made sure to be on quality control check while we were putting them together. Little rascal. I just served these with a big green salad for a balanced dinner. We had plenty of leftovers and they reheated extremely well in the oven. I’m definitely keeping these in mind for appetizers too. They were a perfect finger food and were fun to eat and make!

INGREDIENTS
1/4 c honey
1/4 c yellow mustard
1/8 c mayonnaise
1 lb chicken breast tenders
1 tbsp butter
2 cans crescent rolls
8 slices Swiss cheese, cut in half
8 slices ham cut in half lengthwise

STEPS

  • Combine together honey, mustard, and mayonnaise in a small bowl or measuring cup.
  • Place the chicken tenders in a large Ziploc bag and add in 1/2 of the honey mustard sauce and toss to coat.
  • Melt the butter in a large skillet over medium-high heat and cook the saucy chicken breast tenders flipping once until done, about 10–12 minutes.
  • Separate the crescent rolls into the individual triangles.
  • Spread the remaining honey mustard on each one.
  • Place a slice of the Swiss cheese on each crescent triangle and then top with a slice of ham folded in half.
  • Top each with a cooked breast tender.
  • Roll up the crescent starting at the wide end and place on a baking sheet covered in parchment paper. (The parchment paper helps make cleaning up the melted cheese a breeze!)
  • Repeat with remaining chicken tenders and crescents.
  • Bake for 18–20 minutes or until golden brown.
Appetizers

Recipe—Garlic Parmesan Wings


Recipe—Garlic Parmesan WingsSo I am totally on a low carb kick right now. I am determined to loose this extra weight in preparation for summer and just to feel better overall. A lot of people ask me, “How can you do low carb? Don’t you miss all the good stuff?” My response is, “Uhhh…NO!” One of the reasons I love low carb is that you still get to eat really good food. Look at these garlic Parmesan wings, NO CARBS! Zero! Zilch! And while they are short on carbs they are most certainly not short on flavor. I actually made these for a party last weekend and they were a hit! When I told my husband what I was making for the party he told me he probably wouldn’t eat any. Well, guess who was standing over the kitchen sink chowing down on these wings? He just could not resist them. They smelled so incredibly good! And tasted just as scrumptious. I highly recommend these wings even if you aren’t watching your carbohydrates. They were super easy to make and a real crowd pleaser. By the end of the night several people had asked for the recipe. That my friends, is a very good sign.
INGREDIENTS
2 tsp dried oregano
2 tsp dried rosemary, chopped
2 tsp kosher salt
1 tsp dried cumin
3 lbs chicken wings & drumsticks
4 tbsp olive oil (I used some roasted garlic flavored that I had on hand. Delish!)
2 tbsp dried basil
2 tbsp garlic, minced
1/2 c Parmesan cheese, finely grated

STEPS

  • Preheat oven to 425º.
  • In a small bowl combine oregano, rosemary, salt, and cumin. Stir to combine.
  • Place the wings in a large bowl and sprinkle with the seasoning mixture. Toss to coat.
  • Place all the wings in a single layer in a baking dish.
  • Bake for 23–27 minutes or until the wings just start to turn a golden brown.
  • Place the cooked wings in a large mixing bowl.
  • Drizzle the wings with olive oil and toss to coat.
  • Season the wings with the basil, garlic, and Parmesan and again toss to coat, making sure they all have an even coating of all the flavorful goodness.
Side Dishes

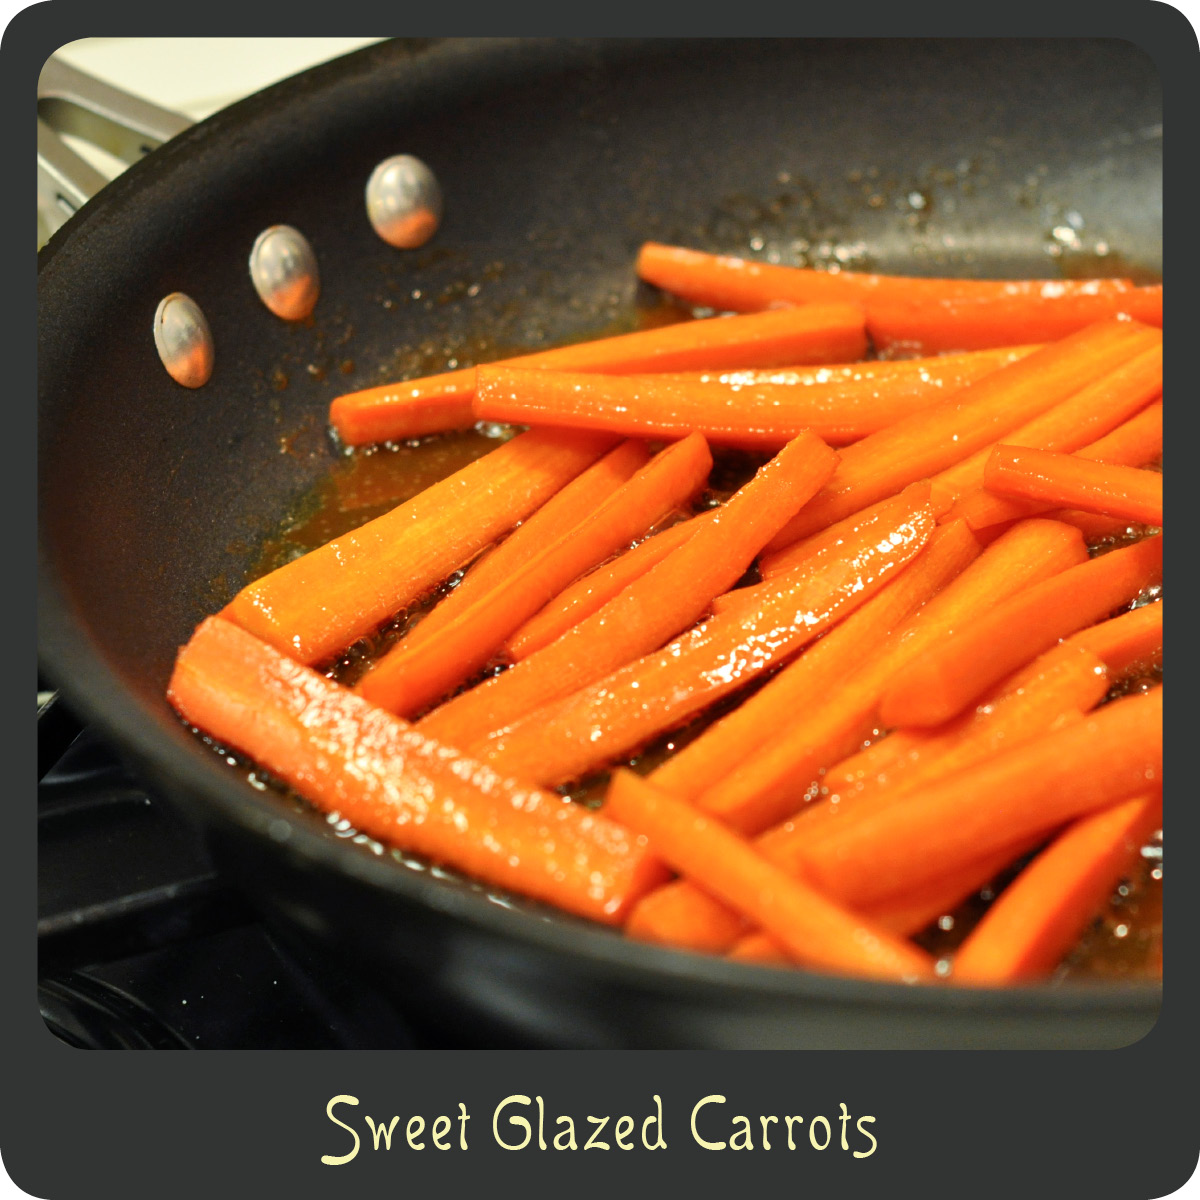
Recipe—Sweet Glazed Carrots

I am a lover of all things carrot. Just not when they are steamed all on their lonesome. If I am eating cooked carrots I want them to have some pizzazz. This is by far my favorite way to enjoy cooked carrots, covered in a sweet and buttery glaze. So good! These are very simple, and in fact you probably already have all the ingredients on hand. These take less than 10 minutes and are a fabulous addition to any dinner.

Note: This recipe is intended to be prepared with petite carrots but I have made it with both carrot sticks and baby carrots and had equally great results. They petite carrots just make for the nicest presentation. I had whole carrots on hand so that’s what you see in the photo.

INGREDIENTS
2 tbsp honey
2 tsp vanilla
2 tbsp butter
2 tsp white vinegar
salt
5 large carrots, cut in half lengthwise and then quarters (See above note for a variety of carrots that can be used.)

STEPS

  • In a large sauté pan combine the honey, vanilla, butter, vinegar, and salt.
  • Heat over medium-high heat.
  • Once the butter is melted whisk the glaze until well combined.
  • Add in the carrots.
  • Cook until the majority of the liquid is gone and the carrots are fork tender, about 8–10 minutes, making sure to stir occasionally.
Sweet Treats

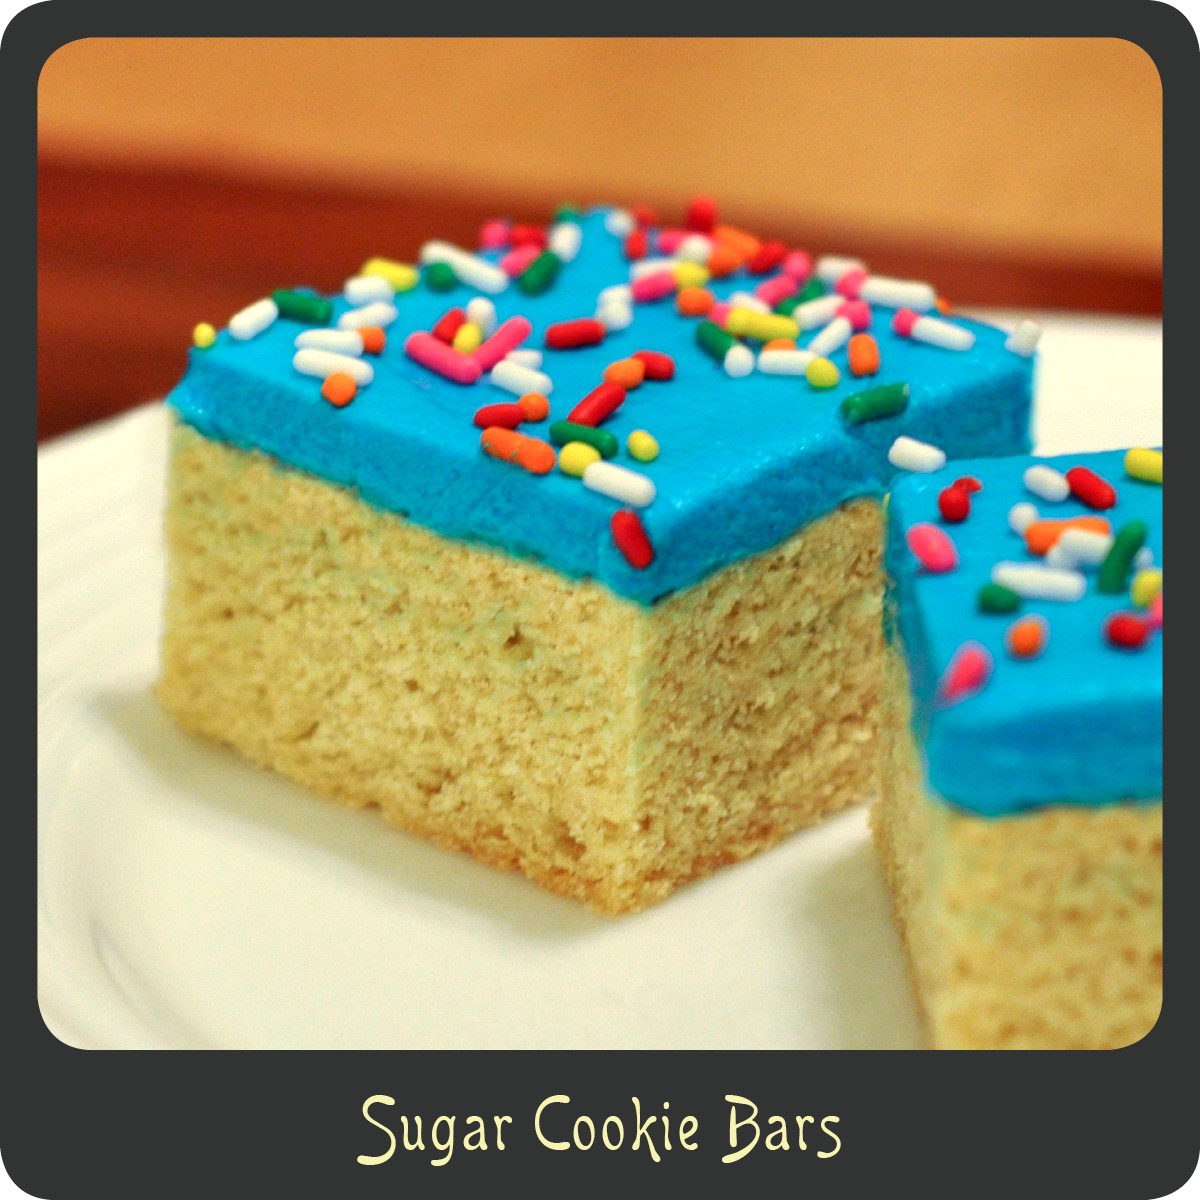
Recipe—Sugar Cookie Bars

Last month we celebrated my son’s third birthday. I knew I wanted to send him to school with some sort of treats to share with all his friends. Well, his birthday is the day after Valentine’s Day so that week is already pretty hectic for me. I didn’t have tons of time to spend on baking and frosting individual mini-cupcakes like I wanted to. I needed something easy that I could make a lot of, and fast. I stumbled upon a recipe for sugar cookie bars. I knew they would be perfect! They had a cute festive look to them and were so easy to make. They turned out perfect! They were just the right size for a bunch of toddlers and I didn’t have to frost them all individually. These sugar cookie bars are perfect for any occasion. Have fun with different festive colored frostings and sprinkles. (I love sprinkles!)

COOKIE BAR INGREDIENTS
1/2 c butter, softened
1 c sugar
2 eggs
1 tsp vanilla
2 1/2 c flour
1/2 tsp salt
1/4 tsp baking soda

FROSTING INGREDIENTS
1/2 c butter
1/2 tsp vanilla
pinch of salt
2 c powdered sugar
2–3 tbsp milk
food coloring
sprinkles

STEPS

  • Preheat oven to 375º.
  • Using an electric mixer beat together the sugar and butter until fluffy, about 2 minutes.
  • Beat in the eggs and vanilla making sure to mix well.
  • In a separate bowl combine the flour, salt, and baking soda and stir to combine.
  • Gradually mix the dry ingredients into the creamy mixture.
  • Line a xx” x xx” baking dish with parchment paper going both directions.
  • Press the cookie dough into the lined baking dish.
  • Bake for 12–14 minutes.
  • Allow cookie bars to cool completely.
  • Using an electric mixer beat together the butter, vanilla, salt, and powdered sugar until well combined.
  • Gradually add in the milk until your frosting reaches the desired consistency. (If it becomes too runny just add in a bit more powdered sugar.
  • Once your frosting reaches desired consistency beat in the food coloring.
  • Spread the cookie bars with the frosting and top with sprinkles.
  • Place in the refrigerator for 1 hour and use a pizza wheel to cut into squares with ease.