Dinners, Soups

Recipe—Tuscan Tortellini Soup

I saw this recipe a couple of months back for a ravioli soup and knew I had to try it. Well I am never one to really “follow” a recipe so I mixed things up and created a tortellini soup. Tortellini are far less doughy so you have these fabulously light cheese filled pillows floating around in a rich creamy tomato soup and then of course some big hearty chunks of sausage in the mix as well. This soup was phenomenal! My four-year-old son gobbled it up and he is usually kind of weird about soups (I think it is a texture thing). This recipe made a massive pot, which allowed us to have a full dinner and then also freeze a bunch for future meals. Tuscan tortellini soup is perfect for a chilly winter day and is so quick and easy to prepare. I could go for a big bowl of it right now!

INGREDIENTS
2 lb ground Italian sausage
4 tbsp butter
1/2 onion, finely diced
1 tbsp garlic, minced
28 oz can crushed tomatoes
28 oz can petite diced tomatoes
4 c chicken broth
1 tsp salt
1/2 tsp garlic powder
4 c half & half
1 c heavy cream
6 oz bag baby spinach leaves, chopped
18–20 oz fresh four cheese tortellini (I got two 9 oz packages.)
1 c parmesan cheese, shredded
croutons

STEPS

  • Brown the sausage over medium-high heat in a VERY large soup pot.
  • Once the meat is about halfway cooked add the butter, onion, and garlic and cook until the union is soft and transparent.
  • Add the crushed tomatoes, diced tomatoes, chicken stock, and chopped spinach.
  • Bring to a boil and add salt and garlic powder.
  • Boil for 10 minutes making sure to stir frequently.
  • While the soup is boiling cook your tortellini in a separate pot per package instructions and drain.
  • Add the half & half and heavy cream to the pot and simmer for 10 minutes.
  • Stir in the parmesan and cooked tortellini until the cheese is melted.
  • Transfer the soup to a bowl using a ladle.
  • Top with croutons and additional parmesan cheese.

Recipe adapted from Kleinworth & Co.

Dinners

Recipe—Portobello Cordon Bleu

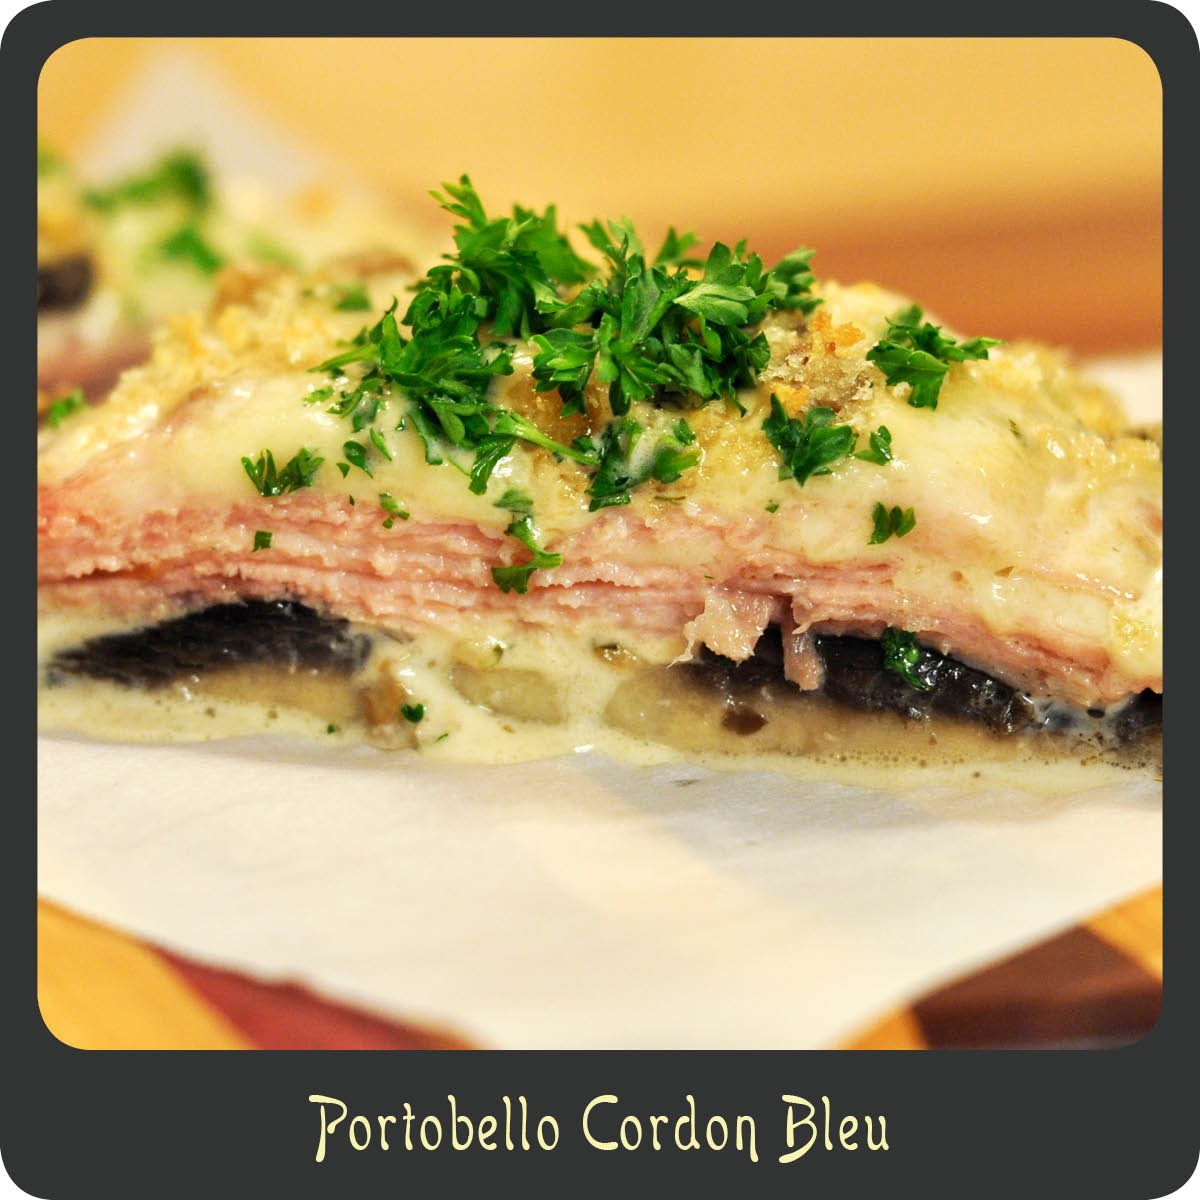
There are two things I hated as a kid and refused to eat, raisins and mushrooms. I guess I had problems with eating wilted fruit and fungus. That’s understandable, right? To this day I still can’t eat raisins unless they are baked in something but I LOVE mushrooms! Love, love, love the fabulous fungi! I have come a long way and can now appreciate the rustic earthy flavor of mushrooms. My friend commented that if she has a good portobello that it is as good as a steak. And it is true! Don’t get me wrong I love steaks, but it is exciting when you find something that makes a great substitution and is lower in calories and is just as filling. Portobello mushrooms are super filling, rich in potassium, essential amino acids, and vitamin B. They are low in calories, fat-free, and are a great source of protein.

This is probably one of my favorite new ways to enjoy portobellos. The creamy Dijon sauce is amazing! And come on, add ham and swiss to anything and you know it will be awesome. The sprinkling of the panko on top gives you just the right amount of crunch. And best of all, this delicious dinner took about 20 minutes to make! Next time I prepare these I want to try and add a fried egg to the top and serve it for breakfast. Oh my goodness, I think that would be awesome! I hope you enjoy this recipe as much as I did!

INGREDIENTS
4 large portobello mushrooms
olive oil for drizzling
2 tbsp butter
1 tbsp garlic, minced
1 c heavy cream
1/2 c chicken broth
2 tbsp fresh parsley, chopped
1/4 c parmesan, graded
2 tbsp Dijon mustard
1/2 lb thin sliced ham
8 slices swiss cheese
4 tbsp panko
salt and pepper

STEPS

  • Preheat oven to 400º.
  • Line a baking sheet with foil or parchment paper.
  • Remove the stems from the mushroom caps and slice a thin layer off the top to allow it to sit flat. (Save all of these pieces.)
  • Drizzle the mushroom caps with olive oil and season with salt and pepper.
  • Place prepared mushrooms on the lined baking sheet and bake for 10–12 minutes.
  • While the portobellos are cooking, chop the mushroom caps and other pieces you trimmed off earlier on.
  • Melt the butter in a skillet over medium-high heat and sauté the mushrooms and garlic for 5 minutes.
  • Add the heavy cream, chicken broth, and parsley.
  • Bring the mixture to a boil and reduce heat to low.
  • Add the parmesan, Dijon, and a little salt and pepper to the sauce and continue to simmer until the sauce thickens up.
  • Remove the mushrooms from the oven and drain off any excess liquid from the baking sheet.
  • Fill the upside down caps with sauce and then layer with ham, cheese, ham, cheese.
  • Top with another spoonful of the sauce and a sprinkling of panko.
  • Place the prepared mushroom caps back in the oven and bake for another 7 minutes and then finish them off under the broiler for another 3–4 minutes or until the panko is lightly brown and crisp.

Recipe adapted from Peace, Love, and Low Carb.

Looking for more portobello recipes? Give this one a try!

Breakfast PortobellosBreakfast Portobellos

Dinners

Recipe—Crock-Pot Barbacoa Tacos

One of my favorite Mexican restaurants when I need a quick fix has got to be Chipotle. You can get quality flavor packed food in a jiffy. My go to is their carnitas and my husband can’t resist their barbacoa. It is kind of funny, Chipotle’s barabcoa meat literally makes him sweat when he eats it. But he still loves it! I can’t help but laugh as soon as the sweat starts to bead up on his forehead. Does anyone else do this when they eat something with a little kick? I swear it reminds me of something from a cartoon. I love that guy.

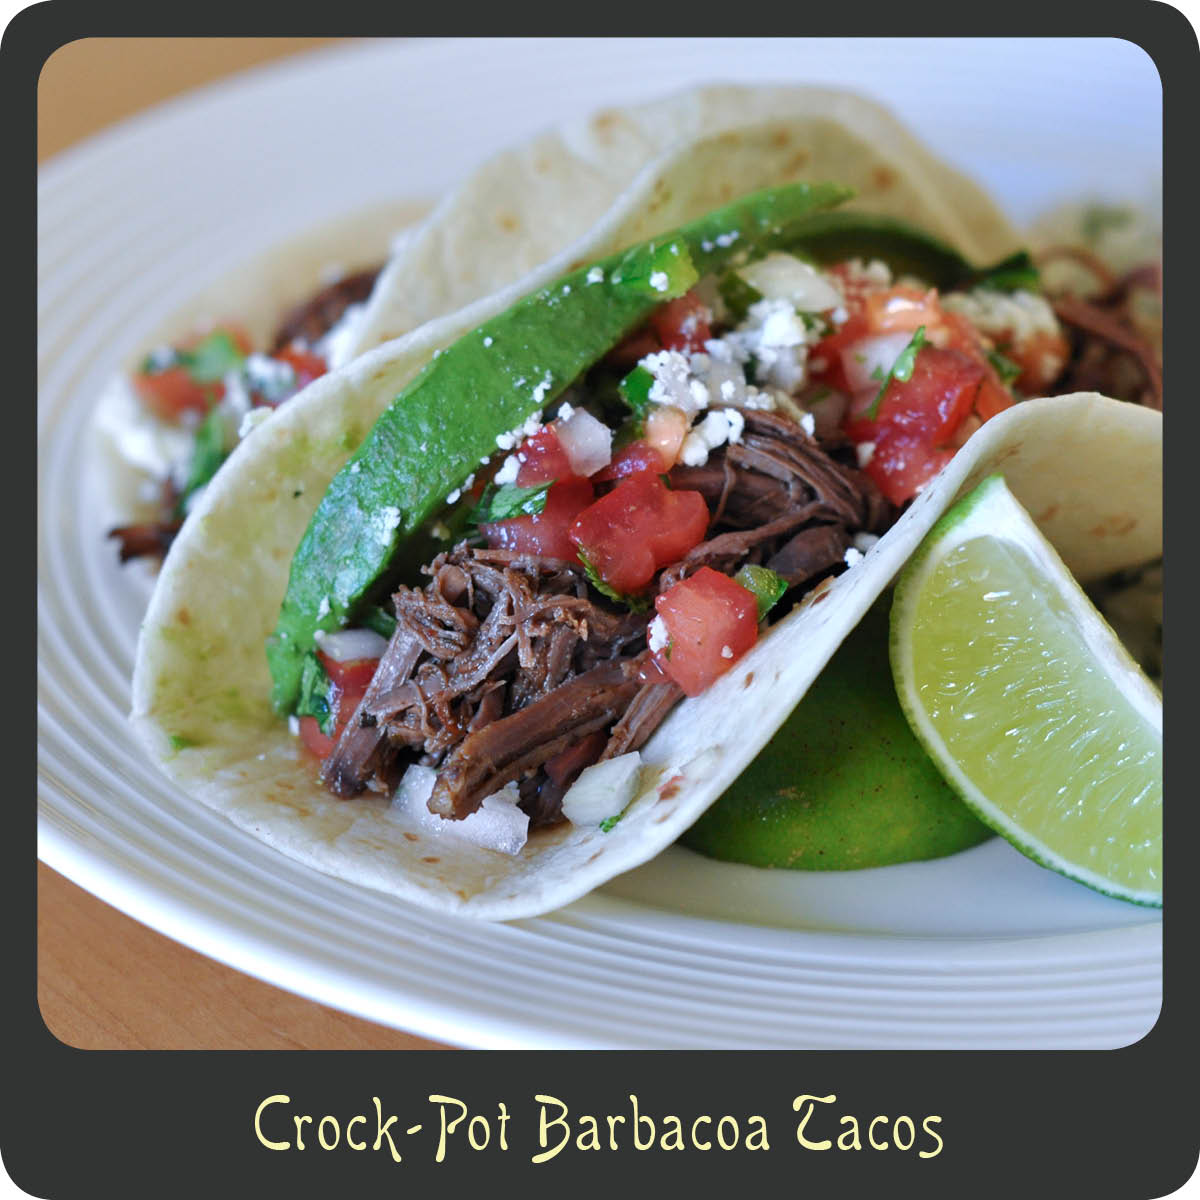
I made this recipe and it is without a doubt a near perfect match of Chipotle’s barbacoa meat. It is a tender, juicy, flavor packed meat perfect for burritos, tacos, or even nachos. I personally love it with a side of my Cilantro Lime Rice. Muy bien!

Note: This meat definitely has a bit of heat in it from the chiles in adobo sauce so if you have a member of your household that doesn’t like heat I would either cut back the chiles or leave them out completely.  

INGREDIENTS
3–4 lb beef chuck roast
1/3 c apple cider vinegar
1/2 yellow onion
2 tbsp fresh lime juice
1 tbsp, garlic, minced
4 tsp ground cumin
2 tsp oregano
1 tsp ground allspice
1 tsp salt
1 tsp pepper
1/2 tsp ground cloves
2–3 chipotle chiles in adobo sauce
3/4 c beef stock

SOME FABULOUS GARNISHES

cotija cheese
, crumbled
chopped green lettuce
diced tomatoes
diced onion
guacamole or sliced avocado
sour cream
pico de gallo
chopped cilantro
lime wedges 

STEPS

  • Trim excess fat off of the roast.
  • Spray your crock-pot with cooking spray (this helps a good deal with cleanup).
  • Place roast in crock-pot.
  • Place all of the ingredients, except for the chuck roast, in the blender and puree.
  • Pour the pureed sauce over the roast.
  • Cook on low for 8–10 hours, or high heat for 5–7.
  • When the roast is done cooking, transfer it to a large cutting board.
  • Using a large fork shred the meat and place it back in the crock-pot to soak up some of the tasty sauce.
  • Serve in a warm tortilla with your favorite taco toppings.

Recipe adapted from Unsophpisticook.

Side Dishes, Soups

Recipe—Sweet Potato and Black Bean Chili

I’ve said it before and I will say it again. My hubby is not a big fan of sweet potatoes. However, we get them pretty frequently in our weekly organic produce delivery so I am always looking for creative new ways to prepare the sweet tasting tuberous root. When I saw this recipe I knew I had to try it. It was the perfect balance of spicy and sweet. Even thought there is no actual meat in it you can certainly fool yourself into thinking there is. It is delicious, thick, hearty, and filling. We served it with a grilled tri-tip and my husband ended up chopping up his tri tip and mixing it in. He is truly a meat and potatoes kind of guy. Give this a try next time you are looking for a super food side dish to warm you up.

Note: For a completely vegan version of this recipe sub vegetable broth for beef broth.

INGREDIENTS
1 tbsp olive oil
1 lb sweet potatoes, peeled and diced
1 yellow onion, chopped
1 green bell pepper, chopped
1 tbsp garlic, minced
2 tbsp chili powder
1 tsp cumin
1 tsp dried oregano
1/4–1/2 tsp cayenne (depends on how much kick you like)
2 (14.5 oz cans) diced tomatoes with chiles, undrained
2 (15 oz cans) black beans, drained
2 c beef broth

STEPS

  • In a large pot heat the olive oil over medium-high heat.
  • Add the sweet potatoes, onion, and bell pepper until the onions become translucent, about 8–10 minutes.
  • Stir in the garlic, chili powder, cumin, oregano, and cayenne.
  • Sauté for about 1 minute.
  • Add the tomatoes, beans, and broth stirring until well combined.
  • Bring to a boil and then simmer for 30–35 minutes or until potatoes are tender and the chili is the desired consistency.

Recipe adapted from Alida’s Kitchen

Brunch

Recipe—Blueberry French Toast Casserole

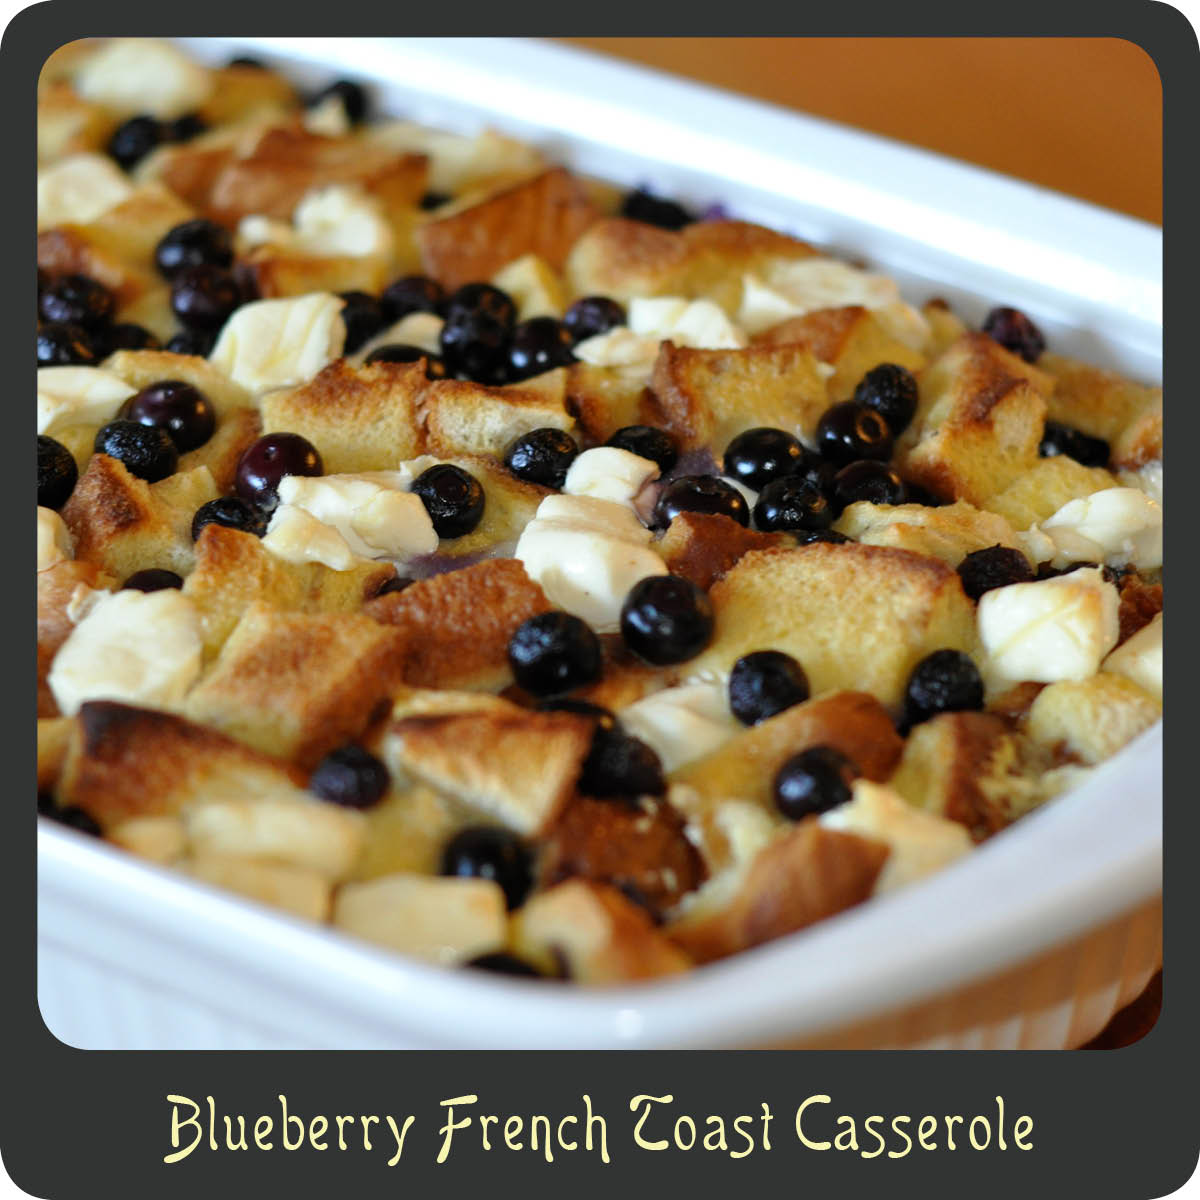
I run a household that always seems to be full of friends and family who come to visit on the weekends. I absolutely love entertaining and cooking delicious meals for my visitors. What I don’t love is when I’m in the kitchen for hours on end. It means I am missing out on valuable time with them. This is a breakfast dish that is perfect for when you are entertaining, or heck, even if you just want an easy breakfast in the morning for the family. You prepare this in advance before your company even arrives, and then just pull it out and pop it in the oven in the morning. And by make it in advance is that you literally take the ingredients, plop them in a dish (in an orderly fashion of course) and refrigerate. How much more easy could it get? Easy to prep and easy to bake. That is my kind of breakfast!

INGREDIENTS
12 slices French toast bread, cut into 1” cubes
16 oz (2-8 oz blocks) cream cheese, cut into cubes
2 c blueberries
12 eggs
2 c milk
1/2 c syrup
1 tsp vanilla

STEPS

  • Grease a 9” x 13” baking dish.
  • Spread half of the bread cubes into the bottom of the baking dish.
  • Sprinkle about three quarters of the cream cheese cubes over the bread.
  • Sprinkle about three quarters of the blueberries into the dish.
  • Top with remaining bread, cream cheese, and blueberries.
  • In a large bowl, whisk together eggs, milk, syrup, and vanilla.
  • Pour the egg mixture over the entire dish.
  • Using your fingers or the back of a spatula gently press all of the bread pieces down into the egg mixture.
  • Cover the baking dish with foil and place in the fridge 8 hours or overnight.
  • When ready to bake remove the dish from the fridge and allow it to sit on the counter for about 30 minutes.
  • Preheat oven to 350º.
  • Keep the dish covered in foil and bake for 45 minutes.
  • Remove the foil and continue baking until the top is s nice golden brown and the egg mixture is set, about an additional 20–30 minutes.
  • Remove from oven and allow it to cool for 5 minutes.
  • Cut and serve.
Dinners

Recipe—Busy Mom’s Beef Wellington

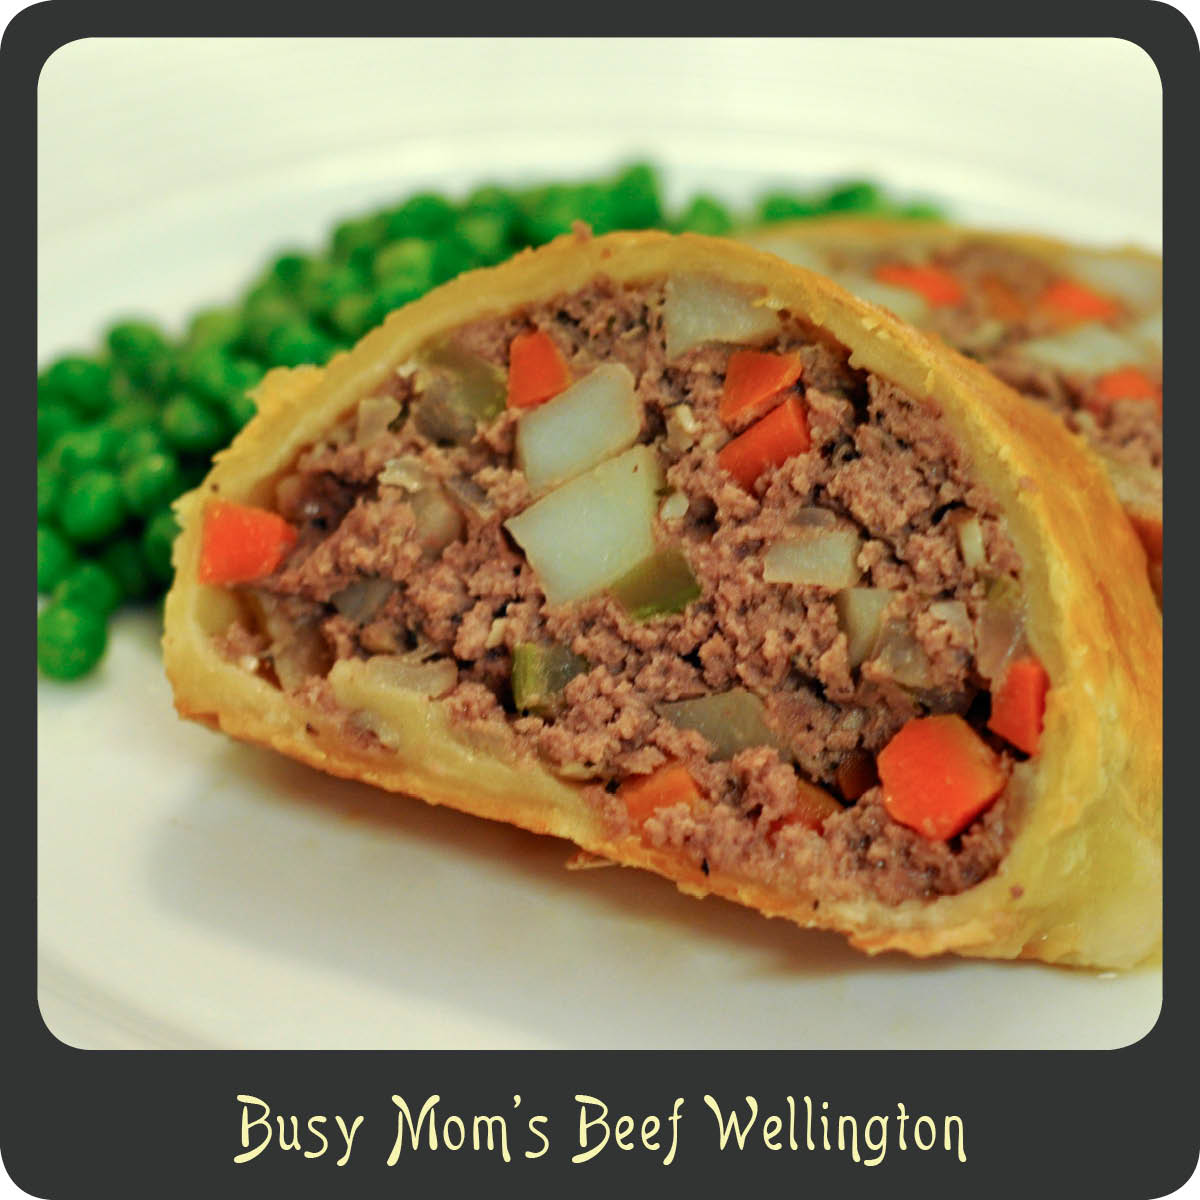
Traditional beef wellington has got to be one of the most glamorous meals ever prepared. It is so rich and attractive but certainly not something you want to be making Monday–Friday. It is a wonderful dish but it is a lot of work! Certainly not in the regular rotation for this busy momma! I saw this recipe the other day for a beef wellington made from ground beef and had to give it a try. It was absolutely delicious! It was relatively easy to throw together and the flavors were very close to that of traditional wellington, just with some added veggies, which are always welcome in our house. This will most certainly be a go to recipe for me from here on out.

Note: Try to dice your veggies so that they are all about the same size. This will help them to cook evenly. This will make two wellington “logs”. Each log will feed 2–3 people. If you don’t think you will eat both, place one prepared and uncooked “log” on a wax paper lined baking sheet and freeze for 2–3 hours. Transfer to an airtight bag or seal o’ meal pouch and freeze for a future dinner. (See Steps below for cooking a frozen one.)

INGREDIENTS
2 tbsp olive oil
1 yellow onion, diced
1 carrot, diced
1 celery stalk, diced
1 potato, cubed
1 tbsp garlic, minced
1 portobello mushroom or 5 baby portobello mushrooms, chopped
2 tsp thyme
1 lb ground beef
salt and pepper
1 package puff pastry (2 sheets), thawed
flour for dusting and rolling
1 egg

STEPS

  • Heat the olive oil in a large skillet over medium-high heat.
  • Add the onion, carrot, potato, garlic, mushrooms, and thyme to the skillet and sauté until your vegetables are fork tender and onions are translucent, about 8–10 minutes.
  • Transfer your cooked veggies to a bowl and place in the freezer for 10–15 minutes to cool.
  • While your veggies cool preheat the oven to 350º.
  • Remove the veggies from the freezer and add in the ground beef, salt, and pepper.
  • Mix everything together until well combined. (I recommend just getting in there and using your hands.)
  • Set your meat mixture to the side.
  • Dust a large cutting board with flour and unfold your pastry. Dust the side of the dough facing up with additional flour and roll out to 1/4″ thickness.
  • Divide your meat mixture into two portions and shape one of those portions into a log in the center of the dough.
  • Wrap the dough around the meat “log” like you would a burrito, making sure to tuck in both ends.
  • Place seam side down on a baking sheet.
  • In a small bowl whisk the egg until broken up.
  • Brush the egg wash over the entire outside of the prepared wellington.
  • Place in the oven and bake for 45 minutes until it is a nice golden brown.
  • Transfer the baked wellington to a cutting board and allow it to sit for 5 minutes before slicing and serving.
  • Enjoy!

Recipe adapted from Jaime Oliver.

Sweet Treats

Recipe—Chocolate Chip Cookie Dough Cheesecake Bars

As I announced a few weeks back after my break from blogging I started a new job back in August. It’s always a rough transition moving out of your comfort zone into something totally new. New environment. New responsibilities. New coworkers. Eek! It can be kind of nerve racking! Well the way I deal with nerves is food. Yes, I am an emotional eater! So I made a batch of these wonderful delicious bars but I couldn’t bear to eat them all so what did I do, I took them to work to share with my new co-workers. Way to bond and score some points at the new gig, right? Well these were a hit and I apologize that the recipe is 5 months late getting to you. Good news is I am still at my job so I must have made quite the impression with my tasty treats or maybe it’s my mad skills.

GRAHAM CRACKER CRUST INGREDIENTS
1 1/2 c graham cracker crumbs
2 tbsp sugar
5 tbsp butter, melted

CHEESECAKE INGREDIENTS
12 oz cream cheese, softened
1 large egg
1/4 c sugar
1 tsp vanilla extract

COOKIE DOUGH INGREDIENTS
5 tbsp butter, softened
3 tbsp sugar
1/3 c brown sugar, packed
1 tsp vanilla
1/4 tsp salt
3/4 c flour
1 c semi-sweet chocolate chips

STEPS

  • Preheat oven to 325º.
  • Line a 8” x 8” baking dish with foil making sure there is enough to go up all four edges of the pan.
  • In a medium bowl mix together all of the graham cracker crust ingredients.
  • Press the crumb mixture into the bottom of the baking pan using a spoon or backside of a spatula making sure that it is firmly packed.
  • Bake for 5 minutes and remove from oven.
  • While the crust cools beat together all of the cheesecake ingredients on low speed until smooth.
  • Pour the cheesecake mixture into the baking dish and set aside.
  • In a large bowl beat together the butter, sugars, vanilla, and salt until well combined and smooth.
  • Add in the flour until well incorporated.
  • Fold in the chocolate chips.
  • Sprinkle small clumps of the cookie dough over the top of the cheesecake mixture making sure to cover most of the dish.
  • Bake until the cookie dough looks cooked and the cheesecake has set, about 25–30 minutes.
  • Move the dish to a cooling rack and allow it to cool completely.
  • Chill in the fridge for a few hours.
  • Remove the entire “bar” from the baking dish by holding onto the edges of the foil and lifting it from the pan.
  • Slice into small squares and eat up.
Soups

Recipe—Creamy Cheesy Broccoli Soup

It is FINALLY starting to feel like winter in California! We have been having 60–70 degree days in December and January. Not normal! Don’t get me wrong, I love nice weather but one of my favorite things about Cali is that we usually have 4 very distinct seasons. I love being bundled up with a cozy scarf and boots on a cold winter day with a big bowl of soup and it has just not been that kind of winter. Well we just got our first spell of rain in what feels like months! This led me to go into full on soup mode.

Broccoli cheddar soup has always been one of my all time favorite soups. It is so rich, creamy, and filling. (Exactly what you need after you made your new year’s resolutions right?) Well give yourself a cheat day and serve this up with an old-fashioned grilled cheese sandwich for a real winter treat. A perfect warm up for a cold winter day!

INGREDIENTS
1/4 c butter
1 tbsp garlic, minced
1 yellow onion, diced
1/4 tsp thyme
3 tbsp flour
3 c milk
3 c chicken broth
1 c heavy cream
2 heads broccoli, chopped
1 c cheddar cheese, shredded
1/4 c parmesan, grated
salt
white pepper

STEPS

  • Melt the butter in a large pot over medium-high heat.
  • Add the garlic, onion, and thyme and cook stirring occasionally until the onion is translucent, about 4–5 minutes.
  • Add in the flour and mix until well combined and it starts to brown, about 1 minute.
  • Gradually whisk in milk, broth, and cream.
  • Stir in the chopped broccoli and bring to a boil.
  • Reduce the heat to a simmer and cook until the broccoli is tender, about 8–10 minutes.
  • Add in the shredded cheeses and stir until smooth and melted, about 2 minutes.
  • Season to taste with the salt and white pepper.
  • Serve and top with additional shredded cheddar if desired.
  • Serve immediately.
Dinners, Sandwiches

Recipe—Shrimp Po Boys

Hey ya’ll! One of my best friends is a true southern belle. I’m talking straight out of Alabama. I love the ways she says ya’ll and ma’am, and she calls a shopping cart a buggy, she makes banana puddin’ (one of may favorite desserts of all time), and that she drinks sweet tea. Okay, I love everything about her. She is just down right fabulous, a true belle. Since hanging out with her I have been channeling my own southern diva and trying some of the foods I hear her talk about. Made cheesy grits with shrimp for the first time ever the other day. Those things are dangerous by the way!

Well awhile back my friend and I were at some food trucks for lunch and she ordered a fried catfish po’ boy sandwich. It looked amazing! Po’ boy sandwiches are essentially a sub sandwich loaded up with some sort of fried fish. I knew as soon as I saw this sandwich that I wanted to try and whip up some of my own po’ boys at home for dinner. I am a huge shrimp fan so I opted to make shrimp po’ boys and well I declare, they were amazing! The crispy shrimp are just awesome, and make sure you don’t skip the remoulade sauce. The sauce is what makes these over the top delicious. I hope you and the fam enjoy these loaded sandwiches as much as we did!

INGREDIENTS FOR SHRIMP
3 tsp salt
3 tsp paprika
1 tsp cayenne
1 tsp pepper
1/2 tsp garlic powder
1/2 tsp onion powder
2 cup panko bread crumbs
3 eggs
1 1/2 lbs medium shrimp, peeled and deveined
vegetable oil for frying

INGREDIENTS FOR REMOULADE
1/2 cup mayonnaise
2 Tbs. dill pickle relish
1/2 tsp. paprika
1 tsp. pickle juice
1/8 tsp. Tabasco Sauce
1 clove garlic, minced

ADDITIONAL INGREDIENTS
4 sandwich rolls
2 tomatoes sliced
green lettuce, shredded
red onion, sliced

STEPS

  • Combine all remoulade ingredients in a small bowl and chill until ready to serve.
  • Combine the salt, cayenne, pepper, garlic powder, onion powder, and panko in a shallow dish.
  • Whisk the eggs in a small bowl.
  • Dip the shrimp in the egg wash and then dredge in the seasoned panko mixture.
  • Fill a large skillet halfway up with oil and heat over medium-high heat.
  • Fry the shrimp in batches until they are a nice golden brown, about 3-4 minutes, and transfer to a paper towel lined plate. (Note: If they are turning dark too quickly remove the skillet from the burner and turn down the heat.)
  • Once all the shrimp are done fill each roll with lettuce, tomatoes, and red onion.
  • Place the shrimp in that bad dog and drizzle with the remoulade sauce.
  • Dig in!
Snacks

Recipe—S’More Snack Mix

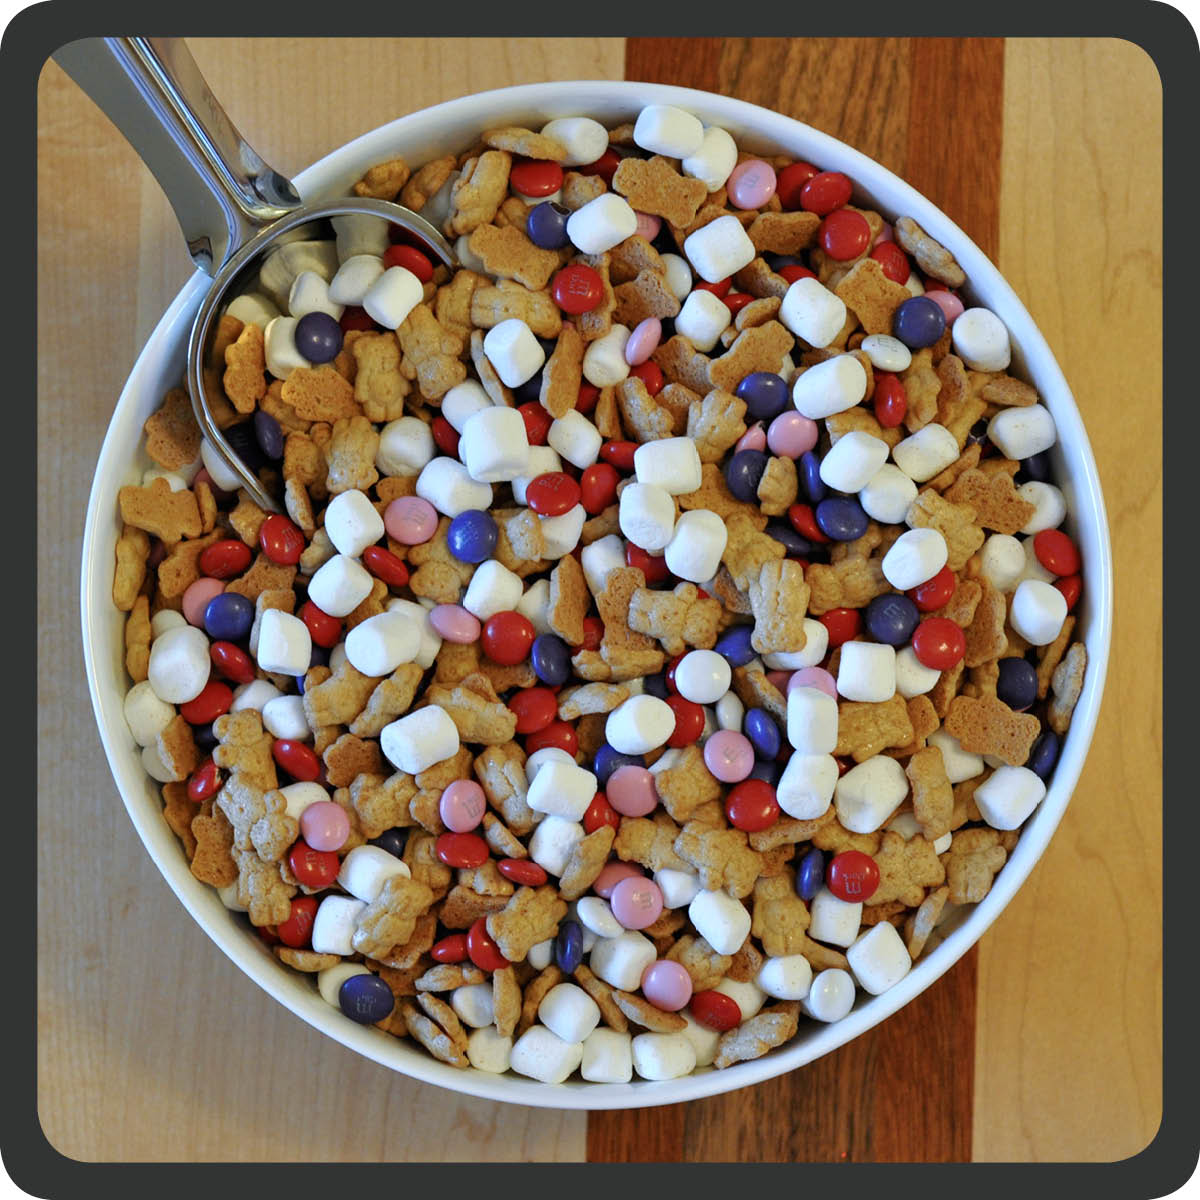
S’more snack mix please! Last year I made a Valentine’s Day Snack Mix that was a total hit with my followers and also my little man’s little buddies at school. Well it’s that time of year again and I was trying to come up with something fun. All kids love Teddy Grahams so those were a given ingredient. What goes better with graham crackers than M&M’s and marshmallows? This was a no brainer! I had to make s’more snack mix. This is a perfect treat whether or not it’s Valentine’s Day. I’m thinking I will make a big batch for our next summer camping trip (with traditional M&M’s of course). You can just serve it in a large bowl (perfect for a party) ORRRRR you can make your own Valentine’s Day snack bags to pass out!

Last year I had a couple people contact me requesting that I share my valentine snack bag design so that they could print and make their own. This year I thought I would just go ahead and include it right here on my blog. That’s right! You can download a pdf of the cute cards I designed and print and make your own! How fun is that?!? A special homemade bag of snack mix for the kiddos to share with their friends! You’re welcome.

Click to Download PDF

I hope you enjoy this fabulous mix as much as me and my munchkin do! I wish all of my followers a wonderful Valentine’s Day filled with lots of love and happiness.

xoxox
The Diva

Note: This recipe makes enough to fill 24–26 snack size Ziploc bags or 1 large bowl. IF you don’t want to print and trim these on your own just take the pdf file to Kinkos or Staples and they can do the work for you. 😉

INGREDIENTS
3 (8 oz) bags Honey Teddy Grahams
10 oz bag mini marshmallows
2 (12.6) oz bags Valentine’s M&M’s

STEPS

  • Combine all ingredients in a large bowl and mix.

STEPS TO CREATE THE VALENTINE’S DAY SNACK BAGS

  • Make snack mix as directed above.
  • Distribute mix into snack sized ziplock bags.
  • Click on the above picture of the Valentine’s Day tabs.
  • Save the pdf to your computer.
  • Print out however many pages you will need to a heavy card stock.
  • Cut out the valentines along the black trim marks.
  • Fill in the “To” and “From” portion of the valentine.
  • Fold each valentine in half.
  • Staple along the top of the ziploc bag.
  • Wellah!


If you like this recipe, perhaps you will LOVE this!