Sweet Treats

Recipe—Chocolate Truffle Pie

Valentine’s day is right around the corner and what says Valentine’s Day better than a big slice of sinfully rich chocolate truffle pie? I know a lot of people like to go out to eat on what is supposed to be the most romantic day of the year but I have always been more of a homebody on this Hallmark Holiday. I like setting the table with candles and our best linens and cooking my husband a nice romantic dinner at home. And like all romantic dinners even one at home needs a wickedly decadent dessert. That’s why I love this truffle pie, there is not one, but two rich chocolate layers finished off with a light whip cream topping. Perfect for the chocolate lover in your life!

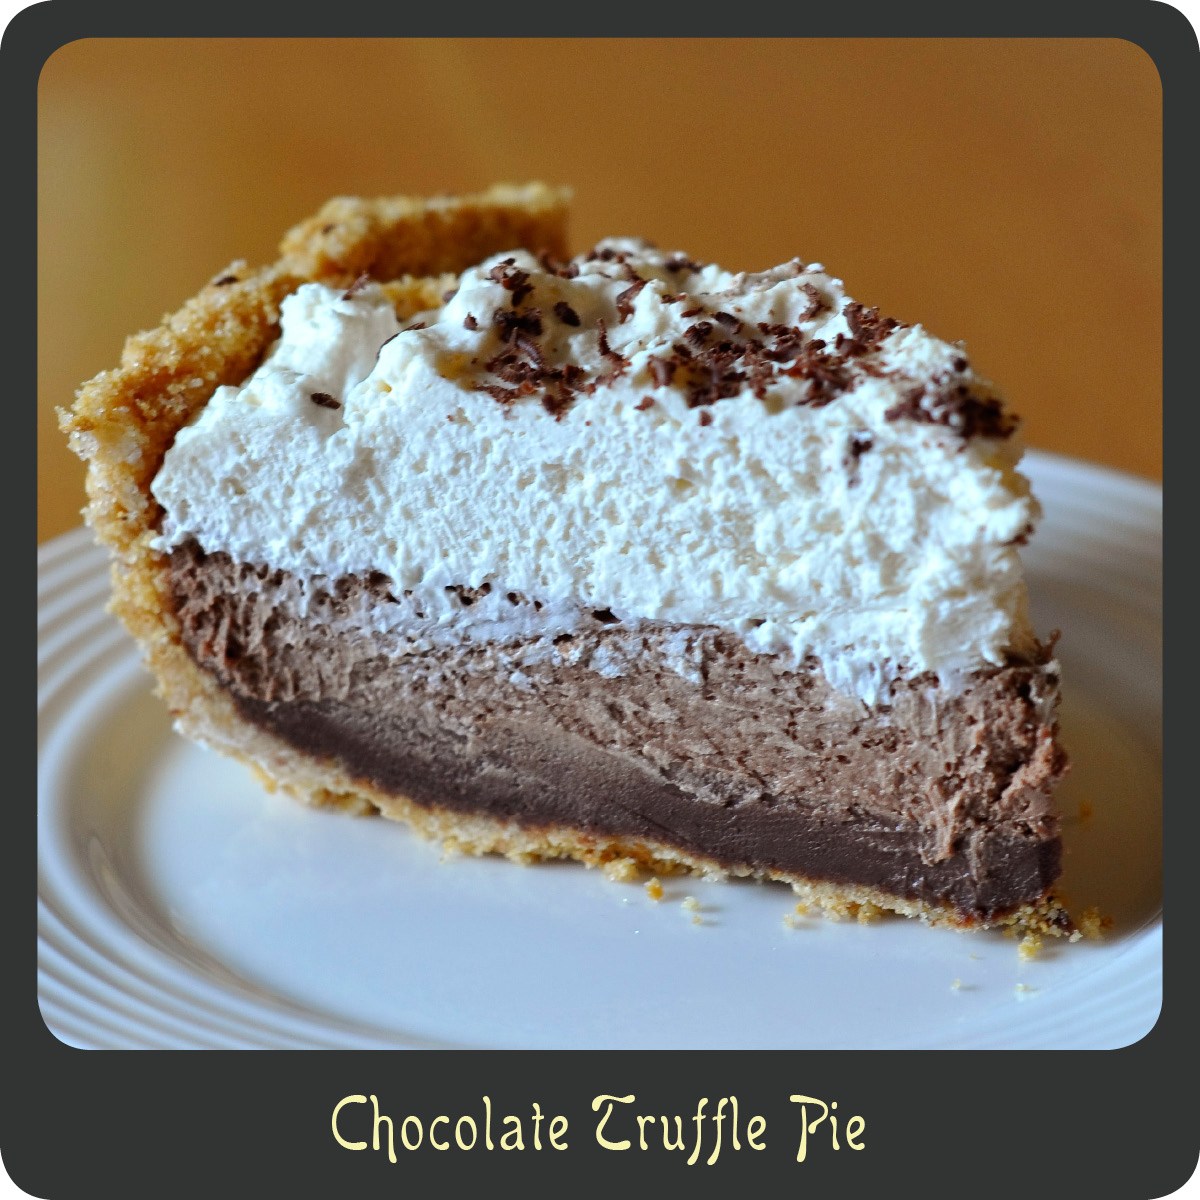
STEP 1: GRAHAM CRACKER CRUST
2 c graham cracker crumbs
1/3 c white sugar
1/2 c butter, melted

  • Mix all ingredients together.
  • Press the graham cracker mixture into the bottom and up the sides of a pie dish using the backside of a large spoon or rubber spatula.
  • Place in freezer.

STEP 2: TRUFFLE FILLING 
2/3 c heavy cream
6 oz bittersweet chocolate chips

  • In a small saucepan bring the cream to a simmer. (Be sure it does not boil over.)
  • Place the chocolate chips in a small mixing bowl and pour the hot cream over the top of them.
  • Let stand for 1 minute and then using a fork gently whisk until smooth.
  • Pour the truffle filling into the piecrust and gently spread it out evenly.
  • Place in the freezer for 20 minutes.

STEP 3: WHIPPED CHOCOLATE FILLING 
6 ounces bittersweet chocolate chips
1 1/2 c heavy cream
1/2 tsp vanilla

  • In a small saucepan bring a 1/2 cup of the cream to a simmer. (Be sure it does not boil over.)
  • Place the chocolate chips in a small mixing bowl and pour the hot cream over the top of them.
  • Let stand for 1 minute and then using a fork gently whisk until smooth.
  • Let cool to room temperature.
  • In a medium mixing bowl beat the remaining cup of cream on medium-high speed until thick and fluffy.
  • Add the melted chocolate mixture and the vanilla and continue beating until thickened.
  • Spread the whipped chocolate filling over the truffle layer.
  • Place in refrigerator.

STEP 4: WHIPPED CREAM TOPPING
1 c heavy cream
1/4 c powdered sugar
chocolate bar (for garnish)

  • Beat the cream and powdered sugar on medium high speed until thick enough that stiff peaks form.
  • Spread the whipped cream over the top of the pie.
  • Using a grater or vegetable peeler make shavings off the chocolate bar.
  • Garnish finished pie with chocolate shavings.
  • Chill for 5–6 hours or overnight before serving.

Recipe adapted from Deen Bros.

Dinners, Soups

Recipe—Creamy White Chicken Chili

Chili is one of my favorite comfort foods and I love that this is a fun twist on the classic bean based dish, and the fact that it is super easy is a huge plus too. I took several different recipes I found online and mixed them all together and came up with this one for creamy white chicken chili. I think it turned out pretty darn fabulous! I used green chilies keeping it really mild so that everyone in the family would eat it but you can substitute jalapeños to give it a good kick. The mild heat is really balanced out nicely with the creaminess of the cheese and the sweetness of the corn. I served it up with some cut up tortillas on the side but a quesadilla would be great too. If you have any chili cook offs coming up give this recipe a shot. You may just get some extra points for thinking outside the box.

Note: To simplify this recipe and shave off some time, pick up a rotisserie chicken at the store and skip the first four steps. You can chop it up while the veggies are cooking.

INGREDIENTS
1 lb boneless skinless chicken breasts
salt and pepper
2 tbsp butter
2 tbsp olive oil
1 medium yellow onion, chopped
1 green bell pepper, chopped
1 tbsp garlic, minced
1/2 tsp chili powder
1/2 tsp dried oregano
2-4 oz cans diced green chilies (use jalapeños if you like it hot)
15.5 oz can cannellini beans
1 1/2 c chicken broth
8.5 oz can corn
8 oz cream cheese, cut into a few pieces
1/4 c fresh cilantro, chopped

STEPS

  • Cut the chicken into bite size pieces and season with salt and pepper.
  • Melt the butter over medium heat in a large pot or saucepan.
  • Add the chicken and cook through stirring occasionally.
  • Transfer the chicken to a plate and cover with foil.
  • Heat the oil in the same pot and add the onion, bell pepper, garlic, chili powder, and oregano.
  • Season the veggies with salt and pepper and cook for 5 minutes stirring ever minute or so.
  • Add the green chilies and cook for another 3 minutes.
  • Add the can of beans and all the juices, the broth, corn, and cooked chicken.
  • Simmer for 25 minutes.
  • Reduce heat to medium-low and add in the cream cheese.
  • Stir the chili until the cream cheese is completely melted and smooth.
  • Allow the chili to simmer on low for 5 minutes.
  • Remove the pot from the stove and stir in the cilantro.
  • Taste and add more salt and pepper if needed.
Side Dishes

Recipe—Garlic Roasted Mushrooms

How many times have you had mushrooms on hand and you just sautéed and served them up as a lackluster side dish? Never again! Okay, I’m sure we will do it again, but after having these flavor packed oven-roasted mushrooms my eyes have been opened to a whole new super easy way to prepare the fabulous fungi. I won’t deny, I have simply sautéed mushrooms an abundance of times myself but mushrooms deserve so much more than that! These roasted mushrooms are so simple and the flavors come together very nicely. This dish really has an elegant flare to it, perfect for a romantic dinner night. I served it with sliced tri tip and some crusty bread to sop up all those yummy juices. Can’t let wine go to waste after all!

Note: Chop any large mushrooms in half so that they all cook evenly.

INGREDIENTS
1 lb mushrooms (cremini or white)
2 tbsp capers
2 tsp garlic, minced
2 tsp olive oil
1/4 c white wine
salt and pepper
3 tbsp butter, sliced into pieces
2 tsp lemon juice
1/4 c flat leaf parsley, chopped

STEPS

  • Preheat oven to 450º F.
  • In a small baking dish toss together the mushrooms, capers, garlic, olive oil, wine, salt, and pepper.
  • Top with sliced butter.
  • Roast stirring occasionally until the mushrooms are tender, about 15–20 minutes.
  • Remove mushrooms from oven and stir in the lemon juice.
  • Top with parsley and serve immediately.
Uncategorized

Crowd Pleasing Super Bowl Recipes

DivaDiCocina_SuperBowl

Super Sunday is right around the corner! The Super Bowl is the biggest football game in America. It’s when we get together with family and friends to watch two rival teams have it out on the field (and of course over indulge in delicious food).

Whenever we have a Super Bowl party we typically serve one dish per quarter. Appetizers during the first two, a main course for the third, and of course a super ice cream sundae during the fourth.

I have put together some of my favorite recipes that are perfect for your big bash. Enjoy the game!

Appetizers

DivaDiCucina_QuesoFundido

Queso Fundido

DivaDiCucina_Poppers

Western Bacon Jalapeño Poppers

DivaDiCucina_BuffaloCauliflowerBites

Buffalo Cauliflower Bites

DivaDiCucina_CheesyMushrooms

Cheesy Stuffed Mushrooms Wrapped in Bacon

DivaDiCucina_ShrimpCups

Shrimp Taco Cups with Creamy Cilantro Lime Sauce

Warm-ups

DivaDiCucina_Chili

Chili (The Classic Kind)

DivaDiCucina_ChickenEnchiladaSoup

Crock-Pot Chicken Enchilada Soup

Meals

DivaDiCucina_FrenchDip

Crock-Pot French Dips

DivaDiCucina_PhillySloppyJoes

Philly Cheesesteak Sloppy Joes

DivaDiCucina_ShreddedBeefTacos

Crock-Pot Shredded Beef Tacos

DivaDiCucina_HotHam&Swiss

Hot Ham and Swiss Sammies

DivaDiCucina_BBQChickenSando

Crock-Pot Pale Ale BBQ Chicken Sandos

DivaDiCucina_PopperGrilledCheese

Jalapeño Popper Grilled Cheese

Side Dishes

Recipe—Utica Greens (Cooked Escarole)

Note: This picture does not do this dish justice! This should actually be called awesome escarole!

I recently received a bundle of escarole in my organic produce delivery and wasn’t quite sure what to do with it. After doing some research I found that on the West Coast it is commonly used in salads but on the East Coast it is more commonly cooked, Utica style. You can make this recipe with lots of other cooked greens as well. Such as radicchio, kale, and chard. This was a really great way to enjoy the cooked greens and get away from just sautéing them. All the great flavors came together nicely and created a really elegant, delicious, and complex side dish. Definitely a crowd pleaser!

INGREDIENTS
1 large head escarole, cleaned and chopped into large pieces
2 tbsp olive oil
1/2 c prosciutto, chopped
1 tsp garlic, minced
1 yellow bell pepper, deseeded and chopped
1/2 c chicken broth
1/2 tsp crushed red pepper
salt to taste
1/2 c breadcrumbs
1/4 c parmesan, grated

STEPS

  • Bring a large pot of water to boil.
  • Add the escarole and cook for 5–6 minutes until wilted.
  • While the escarole is cooking heat the olive oil in a sauté pan over medium-high.
  • Add the prosciutto and garlic and cook for 2–3 minutes making sure not to burn the garlic.
  • Add the bell peppers and cook for an additional 2 minutes.
  • Drain the escarole when it is done and add it to the sauté pan along with the chicken broth, red peppers, and salt.
  • Gradually stir in the majority of the breadcrumbs and cheese reserving a little bit to sprinkle on top.
  • Transfer the cooked escarole mixture to a small casserole dish and sprinkle with the remaining breadcrumbs and cheese.
  • Finish off under the broiler for 4–5 minutes.
Salads

Recipe—Beet and Goat Cheese Salad

A couple of weeks ago I got the first beets of the season in a my produce box and I knew right away that I had to put them to use making one of the most rich and elegant green salads I know of. This beet and goat cheese salad is so simple but is full of flavor. Each ingredient really stands out independently but they all are fabulous complements to one another. This salad is earthy, creamy, tart, and sweet, truly a salad from salad heaven, if there is such a place.

Note: This salad calls for roasted beets. You can get them in a can at your local market or you can get some fresh ones in the store and roast them yourself. I like roasting mine at home in the oven. (See here for how to roast your own beets!)

INGREDIENTS
1/4 c olive oil
1/4 c balsamic vinegar
1/4 tsp garlic, minced
1 tsp sugar
3 c arugula
3 roasted beets, sliced (See here for how to roast your own beets!)
4 oz goat cheese
1/2 c candied walnuts

STEPS

  • In a small bowl whisk together the olive oil, balsamic vinegar, garlic, and sugar. Refrigerate until ready to use.
  • Place the arugula in a salad bowl or on individual salad plates.
  • Top the arugula with the roasted beets.
  • Drizzle the salad with the dressing and top with goat cheese and walnuts.
Brunch

Recipe—Sausage Gravy

I was never really a huge fan of biscuits and gravy, until I had this recipe. Oh my goodness! Now I am hooked! I am a huge fan of breakfast and this is the perfect side to serve up with some scrambled eggs and potatoes. It is the ultimate in breakfast comfort food (especially after a night of drinking). I actually really like this gravy with Pillsbury biscuits, they are cheap, quick, and convenient. Sausage gravy and biscuits are perfect for a cold winter day and best of all it is super easy to make.

INGREDIENTS
1 lb roll breakfast sausage (not link or patty)
2 tbsp flour
2 c milk
salt and pepper

STEPS

  • In a medium skillet brown the sausage over medium high heat.
  • Remove the sausage when done and set aside.
  • Leaving the drippings in the pan, stir in the flour.
  • Cook over medium heat for 1–2 minutes.
  • Pour in the milk and whisk to combine.
  • Cook over medium or medium-high heat until thickened.
  • Season with salt and pepper.
  • Serve over warm biscuits.
Dinners

Recipe—Garlic Shrimp and White Beans

A couple of weeks back I had the opportunity to be a guest blogger over at Rantings of an Amateur Chef. I shared this simple recipe for Garlic Shrimp and White Beans. In case you missed it here it is. 

I absolutely love it when I can find a recipe that is not only fabulous but also incredibly quick and easy. Being a working mom those are mandatory criteria for a recipe to make it into our weeknight dinner rotation. This recipe for garlic shrimp and white beans is very simple and yet super flavorful and it only uses one pot making clean up a breeze. Score! I just put the pan right on the kitchen table and let everyone serve it up family style. This rustic recipe goes great with some crusty bread to sop up all the rich tomato sauce and a green salad to balance out the meal. Yum!

Note: If you don’t have a large ovenproof skillet just complete the first 9 steps in a regular skillet and transfer the bean and tomato mixture to an oven safe baking dish and then top with shrimp and finish off under the broiler.

INGREDIENTS
6 tbsp olive oil, divided
4 tsp garlic, minced and divided
1 tsp chili powder
1/4 tsp crushed red pepper (more if you like is spicy)
1 bay leaf
15 oz can petite-diced tomatoes, drained
salt and pepper
2 tbsp tomato paste
2-15 oz cans white cannellini beans, rinsed and drained
1 c chicken broth
1 lb large shrimp, peeled and deveined
1 tsp paprika
2–3 tbsp flat leaf parsley, chopped

STEPS

  • Preheat broiler.
  • Heat 2 teaspoons olive oil in a large ovenproof skillet over medium-high heat.
  • Add 2 teaspoons of the garlic, chili powder, crushed red pepper, and bay leaf.
  • Cook stirring constantly for 1–2 minutes making sure not to burn the garlic.
  • Add the tomatoes and season with salt and pepper.
  • Using the backside of the spoon smash up any large chunks of tomatoes and cook until broken down, about 5 minutes.
  • Add the tomato paste and cook stirring constantly until the tomato mixture is a deep red and begins to caramelize, about 5 minutes.
  • Stir in the beans and broth and bring to a steady simmer.
  • Cook down until the liquid has reduced and thickened.
  • In a large bowl combine the shrimp, 2 tablespoons of olive oil, remaining 2 teaspoons of garlic, paprika, and salt and pepper tossing to coat.
  • Lay the shrimp over the beans making sure they do not overlap.
  • Place the entire oven safe skillet in the oven under the broiler.
  • Broil until the shrimp are cooked through, about 4–5 minutes.
  • Carefully remove skillet from broiler.
  • Drizzle with dish with the remaining 2 tbsp of olive oil and garnish with the chopped parsley.
  • Enjoy!
Appetizers, Brunch, Side Dishes

Recipe—Crab Stuffed Mushrooms


Are you looking for a classy appetizer to serve at your New Year’s Eve party tomorrow or any other night of the year? Search no further! These crab stuffed baby portobello mushrooms are easy, can be made ahead of time, are really elegant, and of course delicious. These will be a hit with all your guests. The crab filling is creamy with a nice little kick to it thanks to the Tabasco and the breadcrumbs give them the perfect little crunch. If you are serving a steak for a main course these can also be the perfect complementary side dish. Either way enjoy this fabulous recipe as you ring in 2013! Happy New Year everyone!

Note: You can completely make and assemble the stuffed mushrooms a half day in advance and store in the fridge until ready to bake.

INGREDIENTS
1/4 c olive oil
1 tbsp butter
1 tbsp garlic, minced
1 tbsp shallot, chopped
10–12 baby portobello mushrooms, washed and destemmed
salt and pepper
3 tbsp red bell pepper, chopped
8 oz lump crabmeat
1 tsp hot sauce (I like Tabasco)
1 1/2 tsp Worcestershire sauce
2 tbsp mayonnaise
2 tbsp Dijon mustard
2 tsp old bay seasoning
1/2 c breadcrumbs

STEPS

  • Preheat oven to 350º.
  • In a medium sauté pan heat the olive oil and butter over medium-high heat.
  • Add the garlic and shallot and sauté for 2 minutes.
  • Add the mushroom caps and season with salt and pepper.
  • Sauté the mushroom caps for 2 minutes.
  • Remove the mushroom caps from the skillet and place them upside down on a baking sheet lined with parchment paper.
  • Add the chopped bell pepper to the skillet and sauté for 1 minute.
  • In a medium bowl mix together the crabmeat, hot sauce, Worcestershire sauce, mayonnaise, mustard, old bay seasoning, and a dash of salt and pepper.
  • Stir in the sautéed veggies and mix well.
  • Stuff each mushroom cap with the crab mixture and top with breadcrumbs.
  • Bake for 12–14 minutes or until the breadcrumbs start to brown.
  • Allow mushrooms to cool for a couple of minutes before serving.
Sandwiches

Recipe—Hot Ham & Swiss Sammies

I think I have mentioned before that ham and mayo on a croissant was my favorite sandwich as a kid. And by favorite I mean that was one of the only sandwiches I would eat. I have grown up haven’t I? Well this is my favorite childhood sandwich on steroids, and it is AWESOME! I know you may look at the poppy seed sauce and wonder what that’s all about. Well the sauce bakes to the top of the croissant making an ordinary croissant extraordinary. It does not leave the croissants soggy. It actually gives them a nice caramelization and lots of added flavor. Since these make a good size batch and they can be assembled ahead of time they are perfect for a luncheon or shower. These may be my ultimate in comfort food sandwiches this winter, just throw in a bowl of soup and call it dinner.

Note: These can be assembled and kept in the fridge up to 24 hours before baking. How handy is that?!?

SANDWICH INGREDIENTS
9 medium sized croissants cut in half
1 lb thin sliced deli ham
9 square slices of Swiss, cut in half horizontally
mayonnaise

POPPY SEED SAUCE INGREDIENTS
1 1/2 tsp poppy seeds
2 tsp yellow mustard
4 tbsp butter, melted
2 tsp yellow onion, finely minced
1/4 tsp Worcestershire sauce

STEPS

  • Preheat oven to 350º.
  • Spread each half of the croissant with a thin layer of mayonnaise.
  • Place a piece of Swiss on the bottom half of the croissant.
  • Evenly distribute the ham among the nine sandwiches.
  • Top the ham with a second piece of Swiss cheese and then the croissant top.
  • Place the finished sandwiches edge to edge in a large baking dish or on a cookie sheet. It’s okay if they are snug.
  • In a small bowl whisk together all the poppy seed sauce ingredients.
  • Spoon the sauce over the top of each sandwich and allow the sandwiches to sit for at least 10 minutes.
  • Cover the baking dish with foil and bake for 15–18 minutes or until the cheese is melted.
  • Remove the foil and allow the sandwiches to cook uncovered for an additional 5 minutes.
  • Serve warm and enjoy!