Brunch

Recipe—Sausage Gravy

I was never really a huge fan of biscuits and gravy, until I had this recipe. Oh my goodness! Now I am hooked! I am a huge fan of breakfast and this is the perfect side to serve up with some scrambled eggs and potatoes. It is the ultimate in breakfast comfort food (especially after a night of drinking). I actually really like this gravy with Pillsbury biscuits, they are cheap, quick, and convenient. Sausage gravy and biscuits are perfect for a cold winter day and best of all it is super easy to make.

INGREDIENTS
1 lb roll breakfast sausage (not link or patty)
2 tbsp flour
2 c milk
salt and pepper

STEPS

  • In a medium skillet brown the sausage over medium high heat.
  • Remove the sausage when done and set aside.
  • Leaving the drippings in the pan, stir in the flour.
  • Cook over medium heat for 1–2 minutes.
  • Pour in the milk and whisk to combine.
  • Cook over medium or medium-high heat until thickened.
  • Season with salt and pepper.
  • Serve over warm biscuits.
Kitchen Tips

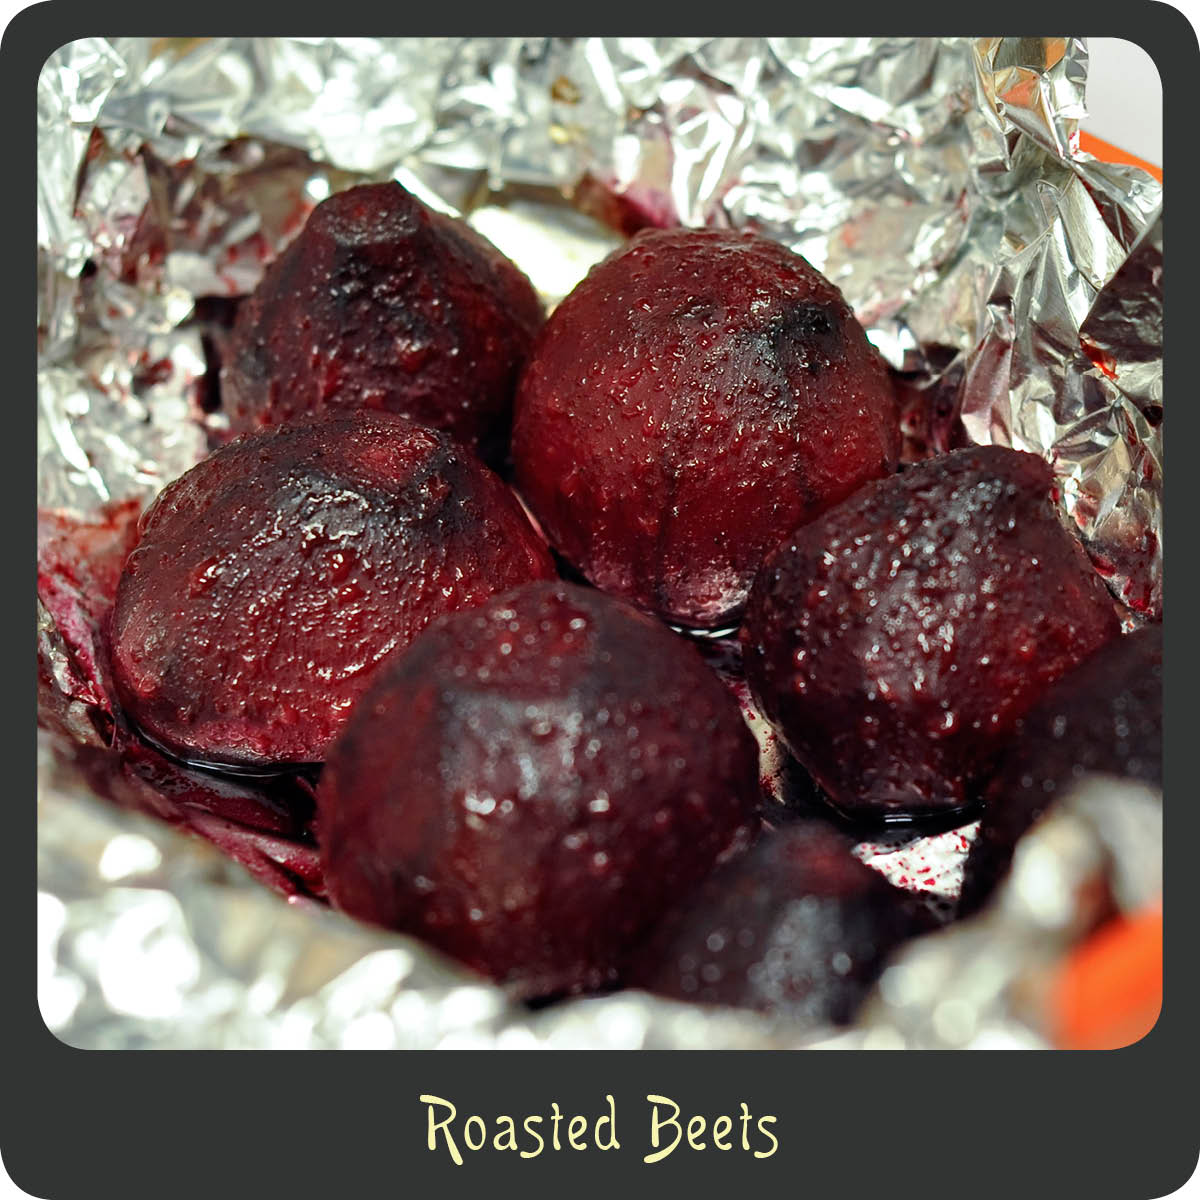
Kitchen Tip—How to Roast Beets

Beets are such a wonderful winter veggie but do you know what to do with them? I love mine roasted in salads. Beets are low in calories, are a good source of fiber, and contain a variety of vitamins and nutrients that can help prevent heart disease and certain types of cancer. I just love the vibrant color of beets. They are a beautiful addition to any dish and bring a unique flavor unlike any other veggie. Here are some step-by-step instructions on how to roast your very own beets.

Note: Roasting beets whole works great for beets the size of a tangerine or smaller but if you have large beets I recommend cutting them into quarters after peeling them. They will cook much faster that way.

INGREDIENTS
raw beets
olive oil
salt and pepper

STEPS

  • Preheat the oven to 400º.
  • Cut the stalks and the roots from the top and bottom of the beets.
  • Using a vegetable brush scrub the beets making sure to get off all the soil.
  • Peel the skin off the raw beets using a vegetable peeler.
  • Place the peeled beets in a bowl and drizzle with olive oil and season with salt and pepper. Toss to coat
  • Line a small baking dish with foil and place the beets in it.
  • Using a second sheet of foil “tent” the beets.
  • Place the baking dish in the oven and roast the beets for 35–45 minutes or until they are fork tender.
  • Beets can be eaten right away or you can place them in an airtight container once they cool and kept in the refrigerator. I slice mine right before serving so they don’t dry out.

Dinners

Recipe—Garlic Shrimp and White Beans

A couple of weeks back I had the opportunity to be a guest blogger over at Rantings of an Amateur Chef. I shared this simple recipe for Garlic Shrimp and White Beans. In case you missed it here it is. 

I absolutely love it when I can find a recipe that is not only fabulous but also incredibly quick and easy. Being a working mom those are mandatory criteria for a recipe to make it into our weeknight dinner rotation. This recipe for garlic shrimp and white beans is very simple and yet super flavorful and it only uses one pot making clean up a breeze. Score! I just put the pan right on the kitchen table and let everyone serve it up family style. This rustic recipe goes great with some crusty bread to sop up all the rich tomato sauce and a green salad to balance out the meal. Yum!

Note: If you don’t have a large ovenproof skillet just complete the first 9 steps in a regular skillet and transfer the bean and tomato mixture to an oven safe baking dish and then top with shrimp and finish off under the broiler.

INGREDIENTS
6 tbsp olive oil, divided
4 tsp garlic, minced and divided
1 tsp chili powder
1/4 tsp crushed red pepper (more if you like is spicy)
1 bay leaf
15 oz can petite-diced tomatoes, drained
salt and pepper
2 tbsp tomato paste
2-15 oz cans white cannellini beans, rinsed and drained
1 c chicken broth
1 lb large shrimp, peeled and deveined
1 tsp paprika
2–3 tbsp flat leaf parsley, chopped

STEPS

  • Preheat broiler.
  • Heat 2 teaspoons olive oil in a large ovenproof skillet over medium-high heat.
  • Add 2 teaspoons of the garlic, chili powder, crushed red pepper, and bay leaf.
  • Cook stirring constantly for 1–2 minutes making sure not to burn the garlic.
  • Add the tomatoes and season with salt and pepper.
  • Using the backside of the spoon smash up any large chunks of tomatoes and cook until broken down, about 5 minutes.
  • Add the tomato paste and cook stirring constantly until the tomato mixture is a deep red and begins to caramelize, about 5 minutes.
  • Stir in the beans and broth and bring to a steady simmer.
  • Cook down until the liquid has reduced and thickened.
  • In a large bowl combine the shrimp, 2 tablespoons of olive oil, remaining 2 teaspoons of garlic, paprika, and salt and pepper tossing to coat.
  • Lay the shrimp over the beans making sure they do not overlap.
  • Place the entire oven safe skillet in the oven under the broiler.
  • Broil until the shrimp are cooked through, about 4–5 minutes.
  • Carefully remove skillet from broiler.
  • Drizzle with dish with the remaining 2 tbsp of olive oil and garnish with the chopped parsley.
  • Enjoy!
Appetizers, Brunch, Side Dishes

Recipe—Crab Stuffed Mushrooms


Are you looking for a classy appetizer to serve at your New Year’s Eve party tomorrow or any other night of the year? Search no further! These crab stuffed baby portobello mushrooms are easy, can be made ahead of time, are really elegant, and of course delicious. These will be a hit with all your guests. The crab filling is creamy with a nice little kick to it thanks to the Tabasco and the breadcrumbs give them the perfect little crunch. If you are serving a steak for a main course these can also be the perfect complementary side dish. Either way enjoy this fabulous recipe as you ring in 2013! Happy New Year everyone!

Note: You can completely make and assemble the stuffed mushrooms a half day in advance and store in the fridge until ready to bake.

INGREDIENTS
1/4 c olive oil
1 tbsp butter
1 tbsp garlic, minced
1 tbsp shallot, chopped
10–12 baby portobello mushrooms, washed and destemmed
salt and pepper
3 tbsp red bell pepper, chopped
8 oz lump crabmeat
1 tsp hot sauce (I like Tabasco)
1 1/2 tsp Worcestershire sauce
2 tbsp mayonnaise
2 tbsp Dijon mustard
2 tsp old bay seasoning
1/2 c breadcrumbs

STEPS

  • Preheat oven to 350º.
  • In a medium sauté pan heat the olive oil and butter over medium-high heat.
  • Add the garlic and shallot and sauté for 2 minutes.
  • Add the mushroom caps and season with salt and pepper.
  • Sauté the mushroom caps for 2 minutes.
  • Remove the mushroom caps from the skillet and place them upside down on a baking sheet lined with parchment paper.
  • Add the chopped bell pepper to the skillet and sauté for 1 minute.
  • In a medium bowl mix together the crabmeat, hot sauce, Worcestershire sauce, mayonnaise, mustard, old bay seasoning, and a dash of salt and pepper.
  • Stir in the sautéed veggies and mix well.
  • Stuff each mushroom cap with the crab mixture and top with breadcrumbs.
  • Bake for 12–14 minutes or until the breadcrumbs start to brown.
  • Allow mushrooms to cool for a couple of minutes before serving.
Side Dishes, Soups

Recipe—Chili (The Classic Kind)

It’s finally cooling off here in California and that means I am cooking up lots of soups and one of my favorite winter comfort foods, chili, the classic kind. This is the good stuff, heavy on meat and beans, light on veggies. That’s how I like my chili. What better way to warm up at the end of a cold day then a big bowl of chili? This recipe really is perfect, it’s not too spicy, not too mild, it’s just right. Something Goldilocks would love, probably Momma, Daddy, and baby bear too. This recipe does take a couple of hours to cook but that’s what makes it so good. All those flavors get cooked into the meat giving you a really hearty and flavorful chili you are sure to enjoy.

Note: If you are someone that likes chili with a little more kick, just add in a couple dashes of cayenne pepper.

INGREDIENTS
2 lbs ground beef
2 medium yellow onions, chopped
4 cloves of garlic, minced
1/3 c chili powder
2 tbsp flour
1 tbsp oregano
1 tsp cumin
1 tbsp sugar
1 tsp salt
1/2 tsp black pepper
2 (14.5 oz) cans diced tomatoes
2 (15 oz) cans red kidney beans, drained and rinsed
15 oz can tomato sauce
1–2 c beef broth

GARNISHES
shredded cheddar
sour cream
green onions, chopped
fritos
diced avocadoes

STEPS

  • In a large pot cook the beef, onions, and garlic over medium-high heat until no longer pink.
  • Drain off most of the fat leaving about 2 tbsp in the bottom.
  • Stir into the pot the chili powder, flour, oregano, cumin, sugar, and salt.
  • Reduce heat to low, cover, and cook for 30 minutes stirring every 10 minutes.
  • Add the tomatoes, beans, sauce, and 1 cup of the broth to the pot.
  • Cook for an additional 45–60 minutes stirring occasionally.
  • Add more broth if you want a soupier chili.
  • Ladle the chili into a bowl and have fun garnishing it with your favorite toppings.
Sandwiches

Recipe—Hot Ham & Swiss Sammies

I think I have mentioned before that ham and mayo on a croissant was my favorite sandwich as a kid. And by favorite I mean that was one of the only sandwiches I would eat. I have grown up haven’t I? Well this is my favorite childhood sandwich on steroids, and it is AWESOME! I know you may look at the poppy seed sauce and wonder what that’s all about. Well the sauce bakes to the top of the croissant making an ordinary croissant extraordinary. It does not leave the croissants soggy. It actually gives them a nice caramelization and lots of added flavor. Since these make a good size batch and they can be assembled ahead of time they are perfect for a luncheon or shower. These may be my ultimate in comfort food sandwiches this winter, just throw in a bowl of soup and call it dinner.

Note: These can be assembled and kept in the fridge up to 24 hours before baking. How handy is that?!?

SANDWICH INGREDIENTS
9 medium sized croissants cut in half
1 lb thin sliced deli ham
9 square slices of Swiss, cut in half horizontally
mayonnaise

POPPY SEED SAUCE INGREDIENTS
1 1/2 tsp poppy seeds
2 tsp yellow mustard
4 tbsp butter, melted
2 tsp yellow onion, finely minced
1/4 tsp Worcestershire sauce

STEPS

  • Preheat oven to 350º.
  • Spread each half of the croissant with a thin layer of mayonnaise.
  • Place a piece of Swiss on the bottom half of the croissant.
  • Evenly distribute the ham among the nine sandwiches.
  • Top the ham with a second piece of Swiss cheese and then the croissant top.
  • Place the finished sandwiches edge to edge in a large baking dish or on a cookie sheet. It’s okay if they are snug.
  • In a small bowl whisk together all the poppy seed sauce ingredients.
  • Spoon the sauce over the top of each sandwich and allow the sandwiches to sit for at least 10 minutes.
  • Cover the baking dish with foil and bake for 15–18 minutes or until the cheese is melted.
  • Remove the foil and allow the sandwiches to cook uncovered for an additional 5 minutes.
  • Serve warm and enjoy!
Sweet Treats

Recipe—Homemade Marshmallows

divadicucina_marshmallows

I was trying to come up with a cute idea for a Christmas gift for my son’s teachers and came up with the idea of making hot cocoa gift baskets. You know, a mug, some hot cocoa, some homemade cookies, and marshmallows. Well I am never the person to take the easy way out by just buying an actual bag of jet puffed marshmallows at the store, I wanted these gift baskets to be special, made from the heart. So I decided to attempt to make my very own marshmallows. Gourmet marshmallows seem to be all the rage this season but unfortunately they can cost a fortune. With this recipe you can make your own at home. They are a little bit of work, and one might by intimidated, but they are actually easy. I think the hardest part was waiting for them to set! These homemade marshmallows put store bought marshmallows to shame and are so totally worth making on your own. If making your own marshmallows isn’t on your bucket list it should be. Give these a shot. They will take your hot cocoa on a cold winter night over the top!

divadicucina_hotcocoa

Note: The original recipe I followed called for using a stand up mixer but I used a hand mixer. You can use either. The marshmallows can be very sticky and difficult to handle so the trick to cutting them is to constantly coat them in powdered sugar after every slice of the knife.

INGREDIENTS
3 c sugar
1 1/4 c light corn syrup
water
4 envelopes Knox unflavored gelatin
1/2 tsp salt
1 tbsp vanilla extract
1 c powdered sugar

STEPS

  • Combine sugar, corn syrup, and 3/4 cup water in a large saucepan and bring to a boil over medium-high heat.
  • While sugar water is heating up add 3/4 cup water to a large mixing bowl and sprinkle the 4 packs of gelatin over the top. Set aside.
  • Bring the sugar water mixture to a rolling boil and boil for 5 minutes or until a candy thermometer reads 235º.
  • Carefully pour the hot sugar water into your mixing bowl with the water and gelatin and mix on low.
  • Add the salt and increase mixer speed to high.
  • Beat the sugar mixture on high for 5 minutes and than add vanilla.
  • Continue beating the mixture for another 5 minutes.
  • When you are done, pour the marshmallow cream into a greased 9” x 13” pan.
  • Smooth the top and gently tap to release air.
  • Leave the dish on the counter for at least 10 hours.
  • After the waiting is up sprinkle the entire top of your marshmallows with powdered sugar making sure it’s coated and place a cutting board over the top of your dish.
  • While holding the cutting board and dish together carefully flip the dish and cutting board upside down simultaneously releasing the marshmallows onto the cutting board. (Your set marshmallows will now be upside down on the cutting board.)
  • Lift the baking dish and sprinkle all of the exposed marshmallow with powdered sugar making sure there are no exposed areas.
  • Using a large sharp knife cut into 1” strips and coat each exposed side with powdered sugar.
  • Cut those strips into 1” cubes making sure you coat each cut side with powdered sugar.
  • Once done, sprinkle all of the marshmallows with the remaining powdered sugar making sure there are no exposed sticky areas.
  • Enjoy in a big mug of hot cocoa!
Side Dishes

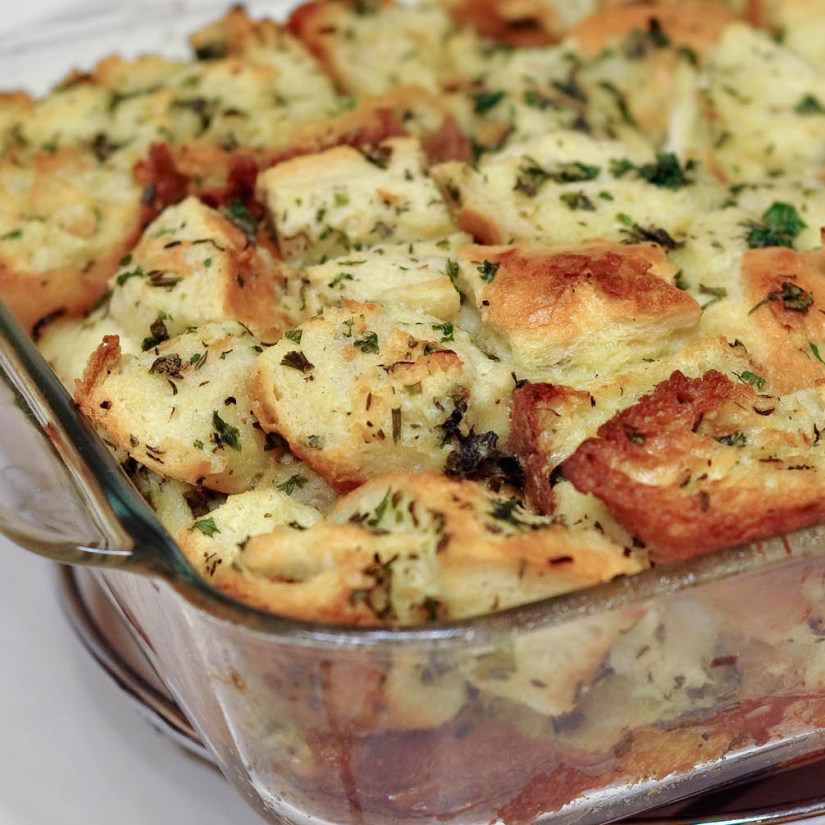
Recipe—Savory Herb Bread Pudding

A couple months back my family and I went to Disneyland for a few days. During our stay at the Hilton we ended up ordering room service for dinner because we were just too pooped from all the fun to actually go out. One of those nights I ordered roasted chicken, which came with a savory bread pudding. The bread pudding was phenomenal! So phenomenal, that I ordered the same dish a second time during our visit. Yes, it was that good! The bread pudding was flavor packed and went perfectly with the chicken. This last weekend I tried to replicate the recipe to go with my roasted turkey because I didn’t want to do the same old stuffing I had just had a couple of weeks prior at Thanksgiving. I think it turned out fantastic! One thing I love about this recipe is that it is super easy, can be made in advance, and goes with any type of meat! This Christmas I will be making this bread pudding along with my prime rib. Whether you are cooking a ham, turkey, or a fine cut of beef at Christmas this will be the perfect side dish that will have everyone talking. It is a perfect substitute for those plain dinner rolls or even mashed potatoes.

Note: The bread pudding can be assembled up to a day in advance and stored in the refrigerator. Remove baking dish from fridge at least one hour before baking and bring to room temperature. If you have a smaller group of people this recipe is easy to halve. Just use an 8″ x 8″ baking dish.

INGREDIENTS
2 large sourdough rounds, cut into 1” cubes
1/2 c fresh parsley, chopped
1/4 c fresh sage, chopped
2 tbsp fresh thyme, chopped
salt and pepper
6 tbsp butter
2 tbsp garlic, minced
1/3 c chives, chopped
8 eggs
2 c chicken broth
2 c heavy cream

STEPS

  • Preheat oven to 325º.
  • In a large bowl combine the bread, parsley, sage, thyme, salt and pepper.
  • In a small skillet melt the butter over medium-high heat and add the garlic cooking until tender. Do not burn the garlic!
  • Add the chives to the skillet and cook for 3 minutes.
  • Drizzle the melted butter over the bread and toss to coat.
  • In a medium mixing bowl whisk together the eggs, broth, and heavy cream.
  • Pour the liquid mixture over the bread and stir until evenly coated.
  • Transfer the bread mixture to a greased 9” x 13” baking dish.
  • Gently press the soaked bread into the pan.
  • Bake for 50–60 minutes or until center is set.
  • Tent dish with foil until ready to serve.
  • Slice into squares and enjoy!
Sweet Treats

Recipe—Confetti Cake Batter Cookies

Awhile back I posted a recipe for lemon crackle cookies. It was a cookie recipe that is primarily made from a box of cake mix. I love the concept of taking cake batter and sprucing it up with a few extra ingredients to make one heck of a fabulous cookie These types of cookies always come out really light and super moist and best of all they are quick and easy to make. Well ‘tis the season for complete chaos and busy schedules so what better time to share a recipe for super quick and scrumptious confetti cake batter cookies. I used red and green sprinkles to make them festive for Christmas but keep this recipe in mind throughout the year. Just change the sprinkle color for the appropriate holiday. Perhaps pink and red for Valentine’s Day?

INGREDIENTS
1-18.25 oz box of white cake mix
1 tsp baking powder
2 eggs
1/3 c vegetable oil
1/2 tsp vanilla
1/2–3/4 c sprinkles

STEPS

  • Preheat oven to 350º.
  • In a large bowl mix together the dry cake mix and baking powder.
  • Whisk together the eggs, oil, and vanilla.
  • Add the egg mixture to the cake mixture and stir until all ingredients are combined.
  • Fold in the sprinkles but be sure not to over mix or the dye will stain the batter.
  • Line a large baking sheet with parchment paper or grease it.
  • Drop 1” balls of dough onto the baking sheet leaving approximately 2” apart.
  • Bakes cookies for 9–10 minutes making sure they don’t brown.
  • Allow the cookies to cool on the sheet for about 3 minutes.
  • Use a spatula to transfer the cookies to a cutting board or cooling rack.
Beverages

Recipe—Homemade Spiked Eggnog

What’s Christmas without a glass or three of spiked eggnog? It is a must have item in our family. I am not a huge eggnog fan but I will drink the occasional glass here and there. However, my sister really loves the stuff so I wanted to be sure and have some on hand for her while we celebrated the holidays early this year. Unfortunately, this eggnog comes with a sad story.

This year I thought I would be adventurous and make my own eggnog. It turned out incredible and was actually really easy to make! This was by far the best eggnog I have ever had. I was so excited to share this fabulous concoction with my sister because I knew she would feel the same way. After slaving over the oven all day (okay I’m exaggerating, more like 20 minutes, this recipe is actually really quick to make) I had the eggnog done and poured it into my brand new glass pitcher. It was a gorgeous site! My mom, sister, husband, son, and I went and walked through a Christmas light display at our local zoo. The perfect end to the evening would be a homemade glass of eggnog. I poured the first glass and then went to pour the second when crack! The handle on my new pitcher literally fell off and the entire batch of eggnog shattered on my counter and went everywhere! I was on the verge of tears. However, the one lonely glass you see above survived. Thank goodness! So we all shared this one lonely glass of eggnog and it was the best glass of eggnog ever!

If you have never had homemade eggnog I highly recommend you give it a try. One thing that I absolutely love about this recipe is that the eggs are par cooked in the hot milk rather than raw, giving this a less eggy flavor. It is the perfect holiday beverage and takes on a superior quality being homemade.

Note: If you want virgin eggnog just omit the rum for a family friendly version. 

INGREDIENTS
3 1/2 c milk
1 1/2 tsp vanilla
1 tsp ground cinnamon
1 cinnamon stick
pinch of ground cloves
6 egg yolks
3/4 c granulated sugar
1 c rum
1 c heavy cream
1/4 tsp nutmeg

STEPS

  • In a large saucepan heat the milk, vanilla, cinnamon, cinnamon stick, and cloves over medium heat.
  • Bring to a gentle boil and remove from heat.
  • Allow the milk to set for about 2 minutes while the cinnamon stick seeps.
  • While the milk is cooling, beat the egg yolks and sugar in a large mixing bowl until it’s pale yellow and fluffy.
  • Remove the cinnamon stick from your milk and slowly pour into the egg mixture.
  • Beat on low until well incorporated.
  • Pour the mixture back into the saucepan and heat on medium/medium-low heat for 5 minutes until thick and creamy. DO NOT LET IT BOIL OR THE EGGS WILL CURDLE!
  • Remove the saucepan from heat and stir in the rum, heavy cream, and nutmeg.
  • Allow the eggnog to cool on the counter for at least an hour.
  • Transfer the eggnog to a pitcher or serving dish and refrigerate for 8–10 hours.