Side Dishes

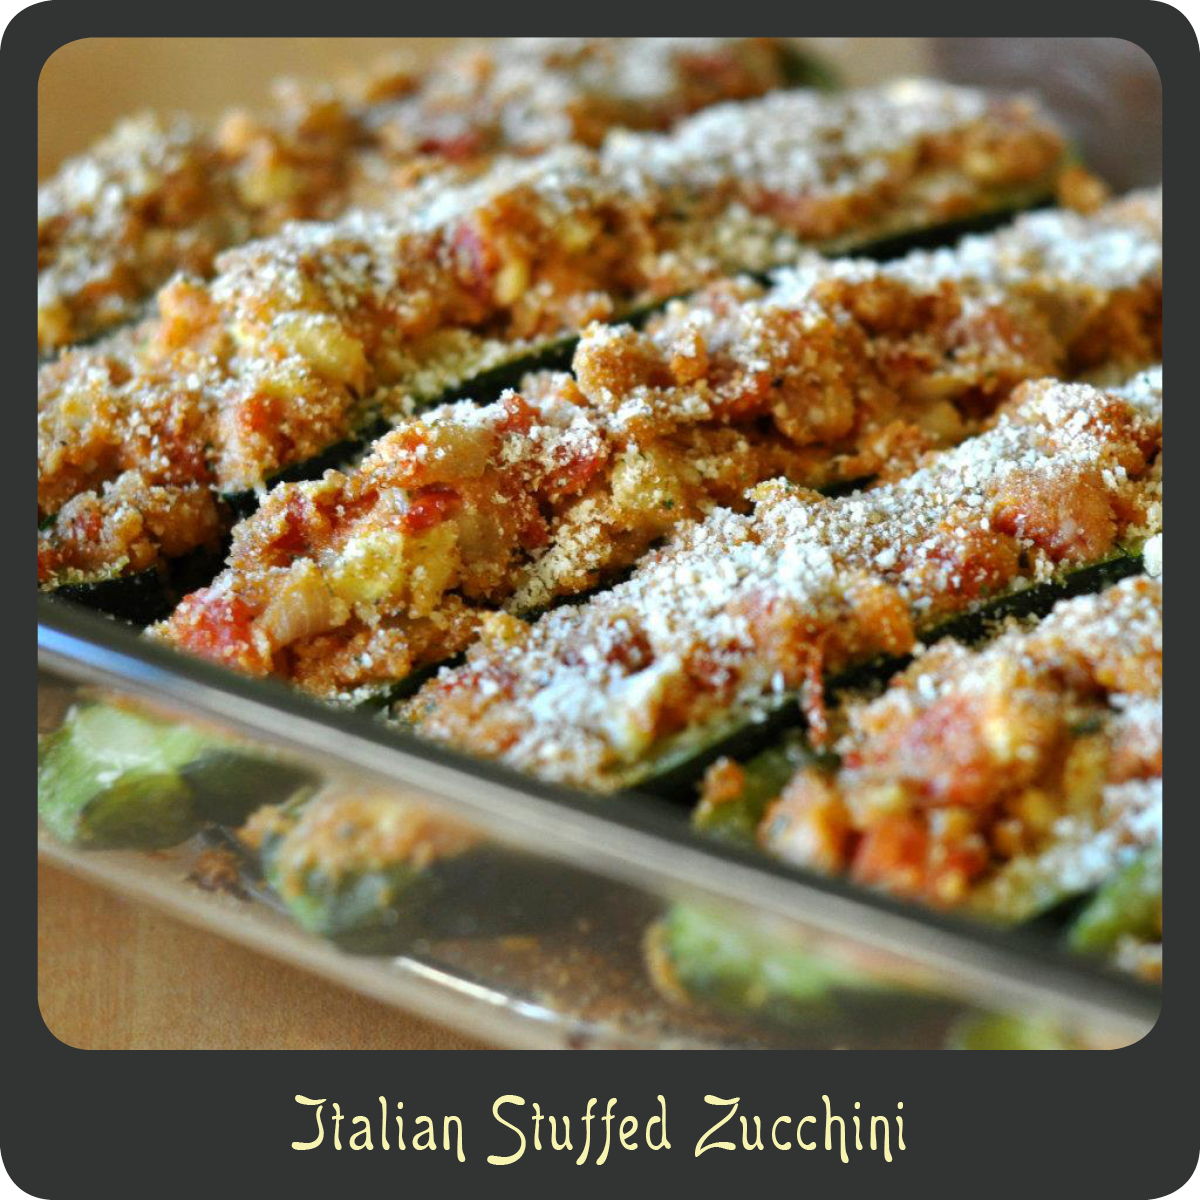
Recipe—Italian Stuffed Zucchini a.k.a. Zucchini Boats

With summer quickly approaching farmer’s markets will start popping up, gardens will be getting planted, and the produce department at your store will be full of fresh goods. It seems as though every summer zucchini is plentiful and I am getting lots of the delicious green squash from family and friends. I have found so many ways to creatively cook zucchini and this is one of my favorites. It is a great side dish to accompany your favorite Italian dish, especially chicken parmigiana or a big bowl of spaghetti.

INGREDIENTS
3 large zucchini
1/4 c yellow onions, minced
2 tbsp garlic, minced
3 tbsp butter
1/2 c fresh tomatoes finely chopped or canned petite diced tomatoes, drained
1 c Italian breadcrumbs
salt and pepper
1/2 c Parmesan cheese, divided

STEPS

  • Preheat oven to 350º.
  • Bring a large pot of water to a boil and add entire zucchini.
  • Cook the zucchini for 8–10 minutes and remove from water.
  • While the zucchini cools, sauté the onion and garlic in butter until tender.
  • Add tomatoes to the pan and heat through.
  • Remove pan from heat.
  • Cut zucchini in half lengthwise and scoop out centers of the zucchini. (I find a melon baller works wonders for this!)
  • Chop the pulp and squeeze out excess water.
  • Add zucchini pulp to the pan and mix.
  • Mix in breadcrumbs, salt and pepper, and 1/4 cup of the Parmesan cheese.
  • Stuff the zucchini “boats” and place in a baking dish.
  • Bake in oven for 10 minutes.
  • Top with remaining Parmesan cheese and bake another 5 minutes.
Sweet Treats

Recipe—Divine Chocolate Cups

I can give you four reasons why this is the perfect dessert recipe, it is ridiculously easy to make, it looks fabulous, each person gets their own little serving, and you can make it in advance. What more do you need?!? Oh yeah, and it is absolutely delicious! Okay, so there are five reasons why you must try this recipe.

This has got to be one of the best dessert recipes I know and it only takes about five minutes to make. Not only is it incredibly quick and easy, but you probably already have the majority of the ingredients in your kitchen as well. This is perfect if you are looking for something rich and chocolaty. I think of this as a cross between grown up pudding and chocolate mousse. This recipe makes two large servings or four small. If you don’t have any individual dessert serving dishes try putting it in champagne or wine glasses for a fun twist.

Note: Whip crème can be made at the same time as the chocolate cups and stored in the refrigerator covered until you are ready to enjoy or you can make it right before serving.

DIVINE CHOCOLATE INGREDIENTS
2/3 c milk (I prefer whole)
1 egg
2 tbsp sugar
pinch of salt
1 c semisweet chocolate chips
2 tbsp Frangelico (Disaronno, Grand Marnier, and Kahlua are also delicious!)
raspberries and chocolate shavings for garnish (optional)

STEPS

  • Bring milk just to a boil. (You can either do this in a small saucepan over the stovetop or in the microwave.)
  • In a blender combine egg, sugar, salt, chocolate chips, and liqueur.
  • Blend using a low setting.
  • Carefully pour in the hot milk in a slow stream. The hot milk melts the chocolate and cooks the egg.
  • Blend mixture until smooth and creamy making sure there are no chocolate chips remaining, about 1 minute.
  • Pour into your serving dishes.
  • Place serving dishes in the fridge and allow to cool for a couple of hours.
  • When ready to serve top with your whip crème and garnish with raspberries and chocolate shavings.


WHIP CRÈME INGREDIENTS
1 c heavy whipping crème
4 tbsp powdered sugar

STEPS

  • Using a hand mixer beat the whipping crème and sugar together on high for 2–3 minutes or until whip crème is desired consistency. (I like mine really thick.)
  • Store in refrigerator until ready to use, or serve immediately if chocolate has already set.
Dinners, Side Dishes

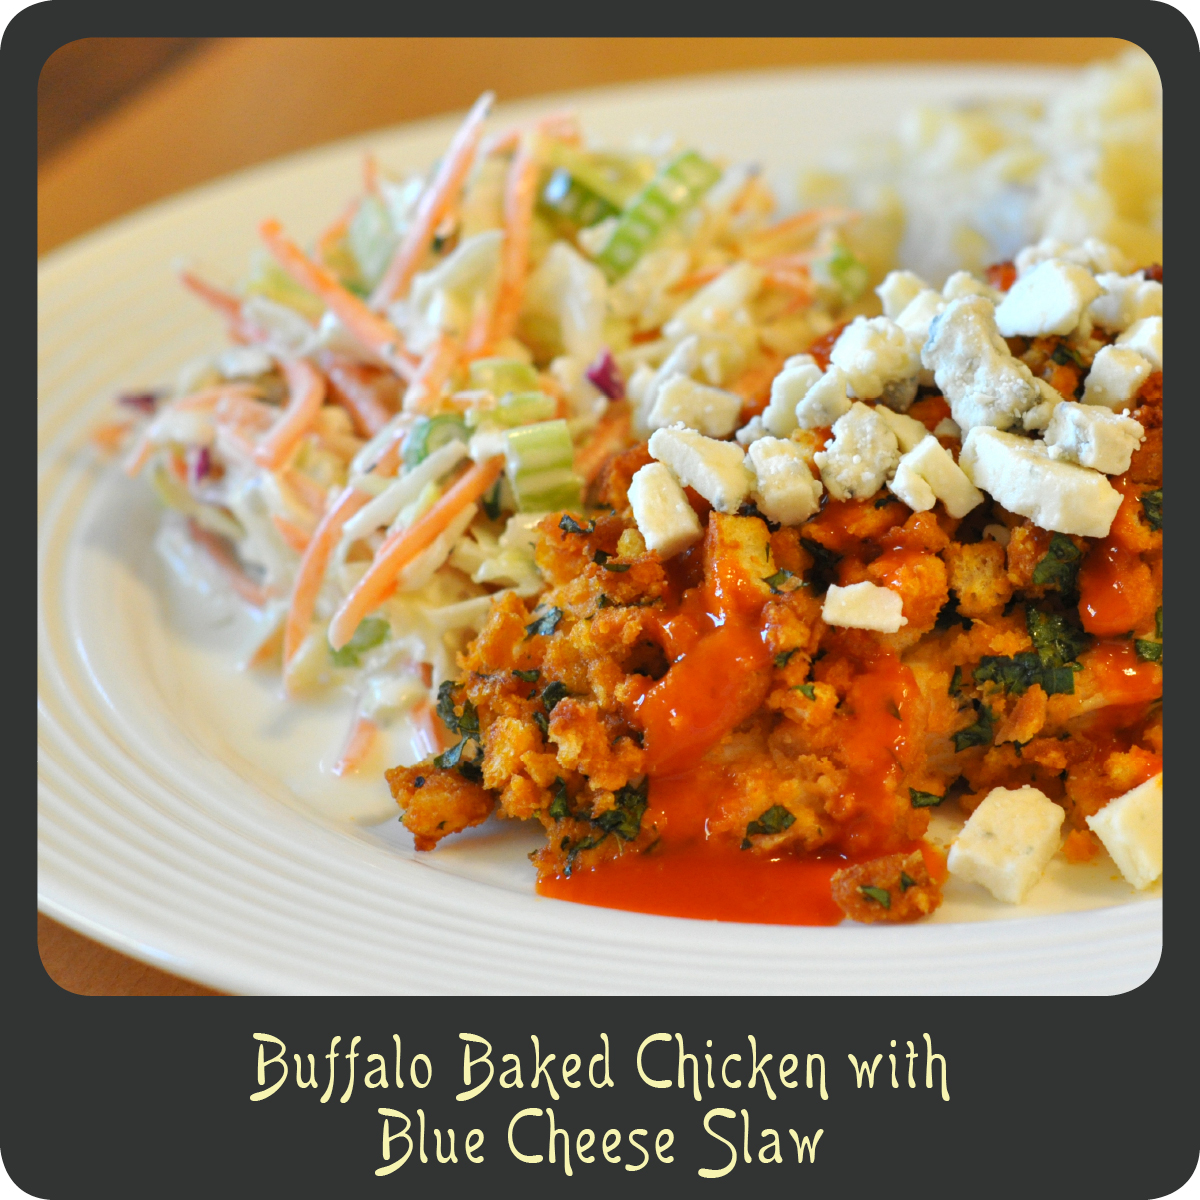
Recipe—Buffalo Baked Chicken with Blue Cheese Slaw

When it comes to spicy foods buffalo chicken has got to be one of my favorites. I just can’t get enough of those delicious little wings drenched in buffalo sauce especially when served with a side of cool blue cheese dressing and celery. Mmmmm…  my mouth is now watering.

This recipe is a great way to turn a popular appetizer into a full dinner. The blue cheese slaw is a perfect complement to the buffalo baked chicken since the tartness of the lemon coupled with the creaminess of the blue cheese really balances out the spiciness of the sauce. Keep this nice light dinner in mind for these upcoming warm summer months. Enjoy!

Note: You can control the heat by using less sauce or getting a sauce that is milder in heat. If you are looking for a tasty finger food make this buffalo baked chicken recipe with breast tenders instead of the whole breasts.

COLESLAW INGREDIENTS
1 c blue cheese crumbles
juice from 2 lemons
1/2–3/4 c mayonnaise
4 celery stalks, sliced
2 cups shredded carrots
6 green onions, thinly sliced
3 c green cabbage, shredded
1 c red cabbage, shredded
OR
You can substitute 3–4 cups of Fresh Express 3-Color Deli Cole Slaw for the green and red cabbage to save some time. It is sold in bags in your store’s produce department.

STEPS

  • In a large salad bowl stir together blue cheese, lemon juice, and mayonnaise.
  • Add in the celery, shredded carrots, green onions, and shredded cabbage.
  • Mix thoroughly and if slaw seems dry add in more mayonnaise.
  • Cover and place in fridge to chill while preparing chicken.

BUFFALO BAKED CHICKEN INGREDIENTS
6 tbsp butter
3/4 c buffalo sauce (I love Frank’s Red Hot Buffalo Wings Sauce!)
4 boneless skinless chicken breasts
salt and pepper
2 c croutons
1/2 c flat leaf parsley, finely chopped

STEPS

  • Pre-heat the oven 400º F.
  • Melt butter over low heat in a small pot and stir in hot sauce.
  • Place chicken in a large bowl and season with salt and pepper.
  • Pour the hot sauce mixture over the chicken and toss the pieces to coat in the Buffalo sauce. Allow to stand for 10 minutes while the meat marinades.
  • Put your croutons in a one gallon Ziploc bag and crush using a rolling pin.
  • Add the parsley to your zip loc bag and toss to mix.
  • Place the hot sauce-coated chicken into the Ziploc bag and toss to coat with the breadcrumbs.
  • Transfer the breaded chicken breasts to a large baking dish.
  • Bake chicken uncovered for 25–30 minutes, or until a thermometer reads 160º when stuck in the thickest part of the chicken breast.
  • Remove the chicken from the oven and serve with your blue cheese slaw. I like to top mine off with a drizzle of the buffalo sauce and some blue cheese crumbles.
Appetizers, Brunch

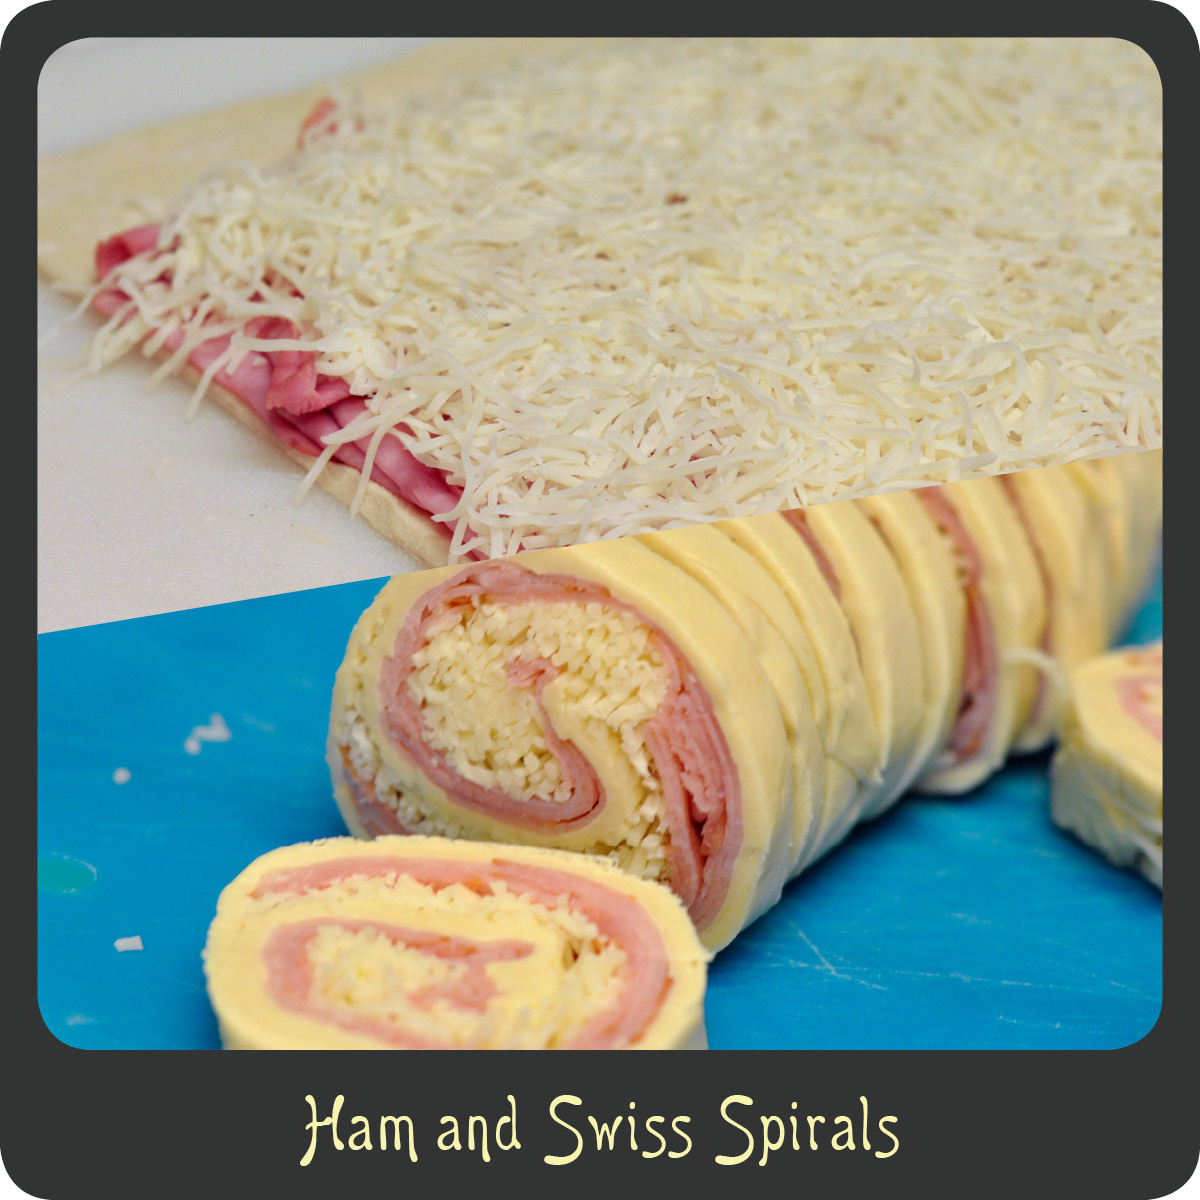
Recipe—Puff Pastry Spirals

Puff pastry has got to be one of my favorite ingredients to work with. It is so incredibly versatile and is a must have item in my freezer at all times. This recipe is a great one to keep in mind when you need an appetizer that can be made ahead of time. Serve them warm or at room temperature. You really can make these with almost any combination of ingredients but these are my favorite. Both combinations are classic flavors, spinach with feta and ham with swiss. These can be prepared a day ahead of time and kept wrapped up in the fridge until you are ready to bake them. I have made these not only as an appetizer but also as a side dish for brunch. I personally love to serve them with champagne. Yummy!

Note: Be sure to remove as much liquid as you can from the spinach before adding it to the pastry otherwise it may make the pastry soggy.

SPINACH AND FETA SPIRAL INGREDIENTS
10 oz frozen chopped spinach, thawed and drained
1 c feta
1/4 c yellow onion, finely chopped
2 tbsp olive oil
salt and pepper
1 sheet Pepperidge Farm puff pastry (1/2 package)
flour for work surface
1 egg
1 tbsp water

STEPS

  • Stir together the spinach, feta, yellow onion, olive oil, salt and pepper in a medium bowl.
  • Sprinkle flour on the work surface and unfold puff pastry.
  • Top puff pastry with the spinach mixture and evenly spread it out leaving one edge exposed about an inch back.
  • Starting at the edge opposite from the exposed edge roll up like a jelly roll.
  • Wrap your roll in saran wrap and chill in freezer for an hour or fridge for a couple of hours. (This will make it easier to slice through.)
  • Preheat oven to 400º.
  • Beat the egg and water together in a small bowl.
  • Remove the saran wrap and cut roll into 1/4″–1/2” slices.
  • Place the slices cut side down on a parchment paper lined baking sheet.
  • Brush the top of each spiral with the egg wash.
  • Bake for 15–20 minutes or until golden brown.
  • Remove the spirals from the baking sheet and allow to cool.

HAM AND SWISS SPIRAL INGREDIENTS
1 lb of thin sliced ham
1 c shredded swiss
1 sheet Pepperidge Farm puff pastry (1/2 package)
flour for work surface
1 egg
1 tbsp water

STEPS

  • Sprinkle flour on the work surface and unfold puff pastry.
  • Top puff pastry with an even layer of the ham and then sprinkle with cheese leaving one edge exposed about an inch back.
  • Starting at the edge opposite from the exposed edge roll up like a jelly roll.
  • Wrap your roll in saran wrap and chill in freezer for an hour or fridge for a couple of hours. (This will make it easier to slice through.)
  • Preheat oven to 400º.
  • Beat the egg and water together in a small bowl.
  • Remove the saran wrap and cut roll into 1/4″–1/2” slices.
  • Place the slices cut side down on a parchment paper lined baking sheet.
  • Brush the top of each spiral with the egg wash.
  • Bake for 15–20 minutes or until golden brown.
  • Remove the spirals from the baking sheet and allow to cool.
Sweet Treats

Recipe—Cadbury Creme Cupcakes

What says Easter better than Cadbury Creme Eggs? You know spring is right around the corner when you start seeing Cadbury Eggs in their shiny foil wrappers popping up at the store. The Cadbury brothers first started manufacturing filled eggs in 1923 but the brand we know and love wasn’t started until 1963. Over 300 million of these delicious eggs are made every year.

This recipe is the perfect marriage of the classic fondant filled milk chocolate egg with a moist chocolate cupcake. These were so simple and fun to make and a real hit with the kids. What person, young or old, wouldn’t love finding a gooey surprise in the middle of a really cute cupcake?

Note: You can make either 48 mini cupcakes or 24 regular sized cupcakes. As much as I love mini cupcakes and their fun size, I will admit, after frosting half of them I was over it! If using a full size muffin pan, be sure to get 24 regular sized Cadbury Creme Eggs rather than 48 of the mini ones. Don’t forget to adjust the baking time accordingly.

INGREDIENTS
box of chocolate cake mix prepared (you will probably need eggs, oil, and water)
48 Mini Cadbury Creme Eggs, unwrapped
container of vanilla frosting
yellow food coloring

STEPS 

  • Preheat oven to 350º.
  • Prepare cake batter per your box’s instructions.
  • Line your pan with cupcake papers.
  • Place about a teaspoon worth of cake batter in each lined cup. (A heaping tablespoon if you are making regular sized cupcakes.)
  • Place a Cadbury Egg in each cup.
  • Top off each cup with more batter covering the eggs.
  • Bake for 8–10 minutes or until a toothpick inserted in the middle comes out clean. (Baking time is almost twice as long for regular sized cupcakes.)
  • Allow cupcakes to cool completely.
  • While cupcakes are cooling prepare your frosting. Take about a quarter of the frosting and mix it in a small bowl with a couple drops of yellow food coloring.
  • Once cupcakes are ready, frost with white frosting and then top off with a dollop of the yellow frosting in the middle.

Happy Easter!

Dinners

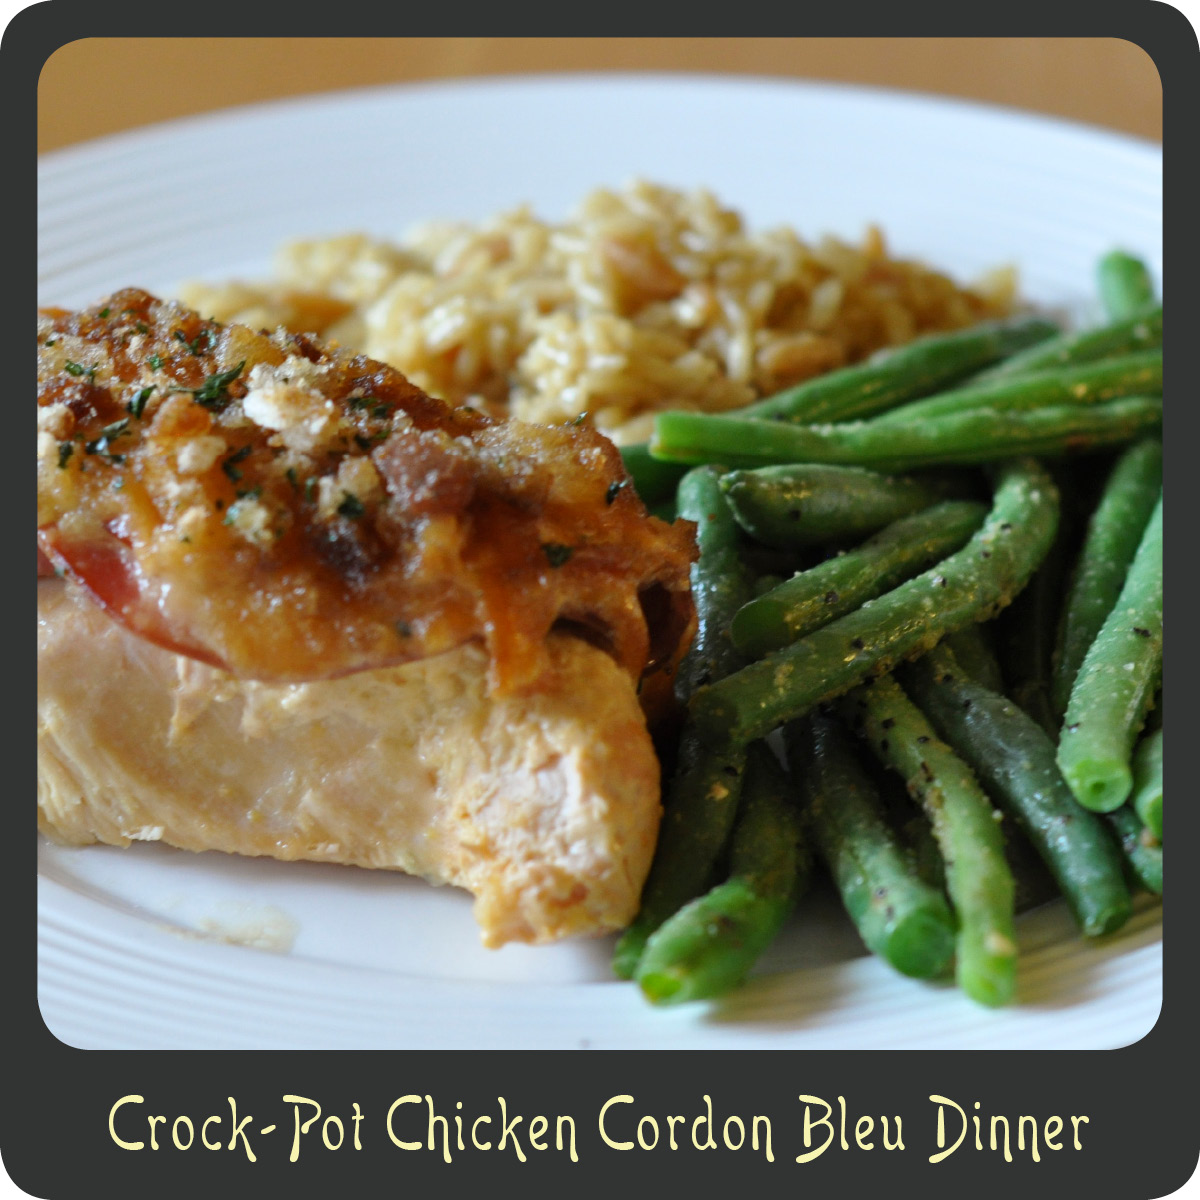
Recipe—Crock-Pot Chicken Cordon Bleu

The crock-pot is a fabulous invention that I don’t utilize enough. What’s not to love about a simple appliance that has dinner ready for you when you get home from a long day at work? Being a working mom I am always looking for quick and delicious dinner recipes to feed my family. This recipe is so easy to put together and it fills your house with such a wonderful smell. Your mouth will be watering as soon as you walk through the door. I love the salty flavor of the ham with the creamy melted Swiss cheese. The slow cooked chicken breast is moist and just falls apart. This certainly has the same flavors as the real deal but is so much easier to make.

Note: If your croutons don’t maintain a crunchy texture, transfer the chicken to an oven safe dish when it is done in the crock-pot and finish the chicken breast off under the broiler for 2–3 minutes. For a low carb alternative just skip the crushed croutons. 

INGREDIENTS
4 boneless skinless chicken breasts
10.75 oz can cream of chicken soup
3/4 c milk
8 slices of ham
1 c Swiss cheese, shredded
1 c croutons, crushed
1/4 c butter, melted

STEPS

  • In a small bowl mix together the cream of chicken soup and milk.
  • Pour enough of the soup mixture into your crock-pot to cover the bottom.
  • Place chicken breasts in the bottom of the crock-pot and drizzle with additional sauce. (I had some leftover.)
  • Fold slices of ham in half and put two slices on top of each chicken breast.
  • Cover the ham with the shredded Swiss.
  • Sprinkle the crushed croutons over the top.
  • Drizzle with melted butter.
  • Cover, and cook on low heat for 4–6 hours, or on high heat for 2–3 hours. Be sure your thermometer reads 160º when stuck in the thickest part of the chicken breast.

Side Dishes

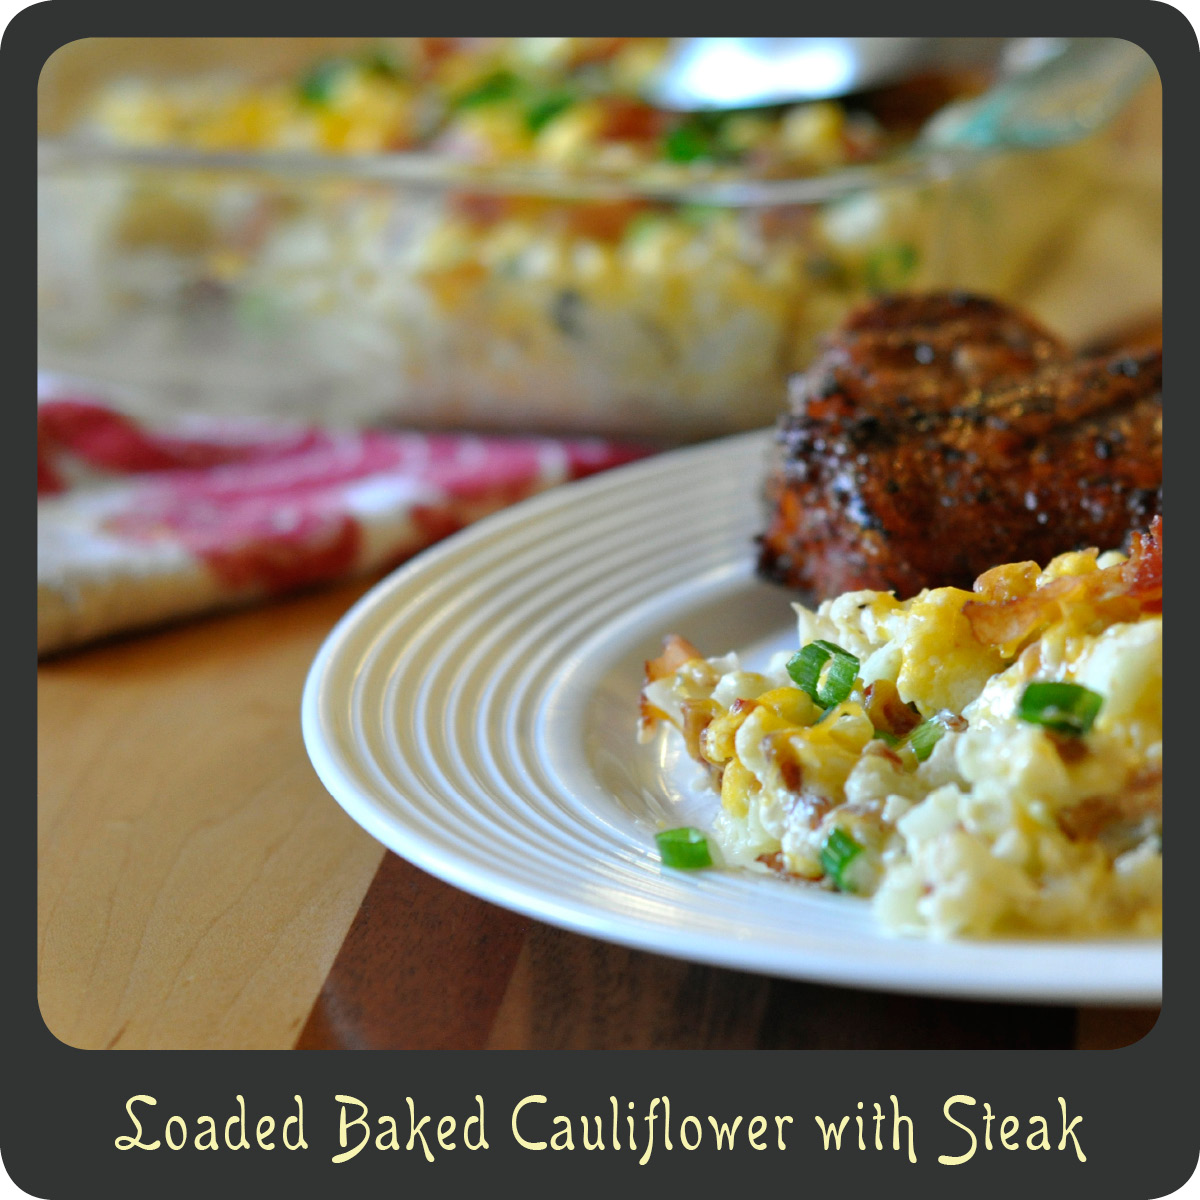
Recipe—Loaded Baked Cauliflower

Whenever I want to try and drop a few pounds I typically opt for a low carb diet. That means cutting back on those delicious carbohydrates like pasta, bread, and potatoes. I really love my potatoes, and while there is no substitute for the real thing, this is as close as you can get to a loaded baked potato. This recipe is one of the many reasons I LOVE low carb dieting. I mean come on! A diet where you can eat bacon and cheese and still loose weight? You will not feel deprived while eating this for dinner. This recipe is certainly not a low calorie recipe, but it is a fantastic way to make a flavor packed vegetable dish that is very satisfying. If you have a picky eater that doesn’t typically like veggies give this a try. You may find out that they love cauliflower.

Note: If you want to make a healthier version of this recipe use low fat sour cream and cheese and substitute turkey bacon for regular.

INGREDIENTS
head of cauliflower prepared and broken up into florets
1 c sour cream
1 c cheddar cheese, shredded
3 green onions, chopped
6 slices cooked bacon, chopped or crumbled
salt and pepper

STEPS

  • Bring a large pot of water to boil.
  • Add in the prepared cauliflower florets and cook for 6–8 minutes or until easily pierced with a fork.
  • Remove cauliflower from water and allow to cool.
  • Preheat oven to 350º.
  • While the cauliflower cools, stir together sour cream, 1/2 of the cheese, 1/2 of the green onions, and 1/2 of the bacon in a large bowl. Add salt and pepper to taste.
  • Chop cooked cauliflower into small pieces and add to the sour cream mixture. Be sure to give it a good stir.
  • Place mixture in a medium baking dish and top with remaining cheese and bacon.
  • Bake for 20 minutes.
  • Garnish with the remaining green onions just before serving.

Soups

Recipe—Creamy Turkey Noodle Soup

The other day my poor hubby was down with a nasty cold and I wanted to whip him up some sort of soup with my left over rotisserie turkey breast to make him feel better. (This recipe would be just as wonderful with cooked chicken if that’s what you have on hand.) Normally I just make my turkey soup with a broth base, some vegetables, and noodles but since it was a rainy day I thought something rich and creamy would hit the spot. This was sort of an experiment but it really turned out great! I went a little heavy on the cayenne pepper but it gave it a nice kick. The cream balanced out the heat very nicely. One thing I love about this soup recipe is that it was done in under a half hour. It is not one of those soup recipes that has to simmer for hours. Next time I think I might try to substitute the pasta for some homemade dumplings just to mix it up. Mmmmm…

Note: For a delicious turkey alfredo pasta bake, use 5 cups of uncooked noodles instead of 2 and follow the rest of the recipe as usual. The pasta will soak up most of the liquid. When your pasta is cooked al dente, probably about 10 minutes, remove from heat and put in a large baking dish. (The pasta will finish cooking while baking in the oven.) Top pasta with breadcrumbs and bake for 10 minutes at 350º. Wellah! We have a two for one recipe. Also, feel free to substitute the veggies for whatever you have on hand. I’m sure corn or green beans would be fabulous additions.

INGREDIENTS
1/4 c butter
2 large carrots, sliced
2 celery stalks, sliced
1 yellow onion, chopped
2 cloves garlic, minced
1/4 c flour
5 c chicken or turkey broth, divided
2 c cream
1 tsp salt
1/2 tsp white pepper
dash cayenne pepper
3 c chopped cooked turkey
2 c uncooked rotini noodles
1/4 c fresh chopped parsley

STEPS

  • Sauté carrots, celery, onions, and garlic in butter until soft.
  • Add flour and mix well.
  • Gradually add 2 cups of the broth and all of the cream.
  • Cook over medium high heat until it’s thick and bubbly, 12–14 minutes.
  • Stir in remaining 3 cups broth, and all remaining ingredients except parsley.
  • Simmer for 11–13 minutes stirring occasionally until noodles are tender.
  • Stir in chopped parsley and serve.
Random Thoughts

A Celebratory Milestone? I Think So!

If you know me, you know I will celebrate and drink to anything. A friends engagement. Cheers! A new job. Glasses up! New designer shoes that I got on sale? Heck yeah! Bring on the margaritas! Well today I am celebrating my own little personal accomplishment.

I started the Diva di Cucina blog just under 5 months ago. Since then I have gained 30 fabulous followers and posted to the blog 25 times. Yesterday my blog surpassed 1,000 hits since starting last November. Wooo hooo! This is a milestone for me, which I am very excited about. So in honor of my blog I think a glass of bubbly may be in order.

If you have time, please take a minute to let me know what you think about this little blog of mine. I would love to hear your comments and feedback about the blog or any recipes in particular. Thanks kindly!

Diva di Cucina

Appetizers, Brunch

Recipe—Asparagus Gruyére Tart

Since asparagus is plentiful at the market right now I thought I would post a simple, yet elegant asparagus recipe that will excite your palate. The final product looks impressive and tastes just as good. This asparagus tart is perfect as an appetizer or a side dish with brunch. You really can’t go wrong serving it warm or cold. It is very easy to make and requires hardly any prep time at all. Enjoy!

INGREDIENTS
1/4 c flour, for work surface
1 sheet frozen puff pastry, thawed (I love Pepperidge Farms)
2 c Gruyére cheese, shredded
1 bundle thin asparagus spears
olive oil
lemon pepper
sea salt

STEPS

  • Preheat oven to 400º.
  • On a floured surface, roll the puff pastry into a 16-by-10-inch rectangle and trim uneven edges.
  • Carefully move the pastry to a baking sheet.
  • Using a knife, lightly score pastry dough 1 inch in from the edges to give it a border. This is identifies the boundary you will put your cheese and asparagus in.
  • Using a fork, poke the dough inside the rectangle at 1/2-inch intervals.
  • Bake pastry until golden, about 15 minutes.
  • While the pastry is baking, trim the bottoms of the asparagus spears to fit crosswise inside the tart shell.
  • In a large bowl toss the asparagus with olive oil, lemon pepper, and salt.
  • Remove pastry shell from oven. (If your pastry swells up lay a clean kitchen towel over the top and gently press down until it is about a 1/2” tall.)
  • Evenly sprinkle with the shredded Gruyére.
  • Arrange the asparagus in a single layer over Gruyére, alternating ends and tips.
  • Bake until spears are tender, approximately 15–20 minutes.
  • Allow to cool and then cut into squares using a pizza cutter.

For some great information about asparagus check out a previous post of mine here: https://divadicucina.wordpress.com/2012/03/13/kitchen-tip-asparagus/