Side Dishes, Snacks

Recipe—Roasted Fennel Fries

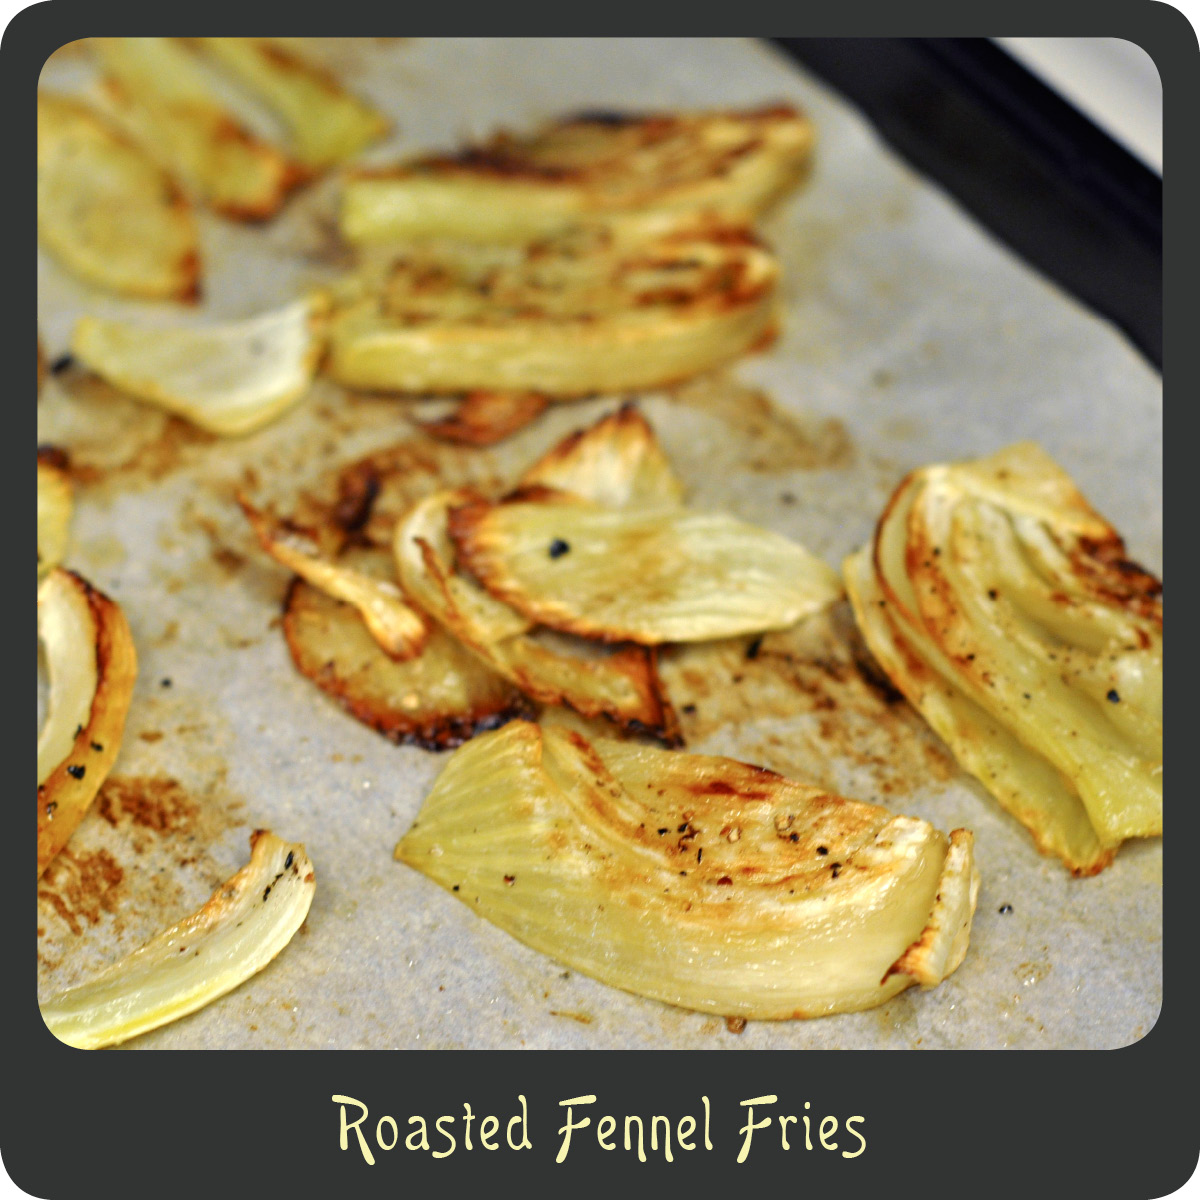
Awhile back I posted a recipe for kale chips. Kale chips are a delicious and healthy snack that my son absolutely loved. I was eager to find more recipes that were just as simple, tasty, and nutritious. I recently used the same seasoning and cooking technique with roasted fennel and had fabulous results. These roasted fennel fries were absolutely addicting. My son and I could not stop eating them! We didn’t even waste time getting out a plate. I kid you not, we were eating the pieces straight off the baking sheet. They were that good! Think french fries, but without the calories and even more flavorful. Roasted fennel fries are not only a great snack but they also make a great side dish for any dinner. Just be sure you make enough because these fries will go fast!

INGREDIENTS

2 large fennel bulbs, fronds removed and sliced into 1/3” thick pieces
1 tbsp olive oil
salt and pepper

STEPS

  • Preheat oven to 375º.
  • Cover a large baking sheet with parchment paper and place the fennel slices in a single layer.
  • Drizzle with olive oil and season with salt and pepper.
  • Place in the oven and cook for 30–45 minutes flipping once halfway through.
  • Bake until the fennel is fork tender and a golden brown.
Side Dishes

Recipe—Zucchini and Tomato Gratin

Out of all of the seasons, I love the summer most. Not just because of my lazy poolside days, baseball games, refreshing beverages, or little summer dresses, but because of the abundance and variety of incredible produce. It is something that people in California take for granted. Every year we grow a couple of cherry tomatoes plants in out backyard. My son can hardly wait for them to ripen and as soon as they do he eats them right off of the plant. Sweet, warm, vine ripened tomatoes. Yummmmmm…there is nothing like them. We seem to have a bowl full on our counter all summer long. The other veggie we seem to never get enough of during the summer is zucchini. Zucchini and tomatoes are a wonderful pair, and when you add in some quality parmesan cheese and fresh basil, delish! When I first tried this recipe for zucchini and tomato gratin I knew it was a recipe I would be making all summer long. Serve it up on it’s own with some pasta or as a side with your favorite protein, either way it is a perfect summertime dish.

INGREDIENTS
sweet Vidalia onion, thinly sliced
olive oil
3 medium zucchini, sliced
1 leek, sliced and thoroughly washed
2 tsp garlic, minced
1 c parmesan cheese
1 1/2 c Italian bread crumbs
1 1/2 c cherry tomatoes
2 tbsp fresh basil, chopped

STEPS

  • Preheat oven to 425º.
  • Drizzle a little olive oil in the bottom of large cast iron skillet.
  • Separate the onions rings, place them in the bottom of the skillet, and drizzle with a little olive oil.
  • Add half of the sliced zucchini, half of the leeks, and all of the garlic to the pan.
  • Sprinkle with a 1/2 cup of the parmesan cheese and a 3/4 cup of the breadcrumbs.
  • Drizzle with additional olive oil.
  • Add the remaining zucchini, remaining leeks, and all of the cherry tomatoes to the pan and drizzle with more olive oil.
  • Sprinkle with the remaining 1/2 cup of the parmesan cheese and a 3/4 cup of the breadcrumbs.
  • Drizzle with a tad more olive oil.
  • Bake entire pan in the oven for 25–30 minutes.
  • Turn on the broiler and finish the dish off under the broiler for 2–3 minutes or until it is golden brown on top.
  • Garnish with fresh basil.

Recipe adapted from Proud Italian Cook.

Side Dishes

Recipe—Cauliflower and White Cheddar Gratin

I was never much of a cauliflower fan growing up and now as an adult I just can’t get enough of the stuff. Sorry mom, but I think you were making it all wrong! The trick is to smoother it in cheese and all sorts of other wonderful flavors. I made this dish the other night and I’m embarrassed to admit that my husband, son, and I finished off the entire dish. All of it! Okay, so my son probably only ate it because I told him it was mac n’ cheese. Is that bad? Apparently we just couldn’t get enough of the creamy cheese sauce and crispy panko topping. We enjoyed this with some cooked greens and a juicy steak. It was delish! If you are having a hard time getting your kids (or even your spouses) to eat their cauliflower, give this recipe a try.  Maybe you’ve just been making it wrong. 😉

INGREDIENTS
1 large head cauliflower, cut into florets
2 tbsp olive oil
salt and pepper
4 tbsp butter, divided
3 tbsp flour
1 1/2 c milk
1/4 tsp ground nutmeg
1 c white cheddar cheese, shredded
1/2 c panko

STEPS

  • Preheat oven to 400º.
  • Place the cauliflower florets on a large baking sheet.
  • Drizzle with olive oil and season with salt and pepper.
  • Toss cauliflower to coat.
  • Roast the cauliflower until lightly browned, about 20–25 minutes.
  • Reduce the oven temperature to 350º.
  • In a large saucepan melt 3 tablespoons of the butter over medium heat.
  • Whisk in the flour and let it cook until it starts to turn a light golden color.
  • Whisk in the milk, nutmeg, cheese, and some salt and pepper.
  • Cook until the cheese is completely melted and the sauce thickens.
  • Add the roasted cauliflower to the cheese sauce and transfer to a square-baking dish (9” x 9” or 8” x 8” works great).
  • In a small microwave safe bowl melt the remaining tablespoon of butter.
  • Add the panko crumbs to the melted butter and stir to combine.
  • Sprinkle the buttered panko over the cheesy cauliflower.
  • Bake the gratin in the oven until it is bubbling and the panko is golden brown, about 15–20 minutes.
Side Dishes

Recipe—Lemon Chive Rice

Sometimes pairing side dishes with entrees can be a daunting task. If you aren’t quite sure what to serve with a main course, consider rice. Rice is incredibly versatile! Just toss in a couple of ingredients that complement the flavors of your main dish and you’ve got it made! I actually made this rice dish the other night to pair with macadamia nut crusted halibut. I love fish with some fresh lemon! This had just the right amount of zest to it so it wasn’t an overpowering flavor. This rice would also go great with some baked or grilled chicken. I find myself cooking with lots of citrus throughout the warmer months of the year. There is just something so refreshing about fresh citrus of any kind. This is definitely a side dish that the whole family will enjoy.

INGREDIENTS
3 tbsp butter
1 yellow onion, chopped
2 c rice
1/4 tsp turmeric
1 tbsp lemon zest, divided
3 c chicken broth
2 tbsp chives, finely chopped
salt and pepper

STEPS

  • Melt the butter in a large skillet over medium heat.
  • Add the onions and sauté until transparent.
  • Add the rice and the turmeric and stir until all the grains of rice are coated.
  • Stir in half of the lemon peel and all of the chicken broth.
  • Bring to a full boil over medium-high heat.
  • Cover and reduce heat to low.
  • Simmer for 20–25 minutes.
  • Remove from heat and let rice sit covered for 8–10 minutes.
  • Fluff rice with a fork.
  • Stir in remaining lemon peel, chives, salt, and pepper.
Side Dishes

Recipe—Italian Style Stuffed Artichokes

One of my best friends used to work in this cute little Italian deli that had numerous homemade Italian dishes. My three favorite things there was their gelato (which my friend kindly delivered to my door step while I was pregnant, becasue she’s awesome like that), eggplant parmesan, and their Italian stuffed artichokes. I LOVE their stuffed artichokes! They are a tad bit messy to eat but so delicious! When I eat artichokes I’m the type of gal that needs soemthing to dip the leaves in, whether it be mayonnaise, aioli, or garlic butter. However with these there is so much flavor in the bread crumbs that no dip is necessary. You just pull the bread crumbs off with the tender ends of the leaves.

INGREDIENTS
3 tbsp olive oil
1 tsp garlic
salt and pepper
1 c Italian breadcrumbs
1/4 c grated parmesan cheese
2 large artichokes
1/2 of a lemon

STEPS

  • Preheat oven to 425º.
  • Heat the olive oil in a medium skillet.
  • Add the garlic and sauté until fragrant.
  • Remove the skillet form heat and stir in breadcrumbs and parmesan cheese.
  • Season bread crumbs with salt and pepper.
  • Put a pot of water on to boil. (The amount of water you will need will depend on the size of your baking dish. You will need enough that the artichokes can sit in 1” of water.)
  • Prepare the artichokes by slicing off the stems and their tops and then pulling off the small outer leaves. (I trim about an inch off. This exposes the center leaves making it easier to remove them.)
  • Using a pair of kitchen shear trim the pointy tips off of the leaves.
  • Take the lemon half and rub it all over the artichokes. (This keeps the cut areas from turning an ugly brown color and gives it a nice little zest.)
  • Gently try to loosen up the dense center leaves by pressing them outward.
  • Pull out some of the thin center leaves if you are able to, creating a small well in the middle.
  • Stuff the prepared breadcrumbs in the center well and in between the large leaves.
  • Place the stuffed artichokes in a baking dish.
  • Once your water has come to a boil, carefully pour it into the baking dish so that the artichokes are sitting in 1” of water.
  • Cover the entire baking dish tightly with foil.
  • Bake in the over for 1 hour or until the leaves are cooked to desired tenderness.
Side Dishes

Recipe—Mexican Grilled Corn on the Cob

When planning out dinner menus I find it challenging to come up with Mexican side dishes beyond the typical beans and rice. And besides, when I am watching my carbs beans and rice just don’t work for me. I stumbled upon a recipe for Mexican grilled corn on Pinterest a few months back and have been meaning to try it. Boy am I happy I did! It was delicious! And by delicious I mean, the best corn on the cob I have ever eaten. While I normally just cover my ear of corn with butter and salt this was a welcomed change. The sour cream gave the corn a nice creaminess and the flavors of the smoky chili powder and zest of lime really fired up my taste buds. Sour cream has less than a third of the calories that butter does, so this corn not only tasted awesome, but it is also way healthy! Low calorie, low carb, and tastes amazing! Win, win, and win!

Note: If you want to try this recipe but don’t feel like firing up the grill, you can boil the corn. To boil corn, place the shucked corncobs in a large pot of boiling water and cover it. Cook for 4–6 minutes. Remove the corn from the water with tongs and continue seasoning by following the last 3 steps.

INGREDIENTS
4 ears of corn
1/2 c sour cream
chili powder
salt
pepper
4 lime wedges

STEPS

  • Cut of both ends of the corn so that the cob is exposed on one end and most of the stalk cut gone from the other, leaving the husk on.
  • Fill your sink or a large pot with water.
  • Soak the corn in the water for 15 minutes. (This allows some water to get inside so that the corn steams while on the hot grill, and also makes the husks wet so that they don’t catch fire.)
  • While the corn is soaking, preheat the grille to 350º.
  • Remove the corn from the water and shake off most of the moisture.
  • Cook the corn over direct heat for 15–20 minutes, making sure to turn every 5 minutes.
  • Remove the corn from the grille.
  • Carefully shuck the corn, remove all of the husks and corn silk. (I use an oven mitt to grasp one end to keep from burning my hands.)
  • Using your fingers or a butter knife spread a thin layer of sour cream all over the entire cob.
  • Sprinkle the corncob with the chili powder, salt, and pepper.
  • Spritz with fresh squeezed limejuice.
  • Devour!

Recipe adapted from Ezra Pound Cake.

Side Dishes

Recipe—Baked Sweet Potatoes

I know many people think that sweet potatoes are a fall dish but why should we limit ourselves to only eating the sweet root vegetable during the cooler months? I am still getting sweet potatoes almost every other week in my produce box and have had fun getting creative with them. The other day at the grocery store I saw some turkey breast tenderloins on sale and I decided to cook a mock Thanksgiving dinner. A Thanksgiving feast once a year is not nearly enough! These potatoes are sweet, tangy, and even had a little hint of spice. They will really get your taste buds going. I’m so glad I made these because they were the perfect side dish for our citrus grilled turkey tenderloins.

Note: I used Hannah sweet potatoes but this recipe works with any type of sweet potato. That is why these are lighter in color than the typical orange sweet potato you may be used to seeing.

INGREDIENTS
4 large sweet potatoes, sliced into 3/4” medallions
1/2 c fresh squeezed orange juice
1/2 tsp orange zest
1/3 c maple syrup
1 tsp cinnamon
3/4 tsp ground ginger
1/2 tsp nutmeg
pinch of cayenne
1/4 tsp salt
1/2 c dried cranberries
3 tbsp butter
2 tbsp brown sugar

STEPS

  • Preheat oven to 400º.
  • Place the sweet potatoes in a large bowl and add the orange juice, zest, syrup, cinnamon, ground ginger, nutmeg, cayenne, salt, and cranberries. Toss to coat evenly.
  • Transfer the sweet potatoes along with all the juices to a baking dish.
  • Slice the butter and place the pats over the top of the sweet potatoes.
  • Sprinkle with the brown sugar.
  • Cover with foil and bake for 20 minutes.
  • After 20 minutes lift the foil and using a baster or a large spoon, pour some of the liquid from the baking dish over the top of the potatoes.
  • Bake for an additional 30 minutes or until the potatoes are tender.
  • Remove the foil and turn on the broiler for 3 minutes to caramelize the top.
Side Dishes

Recipe—Celery Root Puree

First time I ever had celery root puree was over at a friend’s house for an incredible dinner. Ever since then I have been in love with the creamy rich side dish. Celery root puree is a worthy competitor of mashed potatoes and takes a dinner from average to over the top. Don’t be intimidated by celery root, it is just as easy to prepare as mashed potatoes. While it may be gnarly and unattractive out the outside it has a very delicate and light flavor unlike anything else. By boiling the celery root in milk it gives it a silky texture that is just heavenly. This side dish goes a long way since it’s really rich. It goes magnificent with almost any kind of meat but I am especially fond of it with a nice cut of steak. Come on, be adventurous and give celery root a shot!

Note: This celery root puree can be made in advance and then reheated over the stove or in the microwave right before serving.

INGREDIENTS
1 1/2 c milk
1 1/2 c water
2 tsp salt
1 large celery root, peeled and cut into 1” cubes
1 medium russet potato, peeled and cut into 1” cubes
1/2 of a small yellow onion, quartered
3 tbsp butter, cut into 3 pieces
salt
1/4 tsp ground white pepper
1 tbsp fresh chives, chopped

STEPS

  • In a large saucepan bring the milk, water, and salt to a rapid boil over medium-high heat.
  • Add the chopped celery root, potato, and onion to the pot.
  • Reduce heat to medium and simmer until the vegetables are fork tender, about 25 minutes.
  • Drain off all of the liquid.
  • Place the cooked vegetables and the butter in a food processor or blender and puree until smooth. (Add a splash of cream or milk if needed.)
  • Season the puree with salt and white pepper.
  • Transfer the celery root puree to a serving bowl or plates and garnish with chopped chives.
Side Dishes

Recipe—Sweet Glazed Carrots

I am a lover of all things carrot. Just not when they are steamed all on their lonesome. If I am eating cooked carrots I want them to have some pizzazz. This is by far my favorite way to enjoy cooked carrots, covered in a sweet and buttery glaze. So good! These are very simple, and in fact you probably already have all the ingredients on hand. These take less than 10 minutes and are a fabulous addition to any dinner.

Note: This recipe is intended to be prepared with petite carrots but I have made it with both carrot sticks and baby carrots and had equally great results. They petite carrots just make for the nicest presentation. I had whole carrots on hand so that’s what you see in the photo.

INGREDIENTS
2 tbsp honey
2 tsp vanilla
2 tbsp butter
2 tsp white vinegar
salt
5 large carrots, cut in half lengthwise and then quarters (See above note for a variety of carrots that can be used.)

STEPS

  • In a large sauté pan combine the honey, vanilla, butter, vinegar, and salt.
  • Heat over medium-high heat.
  • Once the butter is melted whisk the glaze until well combined.
  • Add in the carrots.
  • Cook until the majority of the liquid is gone and the carrots are fork tender, about 8–10 minutes, making sure to stir occasionally.
Side Dishes

Recipe—Rice Pilaf

How many times have you bought a box of quick and easy rice pilaf at the store? I think we all have at some point or another, I know I’m guilty of it on numerous occasions. Ever since having my son I have become much more aware of what I am serving up at the dinner table. One night I actually looked at a box of rice pilaf as I was making it and realized that there were over 25 ingredients (none of which were veggies like this recipe has) and I didn’t even know what half of the listed ingredients were. (Scary!) This recipe for homemade rice pilaf has 10 ingredients and a third of those are veggies. (Yummy!) This recipe actually ends up being really quick and easy and tastes way fresher than the stuff you get in a box. It is super simple and yet a great side dish for almost any dinner.

Note: Be sure to taste it before serving, I noticed once I added in a little more salt the flavors suddenly really popped. The salt really helped to highlight the flavor of the turmeric.

INGREDIENTS
1 1/2 c long-grain rice
2 tbsp olive oil
1 onion, chopped into small pieces
1 carrot, chopped into small pieces
1 c frozen peas
1 tsp turmeric
1/2 tsp cumin
1/4 tsp paprika
salt and pepper

STEPS

  • Cook rice per package instructions.
  • While the rice is cooking, heat olive oil in a large skillet over medium-high heat.
  • Add onion and cook until it begins to soften, about 5 minutes.
  • Add in the carrot and cook for another 5 minutes or until tender.
  • Stir in the peas, turmeric, cumin, paprika, salt and pepper.
  • After the rice has sat covered per the package instructions transfer it to the skillet
  • with the veggies.
  • Stir to combine.
  • Taste and add additional salt as needed.