Beverages, Kitchen Tips, Sweet Treats

How to Build an Epic Hot Cocoa Charcuterie Board or Box

Hot cocoa charcuterie boards are taking off in popularity and there is no better time than the holiday season to try and make your own. Whether you want to make it for just your family to enjoy around the fireplace, a large party, or even for gifting, it is a sure way to spread some holiday cheer.

While a charcuterie board traditionally refers to an assortment of meats, cheeses, and breads served as an appetizer, the term has become much broader and people are getting creative with how they bring foods together. While I never pass up traditional meat and cheese charcuterie to go with a bottle of wine, hot cocoa charcuterie has become one of my favorite Christmas traditions in our home. 
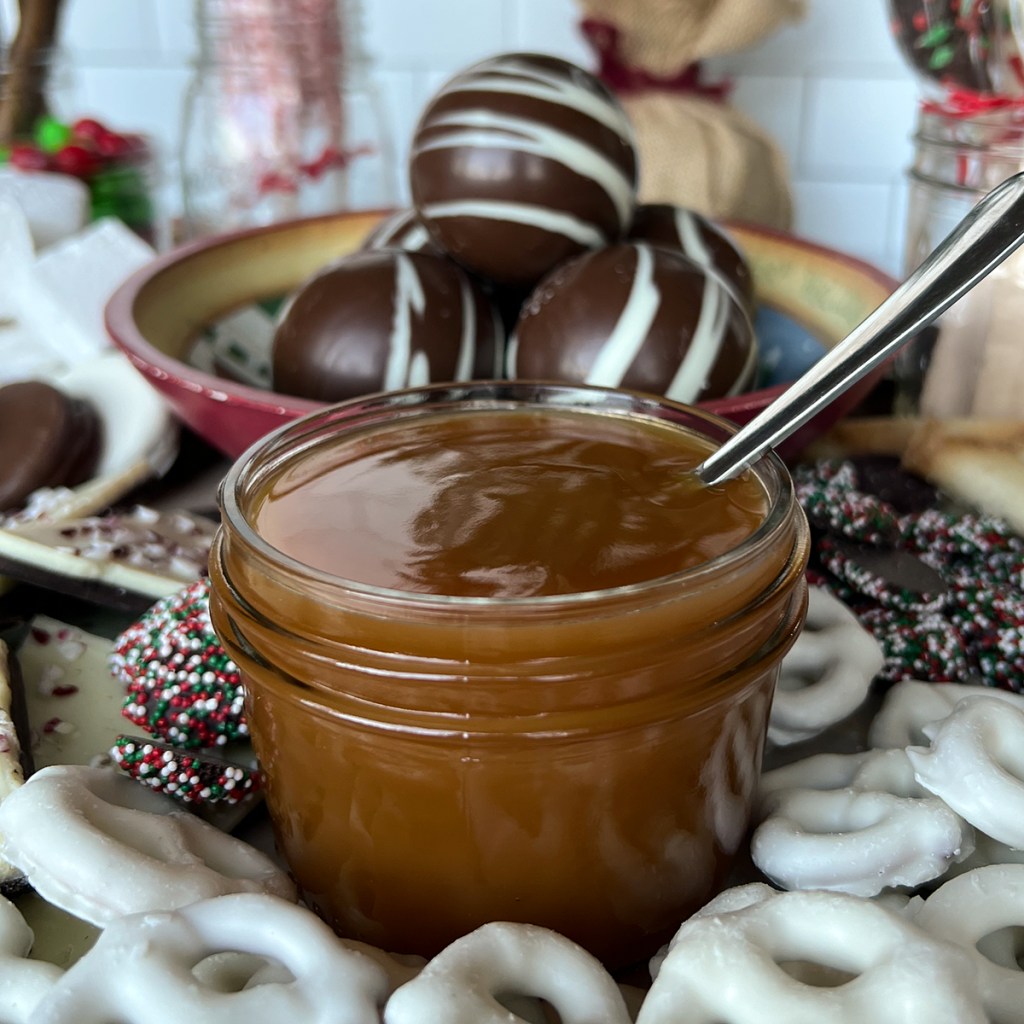
On the day we plan to decorate our Christmas tree and put out all our decorations, I lay out a spread of sweets to snack on and every ingredient my son could dream of to make a big ol’ mug of fully loaded hot cocoa. Do I go overboard? Absolutely. But it makes creating a cup of hot cocoa so much more fun and we love grazing on it throughout the day.

Last year we decided to share that holiday magic and made hot cocoa charcuterie boxes for our friends and delivered them to their doorsteps along with a box of assorted fresh baked cookies. The kids seriously love it! Pair a homemade box with some fun holiday mugs for the cutest gift set ever!

As a special touch I also like to purchase some gorgeously decorated sugar cookies from local bakers. They can include a special saying or message like “Merry Christmas.” They become sort of like an edible card.

There really is no right or wrong way to build a hot cocoa charcuterie board or box, it is about bringing together an assortment of ingredients and letting people use their imagination topping, drizzling, dipping, and sipping. 

Of course, there are always the obvious choices or marshmallows, whipped cream, and sprinkles, but don’t let the fun stop there. You can fill your board with peppermint bark, caramel sauce, and then make sure to include some tasty treats for dipping too! And don’t for one second think this is just for the kids! Add some holiday spirits for the adults. Nothing like spiking your hot cocoa with some Irish cream or peppermint schnapps. 
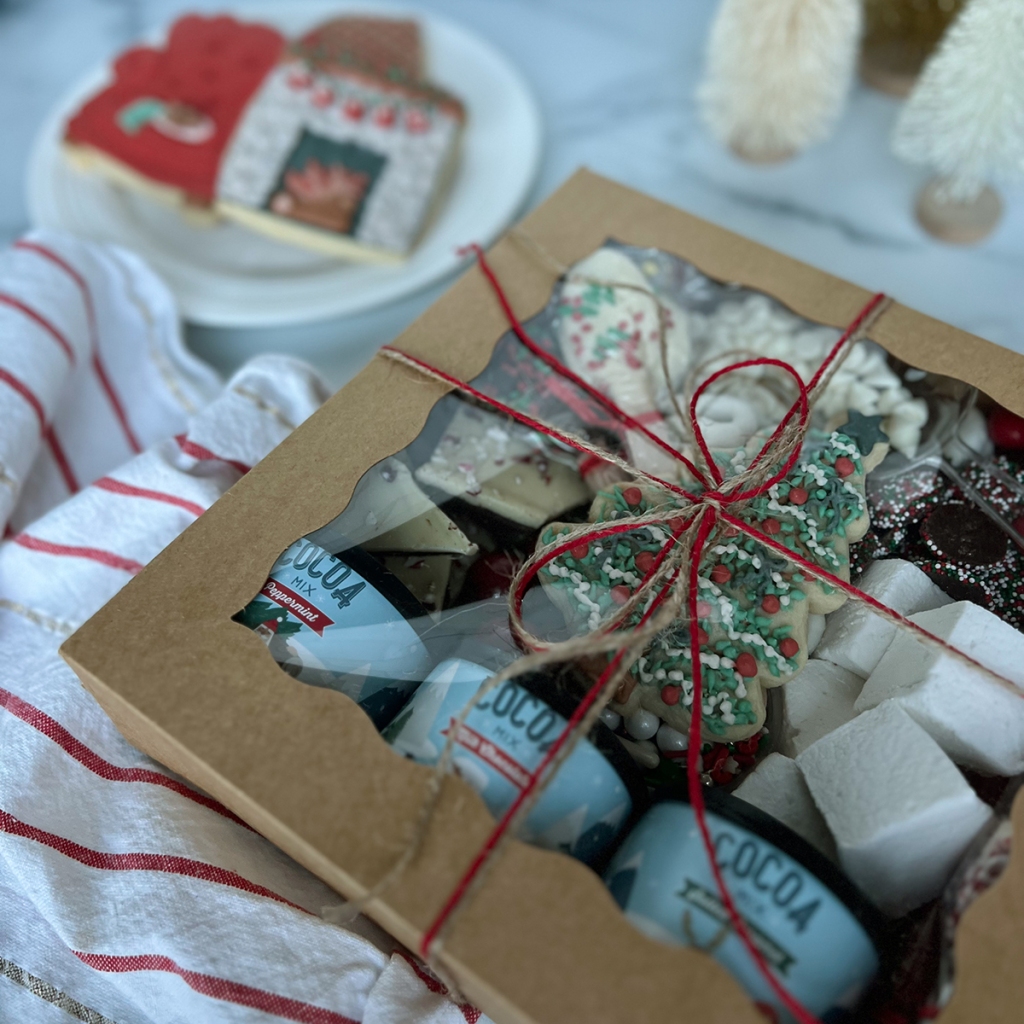
I hope this has inspired you to create your own hot cocoa board or box this holiday season and beyond. And just keep in mind, the number one rule for building a board or box is, there are no rules! Just have fun with it.

How to Build Your Board or Box

Step 1
The first step is selecting your board or box. My best advice is to make sure it is big enough for all your goodies. The bigger the better but just make sure you have enough to fill it so there aren’t any bare spots. 

If you are creating this for a really large group, you could always just line your counter or table with butcher paper or parchment paper and make it a grazing experience.

Step 2
Place your most important ingredient of all, your hot cocoa bombs or container of mix in a corner.

If you want to have your hot cocoa prepared ahead of time, skip this step. When having a party, I like to make my homemade hot cocoa in a crock-pot so it is ready to go. The guests can just ladle it into their mugs. 

Step 3
Place small bowls or containers for sprinkles, chocolate chips, smaller candies, and syrups around the board. If making a gift box, plastic sauce cups with lids work great!

Place longer items, like pirouette cookies, candy canes, and candy coated stir sticks in cups or mason jars to add some height to the board.

Step 4
Arrange cookies in clusters around the board or box.

Step 5
Fill in remaining gaps with candies, marshmallows, and chocolates. You want the board to look full so don’t be shy, add lots and don’t worry about layering things up! 

Step 6
Add some small scoopers and/or tongs in addition to some sort of stir sticks. I love including chocolate dipped spoons and the wood stir sticks coated in crushed peppermints but it could be as simple as some wood stir sticks or spoons.

Fun Toppings and Extra Treats

  • Marshmallows (assorted sizes)
  • Candy canes
  • Festive sprinkles
  • Toffee bits
  • Semi-sweet chocolate chips 
  • White chocolate chips
  • Pirouette cookies 
  • Chocolate coated pretzels
  • Assorted cookies
  • Chocolate coated Oreos
  • Assorted chocolates and candies
  • Caramels         
  • Caramel sauce
  • Chocolate sauce
  • Chocolate truffles 
  • Peppermint bark
  • Chocolate covered spoons
  • Adult mix ins (peppermint or butterscotch schnapps, amaretto, Irish cream, Irish whiskey, etc.)

If you like this, then make sure to also check out my recipes for Homemade Marshmallows or Creamy Hot Cocoa in a Crock-Pot!

A huge thank you to Sugar Sweetery for providing the sugar cookies for this article. Check them out on IG @sugar_sweetery

Kitchen Tips

Meal Planning 101

Hello there my lovely followers! It’s been a minute since I’ve posted. Okay, more like 15 months. That is just far too long but as you can imagine, life happens. First and foremost, I wanted to let you know I am in fact alive and well. I have been busy working full time managing a design studio, doing lots of freelance design work, carting my son around to sports which he does about 10 months out of the year, and squeezing in as much family time as I can during our down time.

But here I am, dealing with all the craziness that has come along with the COVID-19 pandemic. I am currently safe in my home with my family. My husband and I are both thankfully still working (from home), and trying to also juggle the schooling of our 10-year-old son. With so many events and youth sports cancelled, I find myself with more free time than I ever remember having. (At least since becoming a mom.) I am trying to make the best of it and just enjoying playing games with my family, doing puzzles, binge watching shows, finally finding the time again to get back to running a few days a week, sitting down and having at least two meals a day with my family, and in all that, trying to carve out a little extra time to get back to blogging. I am determined to let some good come out of all of this.

I absolutely love sharing recipes with all of you, so much so that I am literally getting teary as I am trying to post this. They are happy tears though. I hope that I can get you at least an email a week to bring a little sunshine your way.

So, what better post to come back with than, how on earth I manage my busy schedule and getting meals on the table. It is all about meal planning! It is the only way I can get through the week. When people ask me how I manage to cook as much as I do, I tell them it is all about meal planning. It seems like such a simple task but I realize so many people don’t even know where to begin. So, consider this my beginners guide to meal planning.

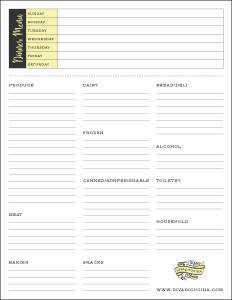
I am going to share with you my tips, tricks, and even a handy shopping list you can print and use at home. This is the same one I use myself every week. I have it organized by categories that follow the flow of most grocery stores. I absolutely hate it when I feel like a pin ball at the grocery store bouncing back and forth from one end of the store to the other. Organization and order is key!

It has been about four years of me using this list and I noticed that as soon as I started spending the 30 minutes doing my meal planning each weekend I was saving so much money by not eating out as often and not buying things I didn’t need, I reduced our wasted food to almost nothing, and best of all, eliminated so much extra stress! It is an easy routine that takes some time to adopt but so worth it once you get into the groove.

Meal Planning Grocery List

MY TIPS AND TRICKS FOR MEAL PLANNING

  • Print out several of my shopping lists at once. I do about 10 at a time. You probably won’t be as consistent if you are only printing out one at a time. If they are nearby and ready to go, you are more likely to use them.
  • If you find yourself running low on or finishing off any items, add that to the shopping list throughout the week. For example, if my husband finishes off the oregano, he just writes it on the shopping list clipped to the fridge. This helps keep you stocked on the essentials and you aren’t trying to rack your brain trying to remember what it was you finished off earlier in the week when you do go to sit down and write out your list.
  • When you are ready to do your planning for the week, look at your calendar and write in your evening commitments so you know what you need to plan around. If you have to work late, or your child has a game, plan to do quick and easy dinners those nights or maybe even takeout.
  • Clean out your fridge each weekend of anything that has gone bad or you know you won’t use. It is good to know what you do have in there.
  • Do a quick inventory of what you have that you need to use. For example, if I have half a bag of shredded cabbage or a handful of tortillas from a few days ago that I know will go bad if I don’t use it soon, I try to plan a meal around that early in the week. This helps you cut down on waste and can save you money.
  • When doing your planning, look at what recipes take common ingredients. For example, last Sunday I wanted to make pork tacos for dinner and those took cotija cheese, chopped red onions, and sliced jalapeños. I decided to make juevos rancheros for breakfast that day since they shared so many of the same ingredients. I was able to prep and chop all my ingredients for dinner while I was doing it for breakfast so come dinner time, I already had all my ingredients ready to go and I got two meals out of those ingredients.
  • Use leftover ingredients from one meal as part of the next one. I will cook twice as much broccoli as I need for a dinner, and then make a broccoli and egg quiche the next day or grill extra chicken for dinner on Sunday, to go on my salads for lunch throughout the week.
  • Plan your meals around seasonal produce. You will get the best quality ingredients and the best prices.
  • Make a shopping list every weekend for the week ahead. Once you have all your meals planned for the week, start filling in the bottom portion with what grocery items you need to make them. Having an organized and written shopping list keeps you on track at the grocery store. You are more likely to buy items you don’t need and spend more money if you go to the store and just try and wing it. Plus, you then only need to make one trip to the store a week.
  • Keep your dinner menu for the week on the fridge and check it each day. That way you remember if you need to defrost any meat, get anything marinated, or load up the crock pot before leaving for the day.

Meal Planning Dinner Menu


PREPPING FOR THE WEEK

  • Chopping and slicing can quickly become one of the most time-consuming parts of any meal. If you have a busy week ahead, consider washing and prepping all your produce on Sunday. I will wash and chop broccoli, onions, peppers, zucchini, pretty much any veggie ahead of time and then just put them in Ziploc bags in the produce drawer of the fridge.
  • If you have a recipe that calls for a marinade, combine all your marinade ingredients in a mason jar ahead of time. Before you leave for work in the morning just pour the marinade into a Ziploc bag with the meat.
  • If you are making a crockpot meal that calls for seasoning and liquid ingredients, combine all those together in a Tupperware or mason jar over the weekend or the night before so that in the morning you just have to dump it over the meat into the crockpot. I do not want to be spending my morning trying to open cans and measure seasonings when I am already running late for work.


OTHER TID BITS

  • Make a double batch of any of your recipes that freeze well. One for now and one for later. My enchiladas freeze awesome! I will make a triple batch, eat one batch fresh and freeze two more. It isn’t that much more work to just double a recipe if you are already taking the time to make it once. Then later on you have a quick dinner that you can just toss in the oven. Soups, lasagna, and baked pasta casseroles also freeze great.
  • Keep foil baking dishes on hand. They are great for your freezer meals! I love the 8” x 8” square foil dishes. They hold 4 enchiladas perfectly and slide right into a gallon Ziploc bag.
  • Purchase meat in bulk and separate into meal size portions. Huge money saver!
  • Invest in a FoodSaver so you can package items in a way that allows them to last a long time.

Grocery List Thumbnail
Click on the above image to save a printable pdf of my shopping list.


Is there anything I missed or do you have any advice? I always love hearing ideas from other people.  Please feel free to share in the comments below.

Kitchen Tips

Winter Produce

It’s the first day of winter and to celebrate I have a very special post, focusing on the seasonal fruits and vegetables throughout the year.

I am a firm believer that you should eat “seasonally,” or include foods in your meals that are grown at the same time of the year you eat them. For example, that means beets in the winter, and corn in the summer. Eating seasonally is important, and carries benefits to your health and your wallet.

At first glance, eating seasonally may seem simple—you eat foods that are in season, or being grown and harvested at the time of the year when you buy them. But there’s more to it than just being a trendy food movement. There are real benefits to eating foods that are available at their peak right now.

Perhaps the biggest tangible benefit of eating seasonally is that you’ll save money at the grocery store and farmer’s markets. When you buy what’s in season, you buy food that’s at the peak of its supply, and costs less to farmers and distribution companies to harvest and get to your grocery store. It may seem like common sense, but it’s one of those things many of us ignore when we’re shopping.

However, the best consequence of eating seasonally is that you get the best tasting, healthiest produce available. The same reasons that keep the cost of seasonal food down also drive its quality up: The food is grown closer to you so it doesn’t spoil on its trip, it’s harvested at the peak of its season, and sold during its season, before it spoils. Ideally, this means you’re getting fruits and vegetables that haven’t had time to lose their flavor or their health benefits by sitting in a shipping container for a trip across the ocean.

Please feel free to print this little “cheat sheet” and post in on the fridge as a reminder of what to look for at the grocery store this winter.

Sources: Life Hacker and United States Department of Agriculture

Kitchen Tips

Fall Produce

It’s the first day of fall and to celebrate I have a very special post, focusing on the seasonal fruits and vegetables throughout the year.

I am a firm believer that you should eat “seasonally,” or include foods in your meals that are grown at the same time of the year you eat them. For example, that means cauliflower in the fall, and corn in the summer. Eating seasonally is important, and carries benefits to your health and your wallet.

At first glance, eating seasonally may seem simple—you eat foods that are in season, or being grown and harvested at the time of the year when you buy them. But there’s more to it than just being a trendy food movement. There are real benefits to eating foods that are available at their peak right now.

Perhaps the biggest tangible benefit of eating seasonally is that you’ll save money at the grocery store and farmer’s markets. When you buy what’s in season, you buy food that’s at the peak of its supply, and costs less to farmers and distribution companies to harvest and get to your grocery store. It may seem like common sense, but it’s one of those things many of us ignore when we’re shopping.

However, the best consequence of eating seasonally is that you get the best tasting, healthiest produce available. The same reasons that keep the cost of seasonal food down also drive its quality up: The food is grown closer to you so it doesn’t spoil on its trip, it’s harvested at the peak of its season, and sold during its season, before it spoils. Ideally, this means you’re getting fruits and vegetables that haven’t had time to lose their flavor or their health benefits by sitting in a shipping container for a trip across the ocean.

Please feel free to print this little “cheat sheet” and post in on the fridge as a reminder of what to look for at the grocery store this fall.

Sources: Life Hacker and United States Department of Agriculture

Kitchen Tips

Summer Produce

It’s the first day of summer and to celebrate I have a very special post, focusing on the seasonal fruits and vegetables throughout the year.

I am a firm believer that you should eat “seasonally,” or include foods in your meals that are grown at the same time of the year you eat them. For example, that means corn in the summer, and leeks in the winter. Eating seasonally is important, and carries benefits to your health and your wallet.

At first glance, eating seasonally may seem simple—you eat foods that are in season, or being grown and harvested at the time of the year when you buy them. But there’s more to it than just being a trendy food movement. There are real benefits to eating foods that are available at their peak right now.

Perhaps the biggest tangible benefit of eating seasonally is that you’ll save money at the grocery store and farmer’s markets. When you buy what’s in season, you buy food that’s at the peak of its supply, and costs less to farmers and distribution companies to harvest and get to your grocery store. It may seem like common sense, but it’s one of those things many of us ignore when we’re shopping.

However, the best consequence of eating seasonally is that you get the best tasting, healthiest produce available. The same reasons that keep the cost of seasonal food down also drive its quality up: The food is grown closer to you so it doesn’t spoil on its trip, it’s harvested at the peak of its season, and sold during its season, before it spoils. Ideally, this means you’re getting fruits and vegetables that haven’t had time to lose their flavor or their health benefits by sitting in a shipping container for a trip across the ocean.

Please feel free to print this little “cheat sheet” and post in on the fridge as a reminder of what to look for at the grocery store this summer.

Sources: Life Hacker and United States Department of Agriculture

Kitchen Tips

Spring Produce

It’s the first day of spring and to celebrate I have a very special post, a new feature per say, focusing on the seasonal fruits and vegetables throughout the year.

I am a firm believer that you should eat “seasonally,” or include foods in your meals that are grown at the same time of the year you eat them. For example, that means strawberries in the spring and summer, and pears in the fall. Eating seasonally is important, and carries benefits to your health and your wallet.

At first glance, eating seasonally may seem simple—you eat foods that are in season, or being grown and harvested at the time of the year when you buy them. But there’s more to it than just being a trendy food movement. There are real benefits to eating foods that are available at their peak right now.

Perhaps the biggest tangible benefit of eating seasonally is that you’ll save money at the grocery store and farmer’s markets. When you buy what’s in season, you buy food that’s at the peak of its supply, and costs less to farmers and distribution companies to harvest and get to your grocery store. It may seem like common sense, but it’s one of those things many of us ignore when we’re shopping.

However, the best consequence of eating seasonally is that you get the best tasting, healthiest produce available. The same reasons that keep the cost of seasonal food down also drive its quality up: The food is grown closer to you so it doesn’t spoil on its trip, it’s harvested at the peak of its season, and sold during its season, before it spoils. Ideally, this means you’re getting fruits and vegetables that haven’t had time to lose their flavor or their health benefits by sitting in a shipping container for a trip across the ocean.

Please feel free to print this little “cheat sheet” and post in on the fridge as a reminder of what to look for at the grocery store this spring.

Sources: Life Hacker and United States Department of Agriculture

Appetizers, Kitchen Tips

Kitchen Tip—Fun Individual Veggie and Dip Cups

Back in December I threw a little party for my son. We invited over a couple of his closest friends. Keep in mind this was a group of 4–5 year olds. I wanted to have kid friendly food that they would enjoy. I made mini burgers, little fruit kabobs with marshmallows, a fun neon green punch, and a couple of other things. Now being a mom who insists on a balanced meal I knew I needed to get some veggies in there. I wanted to do something different so that the kids would actually want to eat them. So here you have Individual Veggie and Dip Cups!

The kids thought they were awesome! They loved having their own little cups. I bought a pack of these small plastic cups at a local party store, did a little squirt of ranch in the bottom and added in sliced carrots, cucumbers, and celery. How great, right?!?! Not only were these fun to eat but it also prevents the kids from double dipping. Have you ever watched kids go to town on a table of appetizers? They will bite and dip and repeat. Heck, I have even caught adults doing that! So regardless of the age of your party guests this is a fun and great way to serve veggies as an appetizer. A crowd pleaser for all ages!

If you like this idea you should check out this one too!

Pre-Scooped Ice Cream—A Party Time Saver

Kitchen Tips

Kitchen Tip—How to Roast Peppers

Roasting peppers at home is surprisingly easy. They are great in sandwiches, Mexican dishes, and even pasta. I use roasted bell peppers and jalapeños pretty frequently in cooking. They seem to hold up best since they have a nice thick flesh. If you have an abundance of peppers and you are unable to use them all before they spoil, roasting and freezing them is a great way to preserve them. This is what I did with my crop of jalapeños at the end of the summer. They will last in the freezer for 3–6 months depending on how you store them. I love always having them on hand ready for whatever flavorful dish I’m cooking up next!

INGREDIENTS
any type of pepper, washed and dried

STEPS FOR ROASTING PEPPERS

  • Put your oven’s rack on the highest rung possible and turn on the oven broiler.
  • If roasting small peppers, such as jalapeños, place them on a skewer for easy handling.
  • Place the peppers on a foil lined baking sheet.
  • Broil the peppers for 10–12 minutes or until the skin is blackened.
  • Flip the peppers over and broil for another 10 minutes.
  • Remove the peppers from the oven and skewer and place them in a paper lunch sack. If you do not have a paper lunch sack place them in a small bowl and cover tightly with saran wrap.
  • Allow the peppers to steam in the bag or bowl for 15 minutes. This helps to loosen up the skin for easy removal.
  • Pull the stems out of the peppers and carefully peel off the charred skin.
  • Slice the peppers down one side filleting them open
  • Spread the pepper open and use the backside of the knife to scrape the seeds out.

STEPS FOR FREEZING ROASTED PEPPERS

  • Place your roasted peppers on a wax paper lined baking sheet making sure they don’t touch.
  • Place the baking sheet in the freezer and leave there over night.
  • Once the peppers are completely frozen place them in an airtight baggie or container. By freezing them on a sheet first it keeps them from sticking to each other once in a single container or bag.
Kitchen Tips

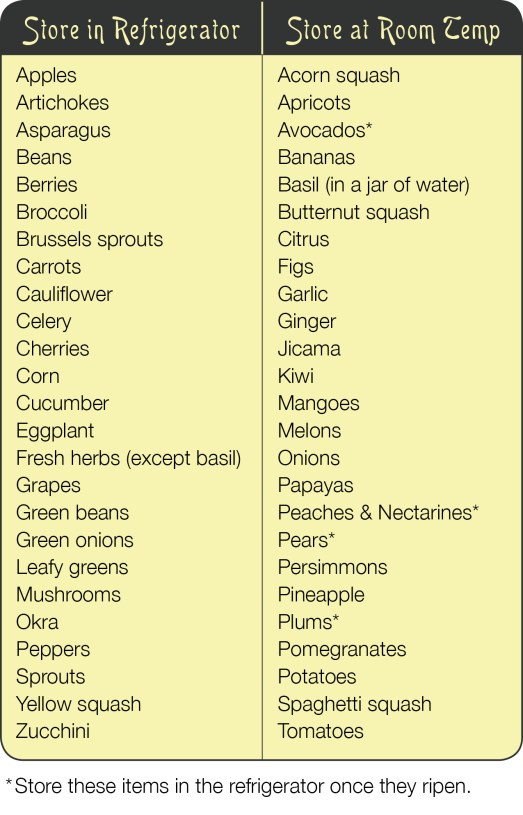
Kitchen Tip—Produce Storage Chart

One of the biggest kitchen blunders I see is the improper storage of fruits and veggies. I frequently see tomatoes in the refrigerator and apples on the counter. These are big no-nos! Refrigeration is the enemy of tomatoes. It not only changes the flavor, but it turns the flesh mealy. By not storing your fruits and veggies correctly you are impacting their flavor, texture, and color. They also may not be lasting as long as they could.  I have compiled this little cheat sheet to help eliminate the guesswork. Feel free to print this out and hang it on the refrigerator or inside one of the kitchen cabinets. Hopefully, by properly storing your produce it will last longer and you will be tossing out less at the end of each week. Happy eating!

Produce Storage Chart

Kitchen Tips

Kitchen Tip—How to Roast Beets

Beets are such a wonderful winter veggie but do you know what to do with them? I love mine roasted in salads. Beets are low in calories, are a good source of fiber, and contain a variety of vitamins and nutrients that can help prevent heart disease and certain types of cancer. I just love the vibrant color of beets. They are a beautiful addition to any dish and bring a unique flavor unlike any other veggie. Here are some step-by-step instructions on how to roast your very own beets.

Note: Roasting beets whole works great for beets the size of a tangerine or smaller but if you have large beets I recommend cutting them into quarters after peeling them. They will cook much faster that way.

INGREDIENTS
raw beets
olive oil
salt and pepper

STEPS

  • Preheat the oven to 400º.
  • Cut the stalks and the roots from the top and bottom of the beets.
  • Using a vegetable brush scrub the beets making sure to get off all the soil.
  • Peel the skin off the raw beets using a vegetable peeler.
  • Place the peeled beets in a bowl and drizzle with olive oil and season with salt and pepper. Toss to coat
  • Line a small baking dish with foil and place the beets in it.
  • Using a second sheet of foil “tent” the beets.
  • Place the baking dish in the oven and roast the beets for 35–45 minutes or until they are fork tender.
  • Beets can be eaten right away or you can place them in an airtight container once they cool and kept in the refrigerator. I slice mine right before serving so they don’t dry out.