Sweet Treats

Recipe—Caramel Apple Cheesecake Bars

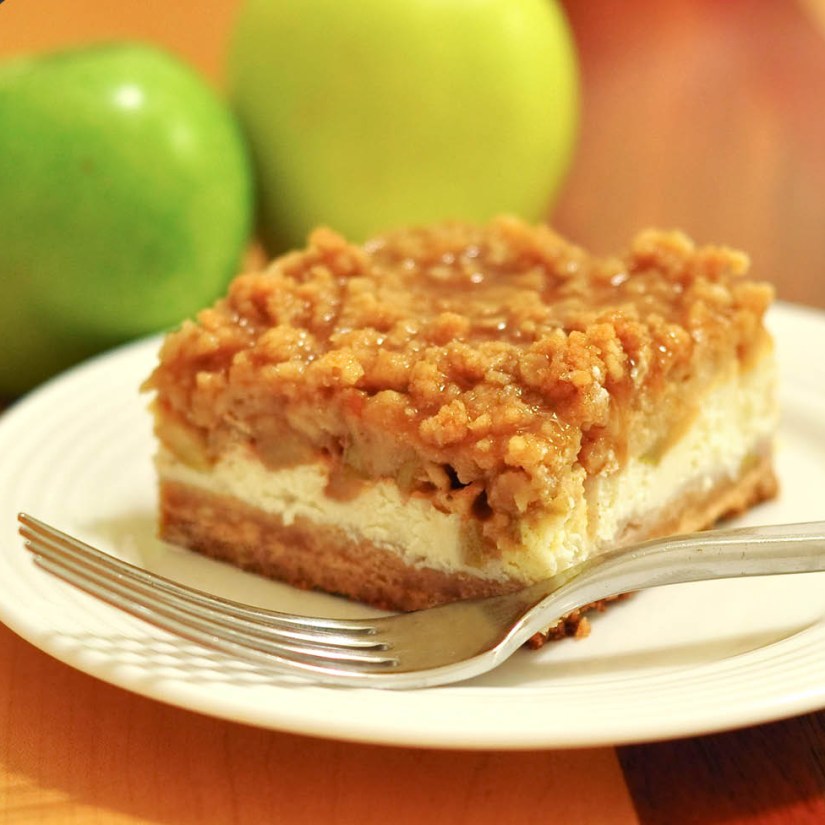
Talk about a match made in heaven! Two classic American desserts coming together to make one heck of a fabulous and indulgent dish. This delicious recipe is perfect for all the holiday social events this time of year. I recently made it for my office party and it was a hit. I cut the squares pretty small so that they were easy to handle and could be eaten as a finger food. This reminds me a lot of Dutch apple pie á la mode. You have the crisp topping drizzled with syrupy caramel, the soft spiced apples, and the creamy sweet cheesecake layer all over a buttery crust. This is a great recipe to keep in mind come Christmas since you can prepare it a day or two in advance giving you some extra time with your guests on Christmas day. Hope you enjoy it as much as I did!

CRUST INGREDIENTS
2 c flour
½ c brown sugar
1 c butter, softened
½ tsp cinnamon

CHEESECAKE FILLING INGREDIENTS
3-8 oz packages cream cheese
3/4 c sugar
3 eggs
1 1/2 tsp vanilla

APPLE LAYER INGREDIENTS
3 apples peeled, cored, and finely chopped
3 tbsp sugar
½ tsp cinnamon
¼ tsp nutmeg

STREUSEL TOPPING INGREDIENTS
1 c brown sugar
1 c flour
½ c oats
½ c butter, softened
1 c caramel topping

STEPS

  • Preheat oven to 350º.
  • In a mixing bowl combine the flour, brown sugar, butter, and cinnamon and mix with your hands until crumbly.
  • Line a 9” x 13” baking dish with foil making sure to go up the sides. (The helps you to easily remove the final cheesecake from the dish making it a breeze for cutting into bars.)
  • Press the crumbly mixture into the bottom of the lined pan making sure it is an even thickness.
  • Bake crust for 15 minutes.
  • In a large mixing bowl use an electric mixer to beat together the cream cheese, sugar, eggs, and vanilla until smooth.
  • Pour the cream cheese mixture over the warm crust and using a rubber spatula carefully spread it so that it is an even layer.
  • In a small bowl stir together all the apple layer ingredients.
  • Sprinkle the apples over the cream cheese layer.
  • In a small bowl combine the streusel ingredients and using your hands mix until crumbly.
  • Sprinkle the streusel over the apple layer.
  • Bake for 40–45 minutes.
  • Allow the cheesecake to cool and then drizzle with the caramel sauce.
  • Once cheesecake is room temperature store in the refrigerator until ready to serve.
  • To serve, carefully lift the finished cheesecake from the pan by holding the edges of the foil.
  • Transfer to a large cutting board and cut into bars.
  • Serve cold.
Brunch, Dinners

Recipe—Broccoli and Cheddar Egg Bake

A few weeks back I received some violet queen purple broccoli in my produce box. It was the most gorgeous piece of produce I have ever seen! It was almost too pretty to eat… almost being the key word there. I was over the moon about this exciting piece of produce and wanted to do something really spectacular with it. Alas, my busy schedule kept me from really thinking outside the box so I made one of my favorite broccoli recipes with it, a broccoli and cheddar egg bake (a.k.a. a quiche with no crust, perfect for the low-carb lover).

This purple broccoli was just too pretty not to show you! I just wanted to put it in a vase on my table. Once the broccoli was cooked it looked slightly darker than a typical bunch of green broccoli. It ended up loosing most of that purple coloring.

One thing I truly love about egg bakes is that they are perfect for any meal of the day, breakfast, lunch, or dinner and they are so versatile. You can add any ingredients you want! This recipe is written with some pretty basic ingredients but you can go wild with whatever you like. Red bell peppers and mushrooms are also great additions. I made this one for dinner the other night and just served it with some toast. The leftovers made an awesome breakfast the next day. Gotta love it when you make a meal you can stretch out over a few days.

INGREDIENTS
8 slices of bacon, chopped
1/2 yellow onion, chopped
12 eggs
1/4 c milk
1/2 tsp garlic powder
1/2 tsp salt
1/2 tsp pepper
2 1/2 c broccoli, chopped and steamed
1 small tomato, chopped
2 c cheddar, shredded (divided)

STEPS

  • Preheat oven to 350º.
  • In a skillet over medium-high heat cook your bacon until done.
  • Remove cooked bacon from skillet and dispose of most of the grease leaving a tablespoon.
  • Sauté the onion in the reserved bacon grease over medium-high heat until brown and caramelized.
  • While the onions are cooking scramble the eggs, milk, garlic powder, salt, and pepper in a large mixing bowl.
  • Mix in the bacon, steamed broccoli, chopped tomato, sautéed onion, and 1 1/2 cups of the cheddar cheese to the mixing bowl.
  • Pour the egg mixture in a greased 8” x 8” baking dish.
  • Sprinkle the remaining 1/2 cup of cheese over the top.
  • Bake for 35–45 minutes or until the center is set.
  • Remove the egg bake from the oven and allow it to sit for 5 minutes before cutting and serving.
Sandwiches

Recipe—Jalapeño Popper Grilled Cheese

This was one of my recipes in the running for the Hot and Spicy Week I did back in September but I just had too many good jalapeño recipes to share so this one got the boot. Well my jalapeño plant was still producing in November thanks to this unseasonably warm weather so here it is, the jalapeño popper grilled cheese sammy! It is creamy, cheesy, and spicy, all the qualities a person looks for in a popper. Enjoy!

INGREDIENTS
2–3 large jalapeños, roasted
2 tbsp butter, softened
4 large slices of sourdough
1/3 c cream cheese
8 slices cheddar cheese

STEPS

  • Heat a large skillet over medium-high heat.
  • Spread one side of each piece of the bread with butter.
  • Place two slices of bread butter side down in the skillet.
  • Top the bread in the skillet with the sliced cheddar cheese.
  • Add the roasted jalapeños to the sandwich.
  • Spread the remaining two slices of bread with cream cheese on the sides without butter.
  • Place the bread cream cheese side down on the sandwich.
  • Cook for approximately 3 minutes or until the bread is a toasty brown.
  • Flip and cook for another 3 minutes until cheese is melted and the other side is a nice toasty brown.
Soups

Recipe—Velvety Celery Cream Soup

I have gotten big bundles of celery in my organic produce delivery several weeks in a row now. I certainly love my celery sticks but I just don’t think I will be able to eat another one for a few days. While recovering from celery stick overload I made one of my favorite vegetable soups, celery cream. This is one of the easiest soups to make and even though it is very simple it is wonderful. It is super creamy and the lemon and hot sauce gives it just the right kick. I made a big batch to take to my mother in law who just had knee replacement surgery a couple of weeks ago. One thing I love about this soup is you can make a big batch of it and it reheats great! I typically double the recipe and then divvy the soup up into several containers for future dinners and lunches. It’s a perfect dinner for cool evenings or even on a rainy Sunday afternoon.

Note: When using a blender to puree the soup you will need to do it in batches. I recommend placing a towel over the top of your blender and holding the lid firmly in place as the heat will make the lid blow off and it makes a huge hot mess and can burn you if not secured.

INGREDIENTS
4 tbsp (1/2 stick) butter
1 bunch of celery, sliced
2 yellow onions, chopped
1 tbsp garlic, minced
4 tbsp flour
6 c chicken broth
1 bay leaf
1 c heavy cream
1 tbsp lemon juice
4–5 dashes of hot sauce
1/2 tsp ground white pepper
salt (optional)

STEPS

  • In a large soup pot melt the butter and add the celery, onions, and garlic.
  • Cook over medium-high heat until soft.
  • Sprinkle the flour in the pot and stir while cooking for 1–2 minutes.
  • Add the chicken broth and bay leaf.
  • Bring pot to a boil, cover, and reduce heat allowing to simmer for 30 minutes.
  • Remove the bay leaf.
  • Using a blender puree the soup in small batches until nice and smooth. (See above note)
  • Transfer the soup back into the pot.
  • Add in the cream, lemon juice, hot sauce, pepper, and salt. (Be sure to sample the soup before adding in the salt. Unless you are using a reduced sodium you may not need it.)
  • Bring pot to a boil, cover, and reduce heat allowing to simmer for an additional 10 minutes or until desired thickness.